This section helps you set up the environment on your computer to:
-
Install the Spresense Arduino Library.
-
Set up your computer to run Spresense Arduino Library sketches.
-
Run a sample application on the Spresense board to test the setup.
1. Supported Operating Systems
The Spresense Arduino Library runs on the following operating systems:
-
Windows 11 (64bit version)
-
Linux Ubuntu 16.04 (64bit version) or later
-
Mac OS X 10.12 Sierra or later
| Does not support 32bit version OS |
2. Prerequisites
-
Download and install the Arduino IDE for your operating system:
-
Download and install the USB-to-serial drivers that correspond to your operating system from the following links:
| If you use the latest Silicon Labs driver (v11.2.0) in Windows 11 environment, USB communication may cause an error and it may fail to flash the program. Please download v11.1.0 from the above URL and install it. |
2.1. Linux USB serial port configuration
-
64bit Linux Ubuntu requires the user to be a member of the dialout group.
-
Add user to dialout groups.
sudo usermod -a -G dialout $USER -
Logout and login again to use the new settings.
-
Connect the Spresense board to the PC via the USB cable.
-
| You must set up the USB port to be able to upload the built image to the Spresense board. |
3. Install Spresense Arduino Library
There are two installation methods to choose from:
We recommend installing through the Arduino IDE Board Manager for ease of use. If you are unable to complete installation through this method, you can still install the library using the manual install method.
3.1. Installation through Arduino IDE Board Manager
The following steps will describe how to install the Spresense Arduino Library into the Arduino IDE using the Board Manager.
-
Start Arduino IDE.
-
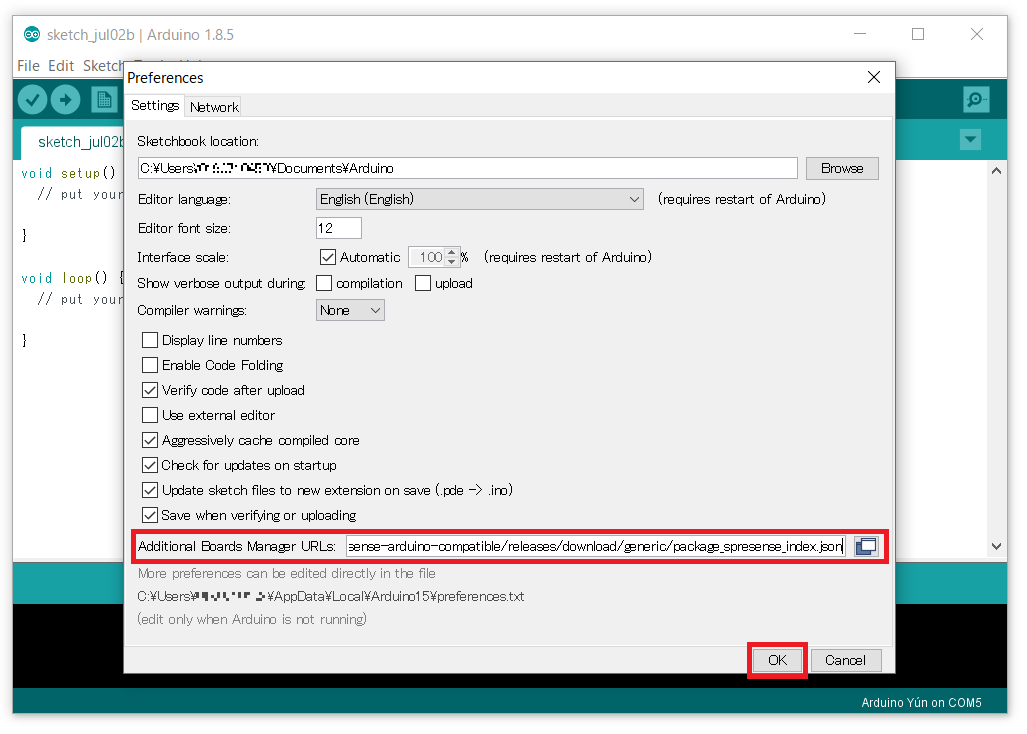
Open the preferences in [File→Preferences].
 Figure 1. Open preferences
 -
Copy and paste the following URL into the field called
Additional Boards Managers URLs: Figure 2. Copy this URL and paste it into the
Additional Boards Manager URLsfield. -
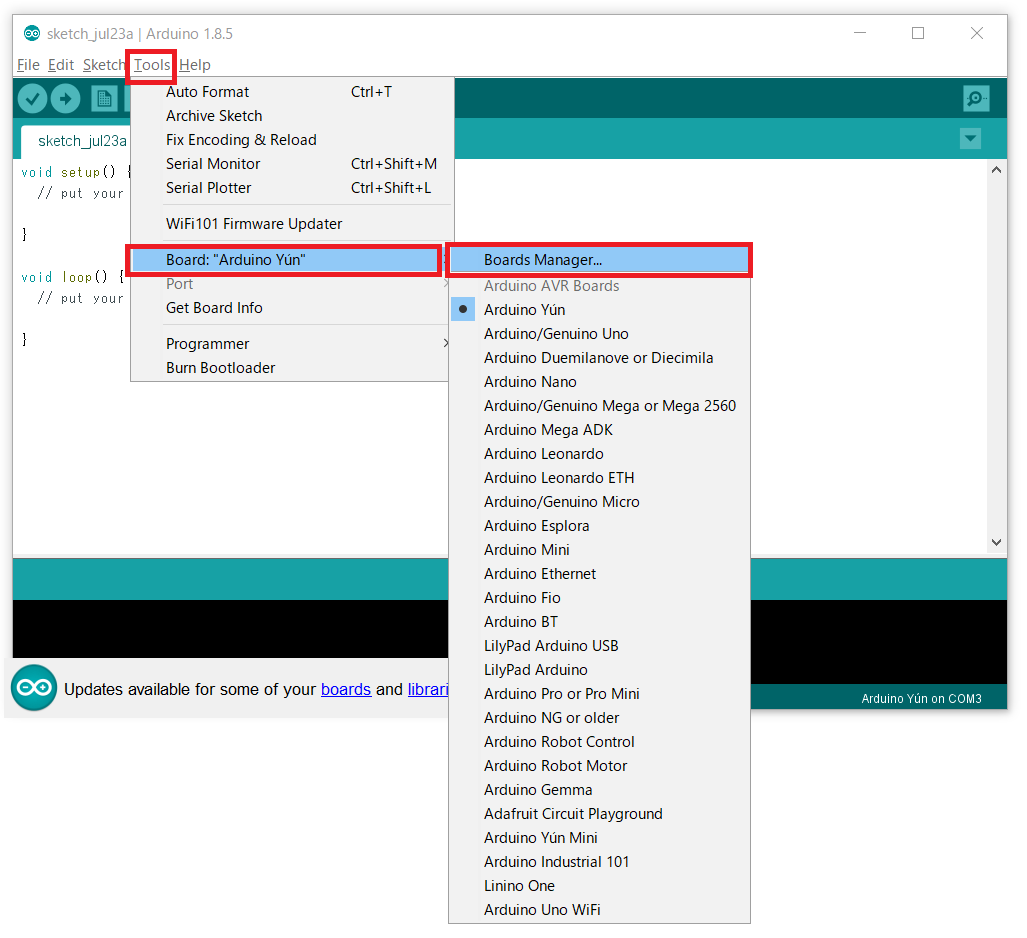
Open the
Boards Manager[Tools→Board→Boards Manager]. Figure 3. Open the Boards Manager.
 -
Search for Spresense. Once found in the list, select it and click install. If the package list fails to download, a possible reason is your network connection uses a proxy. To set the proxy, navigate to [File → Preferences → Network].
The Spresense board package size is above 150 MB. Please be aware of the impact to your network usage limits and charges.  Figure 4. Search for Spresense, select it and click install.
 -
The Spresense Arduino Library is now installed.


4. Setting up the environment
4.1. Identify the serial port used by Spresense board
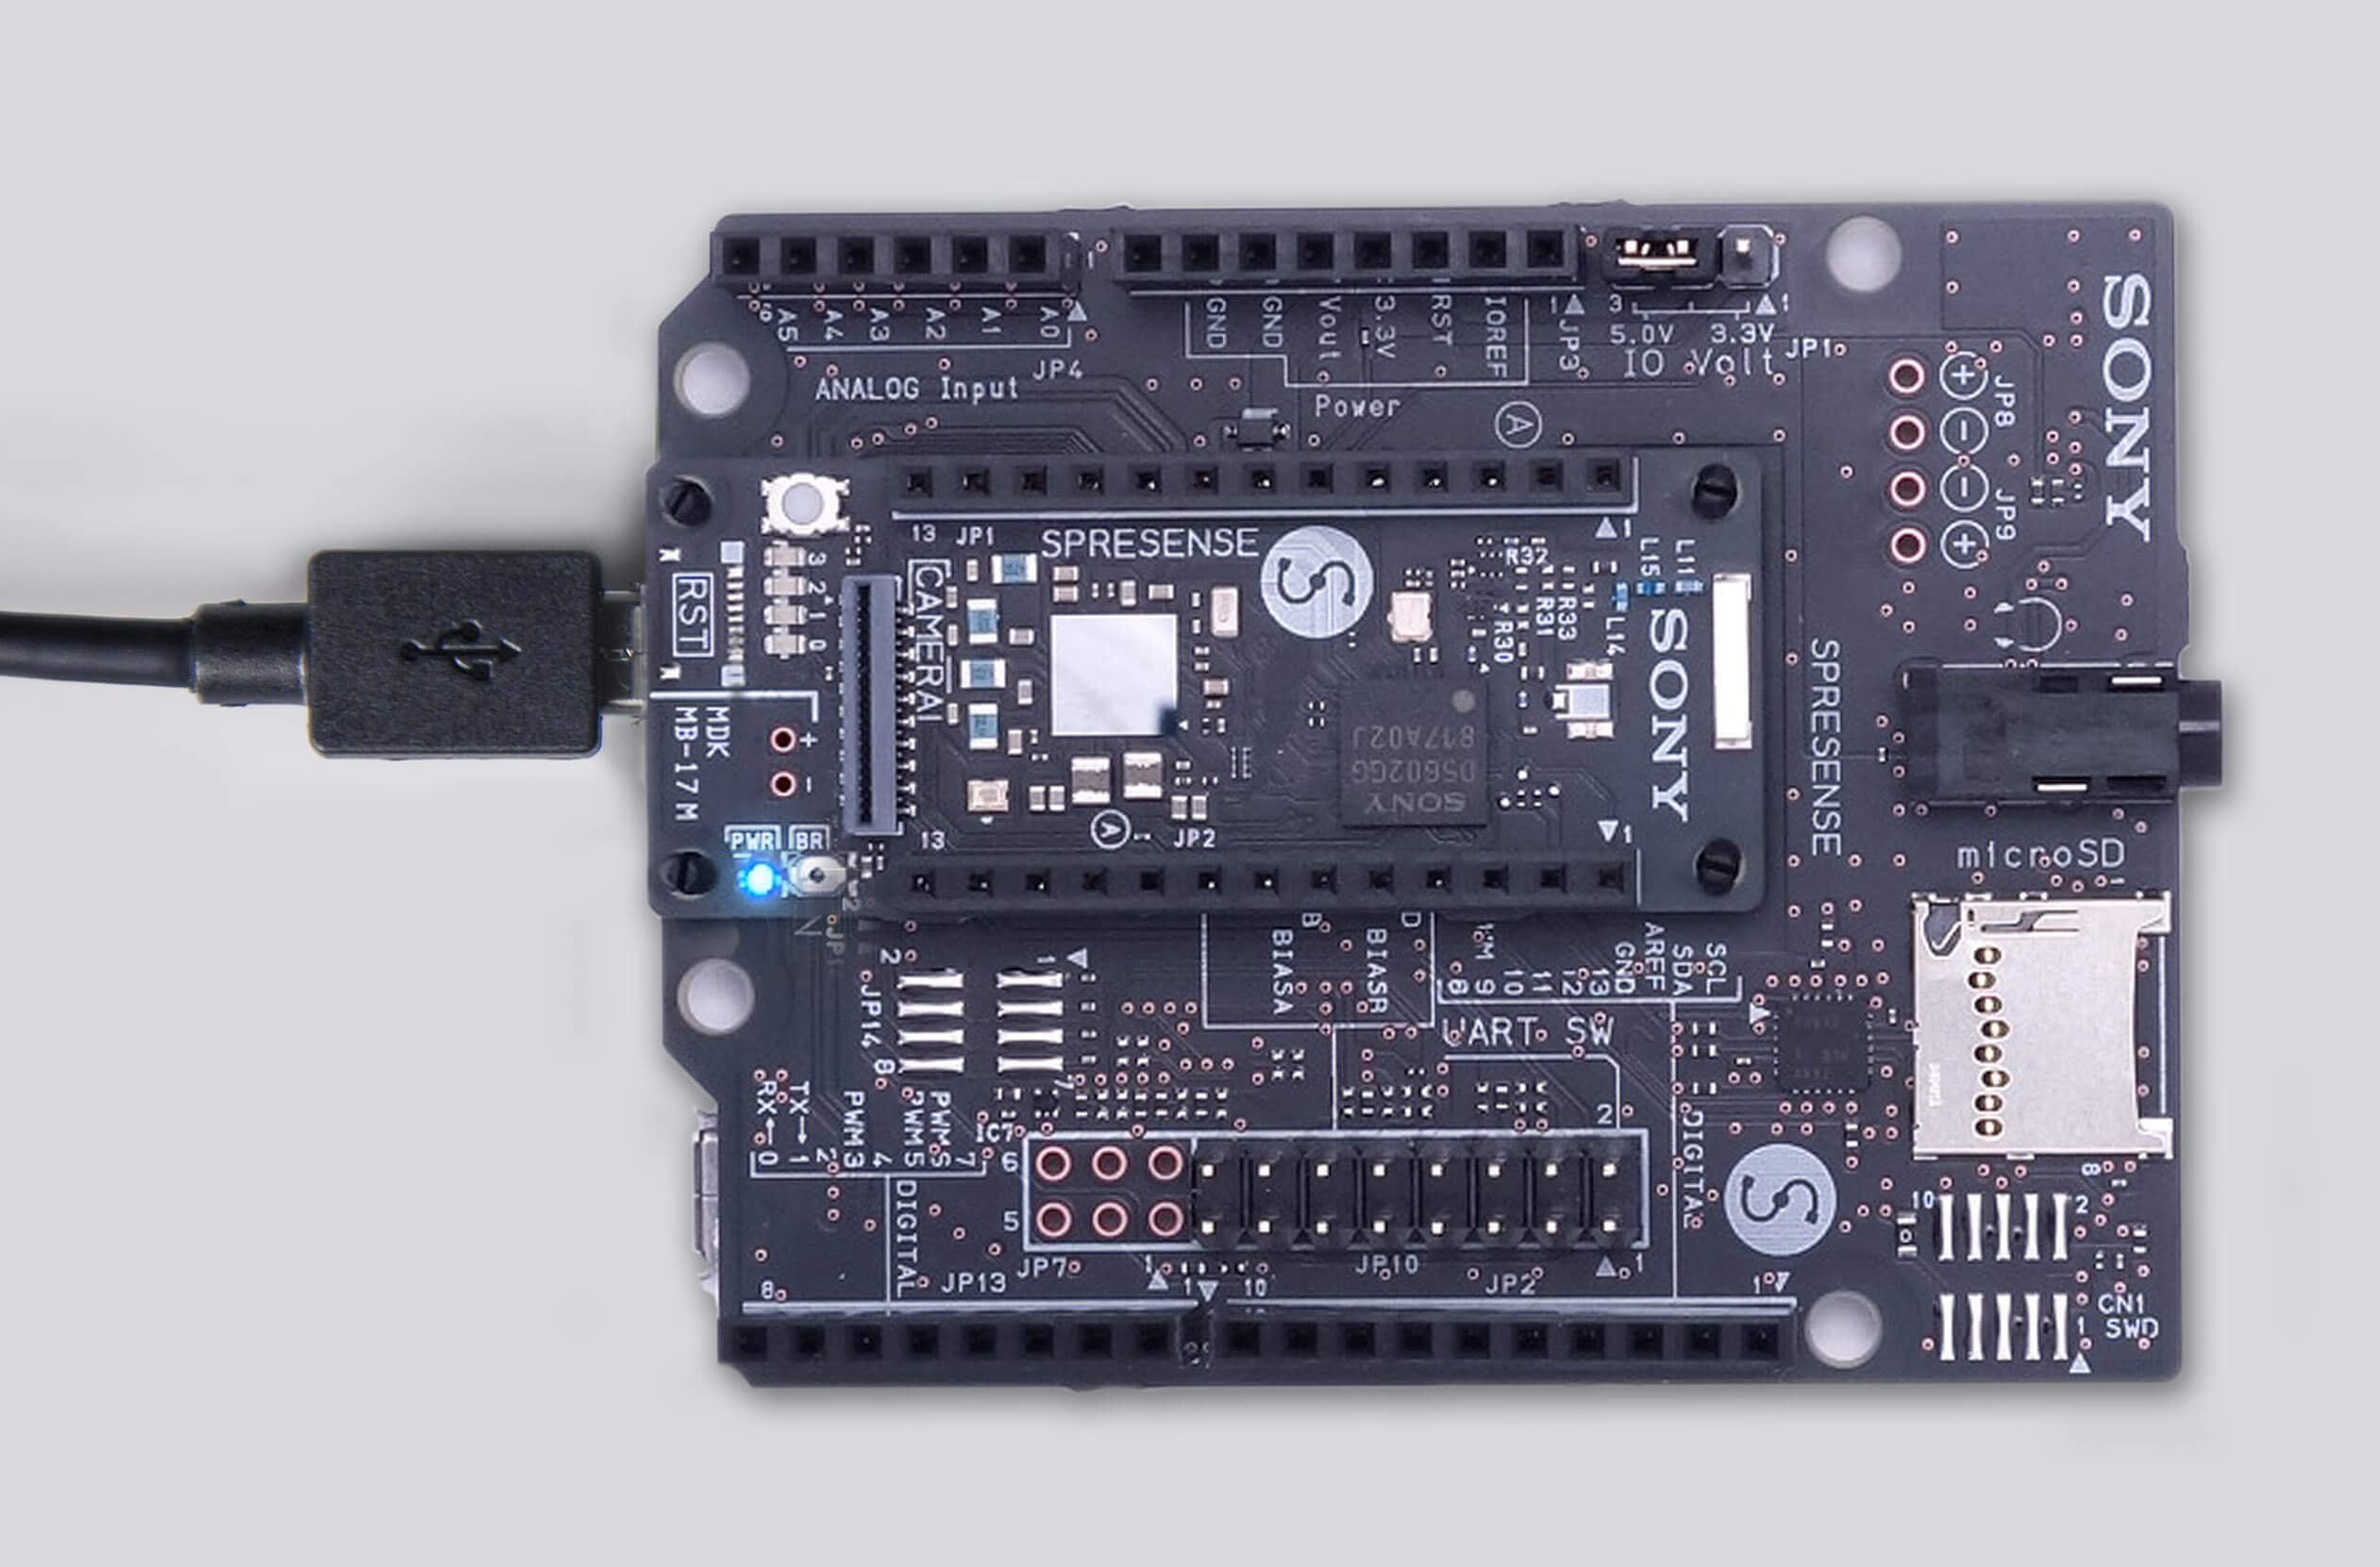
Connect your PC to the Spresense main board USB connector and check that the power LED turns on. The serial port driver may install at this point if it has not done so already.
4.2. Install Bootloader
-
Select the Spresense board in the [Tools→Boards→Spresense] menu.
([Tools→Boards→Spresense Boards→Spresense] in Arduino IDE 1.8.13 or later) Figure 6. Select the Spresense board
 -
Select the serial port used by Spresense from the menu [Tools→Port]. If there is more than one port see Identify the serial port used by Spresense board for more info.
 Figure 7. Select port, this example shows how it looks like in Windows.
 -
If you are using the Spresense board for the first time, or if you are using an updated version of the Spresense Arduino Library, update the boot loader by selecting [Tools→Programmer→Spresense Firmware Updater].
 Figure 8. Select correct programmer to be able to flash the firmware/boot loader.
 -
Then select [Tools→Programmer→Burn Bootloader].
 Figure 9. Burn bootloader.
 -
Review and accept the EULA by following the dialog.
 Figure 10. Accept EULA to load the bootloader binaries.
 -
Once the upload completes, this is how it should look like:
 Figure 11. Burn bootloader.


4.3. Build your first sketch to verify installation
-
You have now finished setting up the board. To verify the setup is correct, copy and paste the following example LED test code into a new sketch:
void setup() { pinMode(LED0, OUTPUT); pinMode(LED1, OUTPUT); pinMode(LED2, OUTPUT); pinMode(LED3, OUTPUT); } void loop() { digitalWrite(LED0, HIGH); delay(100); digitalWrite(LED1, HIGH); delay(100); digitalWrite(LED2, HIGH); delay(100); digitalWrite(LED3, HIGH); delay(1000); digitalWrite(LED0, LOW); delay(100); digitalWrite(LED1, LOW); delay(100); digitalWrite(LED2, LOW); delay(100); digitalWrite(LED3, LOW); delay(1000); } -
Build and upload the LED test sketch by clicking Upload.
 Figure 12. Click Upload.
 -
Wait for the upload to complete.
 Figure 13. Uploading finished without errors.
 -
Your sketch should run automatically. When the LEDs on the main board are flashing, congratulations! Your setup is now complete!
-
If the LEDs doesn’t flash, press the board reset button or open the serial monitor to start the sketch.
-
You may increase the baud rate to shorten the transfer/upload time. This may not always work depending on what hardware you use (PC, cables etc). A recommendation is to start at the default value and increase the baud rate to test if the transfer still works.
 Figure 14. This picture shows the highest possible baud rate. Not guaranteed to work on every setup.
-


5. Explore further!
Now that you have set up your development environment, you can proceed to run example sketches to explore the features on the board or head over to Spresense Arduino Library Developer Guide to read more.
Spresense specific examples are available from the Arduino IDE at File > Examples > Spresense and on spresense-sketches GitHub repository. You can also run example sketches that work with Arduino Uno though be aware of the hardware differences. Spresense Hardware comparison section contains details of these differences.
6. Appendix
6.1. Check USB serial driver connection
This section shows how to verify the USB serial driver connection for different platforms.
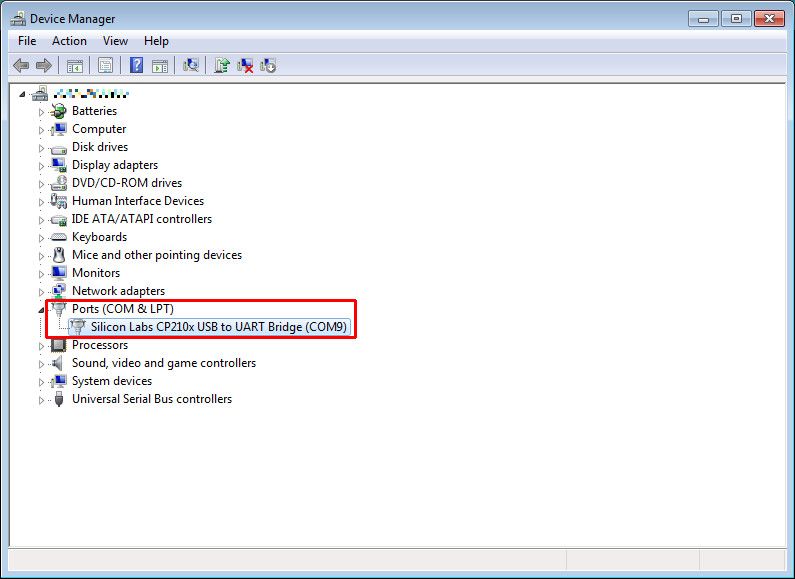
6.1.1. Check USB serial driver connection on Windows
-
Open Device Manager
-
Check the COM port number of the Spresense board.
6.1.2. Check USB serial driver connection on Ubuntu 64bit
Locate the COM port used to connect the Spresense board.
-
Open the terminal.
-
Enter the following command.
dmesg | grep "cp21.*attached"
[12220.625979] usb 1-1: cp210x converter now attached to ttyUSB0
In this example
ttyUSB0is the COM port.
6.1.3. Check USB serial driver connection on Mac OS X
Locate the COM port used to connect the Spresense board.
-
Open the terminal.
-
Enter the following command.
ls /dev/{tty,cu}.*
/dev/cu.SLAB_USBtoUART  /dev/tty.SLAB_USBtoUART
In this example the COM port for CU command is
cu.SLAB_USBtoUARTor for tty commandtty.SLAB_USBtoUART.
6.2. How to create Spresense Arduino customized package
Spresense provides a solution to create a customized board package and install it in the Arduino IDE in a local environment. You can install a customized package into your Arduino IDE, as well as share it between communities.
Please refer to Installation with offline package via Boards Manager in Arduino IDE for the installation method of the created board package.
6.2.1. About Spresense Arduino board package
The Spresense Arduino board package consists of a pre-built Spresense SDK, a Spresense library wrapped around it for Arduino, and tools for Spresense.
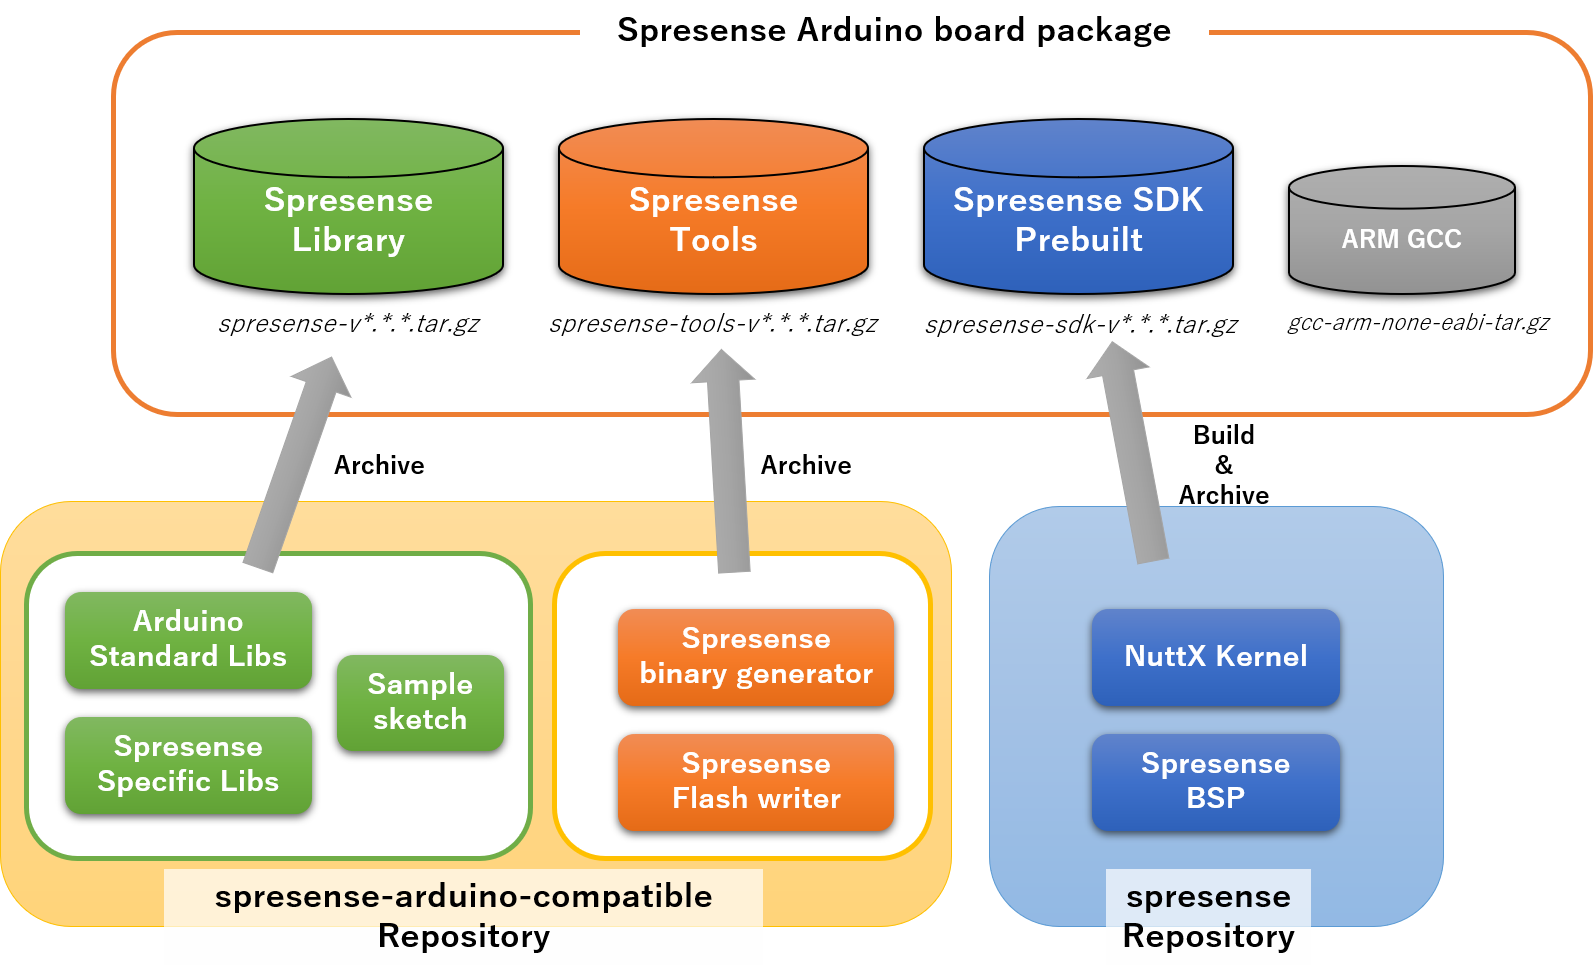
| Component | File name | Details |
|---|---|---|
Spresense Library |
|
A wrapper library for Arduino on the Spresense SDK. Includes Arduino standard library code, Spresense library code and sample sketches. |
Spresense Tools |
|
Includes tools for creating and writing binaries for Spresense on the Arduino IDE. |
Spresense SDK Prebuilt |
|
Contains a static archive of the Spresense SDK built for the Arduino IDE. |
ARM GCC |
|
Includes a toolchain for building your sketches. Basically, the Arduino IDE uses the published toolchain as is, and is not created for local board packages. |
By creating these Spresense archives, you can create customized packages that can be installed on the Arduino IDE.
6.2.2. How to create customized package
This section describes how to create a customized package.
You can create customized package by 4 steps as follow:
-
Clone the repository (spresense.git, spresense-arduino-compatible.git)
-
Modify a Spresense SDK codes (spresense.git) or spresense Arduino(spresense-arduino-compatible.git)
-
(If you modify a Spresense SDK) Import the Spresense SDK
-
Create a package (Archive file, Json file)
The following describes how to create a package for each use case.
6.2.2.1. Case of updating the Spresense Arduino Library for adding samples
If you are only updating Arduino libraries and sample sketches, you can use published Spresense SDK prebuilt. In this case, you can skip "Import the Spresense SDK".
-
Clone the spresense-arduino-compatible.git
-
Modify a
spresense-arduino-compatible/Arduino15/packages/SPRESENSE/hardware/spresense/1.0.0andspresense-arduino-compatible/Arduino15/packages/SPRESENSE/tools/spresense-toolscodes. -
Creating an archive files and Json file.
cd spresense-arduino-compatible
make
-
The process is complete if the following three files have been created.
./out/package_spresense_local_index.json
./out/staging/packages/spresense-v*.*.*_local.tar.gz
./out/staging/packages/spresense-tools-v*.*.*_local.tar.gz
6.2.2.2. Case of using a customized Spresense SDK
If you use a customized Spresense SDK, you must import the Spresense SDK. In this case you need to use spresense-arduino-compatible and spresense repository as follow:
-
Clone the spresense.git
-
Clone the spresense-arduino-compatible.git
-
Modify in a
spresense/If you edit or add a file, that file must be in a build target. Please check a defconfig list in a spresense-arduino-compatible/tools/configs/spresense.conffor confirm build target. -
Import the Spresense SDK
Please use same version of spresense.git and spresense-arduino-compatible.git repository. path/to/spresenseis the path where spresense.git is cloned.-
SDK v1.5 or earlier
cd spresense-arduino-compatible
./tools/prepare_arduino.sh -S path/to/spresense -c spresense -k release -p
./tools/prepare_arduino.sh -S path/to/spresense -c spresense -k debug -p
./tools/prepare_arduino.sh -S path/to/spresense -c spresense_sub -k subcore-release -p
./tools/prepare_arduino.sh -S path/to/spresense -c spresense_sub -k subcore-debug -p
-
SDK v2.0 or later
cd spresense-arduino-compatible
./tools/prepare_arduino.sh -S path/to/spresense -c spresense -d disable -p
./tools/prepare_arduino.sh -S path/to/spresense -c spresense -d enable -p
./tools/prepare_arduino.sh -S path/to/spresense -c spresense_sub -d disable -p
./tools/prepare_arduino.sh -S path/to/spresense -c spresense_sub -d enable -p
-
-
Creating an archive files and Json file.
cd spresense-arduino-compatible
make
-
The process is complete if the following four files have been created.
./out/package_spresense_local_index.json
./out/staging/packages/spresense-v*.*.*_local.tar.gz
./out/staging/packages/spresense-tools-v*.*.*_local.tar.gz
./out/staging/packages/spresense-sdk-v*.*.*_local.tar.gz
6.2.2.3. Case of changing the configuration of Spresense SDK
If you update a configuration of Spresense SDK, you must import the Spresense SDK. In this case you need to use spresense-arduino-compatible and spresense repository as follow:
-
Clone the spresense.git
-
Clone the spresense-arduino-compatible.git
-
Import the Spresense SDK
You can change the configuration of the Spresense SDK when importing the SDK.
Please use same version of spresense.git and spresense-arduino-compatible.git repository. If you only want to add the configuration as defconfig, you can update configuration by adding defconfig into spresense-arduino-compatible/tools/configs/spresense.confwithout option-M SDK.-
SDK v1.5 or earlier
cd spresense-arduino-compatible
./tools/prepare_arduino.sh -S path/to/spresense -c spresense -k release -M SDK -p
<After menuconfig is opened, change the configuration>
./tools/prepare_arduino.sh -S path/to/spresense -c spresense -k debug -M SDK -p
<After menuconfig is opened, change the configuration>
-
SDK v2.0 or later
cd spresense-arduino-compatible
./tools/prepare_arduino.sh -S path/to/spresense -c spresense -d disable -M SDK -p
<After menuconfig is opened, change the configuration for MainCore>
./tools/prepare_arduino.sh -S path/to/spresense -c spresense_sub -d enable -M SDK -p
<After menuconfig is opened, change the configuration for SubCore>
-
-
Creating an archive files and Json file.
cd spresense-arduino-compatible
make
-
The process is complete if the following four files have been created.
./out/package_spresense_local_index.json
./out/staging/packages/spresense-v*.*.*_local.tar.gz
./out/staging/packages/spresense-tools-v*.*.*_local.tar.gz
./out/staging/packages/spresense-sdk-v*.*.*_local.tar.gz
6.3. Spresense Arduino board package local installation
There are two ways to install Spresense Arduino package locally.
| The customized package created in the previous chapter can be installed using the Installation with offline package via Boards Manager in Arduino IDE procedure. |
6.3.1. Installation with offline package via Boards Manager in Arduino IDE
This is an installation method using the file for the board manager. It can be installed together with other boards of Arduino, so it is a recommended method for those who use multiple boards including Spresense with Arduino IDE.
6.3.1.1. Preparation
The following two types of file are required for installation from the Arduino IDE board manager. Both files are created by the spresense-arduino-compatible repository’s script.
-
Archive file (
out/staging)-
Spresense Library(
out/staging/packages/spresense-v*.*.*_local.tar.gz) -
Spresense Tools(
out/staging/packages/spresense-tools-v*.*.*_local.tar.gz) -
Spresense SDK Prebuilt(
out/staging/packages/spresense-sdk-v*.*.*_local.tar.gz)Spresense SDK Prebuilt is only required if you have customized the Spresense SDK.
-
-
Json file(
out/package_spresense_local_index.json)
| Be sure to use an archive and json files created with make command in spresense-arduino-compatible. If it is created at a different timing, it cannot be installed correctly.(Example: If only the archive file is updated and the old Json file is used, it cannot be installed correctly.) |
6.3.1.2. Install steps
-
Copy archive files into Arduino install directory.
cp -r spresense-arduino-compatible/out/staging <Arduino15>/Arduino package installation path <Arduino15> varies depending on your OS and IDE installation method. Arduino package installation path can be opened by click into File→Preferences→Settings→More preferences can be edited directory in the fileon Arduino IDE. -
Add a URLs for the official Json file and the local Json file to the Additional Boards Manager URLs.
https://github.com/sonydevworld/spresense-arduino-compatible/releases/download/generic/package_spresense_index.json
file://<path of the package_spresense_local_index.json>
Please use the original file path used in your OS as it is for <path of the package_spresense_local_index.json>. If you use the file C:\Users\user\spresense-arduino-compatible\out\package_spresense_local_index.json, the second line of Additional Boards Manager URLs need to be set tofile://C:\Users\user\spresense-arduino-compatible\out\package_spresense_local_index.json.If you are using Arduino IDE2, please write the file name with file:and 3 slashes likefile:///C:\Users\user\spresense-arduino-compatible\out\package_spresense_local_index.json.If the official Json file URL is missing, the ARM toolchain will not be installed and you will not be able to use it properly. -
Click
Tools→Board:→Boards Manager…on the Arduino IDE, and searchSpresense local Boardand clickInstall. -
After the installation, the process is complete if the
Spresense localis there inTools→Boards:.
6.3.2. Manual installation
-
Download the manual installation board package zip file
manual-install-spresense-arduino-"OPERATING_SYSTEM"-latest.zipfor your platform from: -
Follow the installation instructions for the respective PC platform:
-
Start Arduino IDE.
-
Open the preferences in [File→Preferences].
-
In the Arduino IDE Preferences dialog box, set the following URL in the field called
Additional Boards Managers URLs:and close the dialog box. This is to prevent the Arduino Boards Manager UI from removing the Spresense board listing.
6.3.2.1. Install Spresense Arduino Library for Windows
Extracting manual-install-spresense-arduino-windows-latest.zip may cause an error, the file path name is too long.
Therefore, the procedure described here extracts the zip file to a folder with a short path name such as c:\temp.
-
Create
c:\tempfolder and unzipmanual-install-spresense-arduino-windows-latest.zipto the folder.The
packagesfolder and apackage_spresense_index.jsonfile will be under anArduino15folder.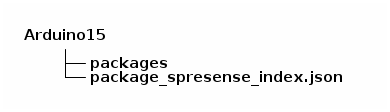
-
Copy these files to Arduino IDE installation folder.
Open
%userprofile%\AppData\Local\Arduino15folder and copypackagesandpackage_spresense_index.jsonto the folder.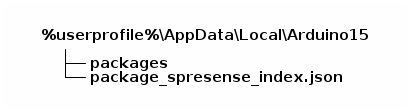
In case of Arduino IDE installed from Microsoft Store, the destination folder is different.
Open%userprofile%\Documents\ArduinoDatafolder and copypackagesandpackage_spresense_index.jsonto the folder.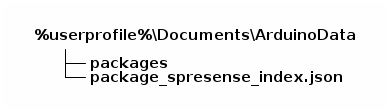
-
The board package is now installed.
6.3.2.2. Install Spresense Arduino Library for Linux
The following steps assume you have a 64-bit Ubuntu PC and you have stored the downloaded file manual-install-spresense-arduino-linux-latest.zip at ~/Downloads.
-
If you have not started the Arduino IDE for the first time, start the application and close it. Check that a folder called
~/.arduino15/exists. -
Open the terminal and navigate to the folder where you have stored
manual-install-spresense-arduino-linux-latest.zip. -
Extract the contents to
~/Downloads.cd ~/Downloads unzip manual-install-spresense-arduino-linux-latest.zip rm -rf ~/.arduino15/packages/SPRESENSE cp -rfv ~/Downloads/Arduino15/* ~/.arduino15/ rm -rf ~/Downloads/Arduino15
-
The board package is now installed.
6.3.2.3. Install Spresense Arduino Library for Mac OS X
The following steps assume you have stored the downloaded file manual-install-spresense-arduino-macosx-latest.zip at ~/Downloads.
-
If you have not started the Arduino IDE for the first time, start the application and close it. Check that a folder called
~/Library/Arduino15exists. -
Open the terminal and navigate to the folder where you have stored
manual-install-spresense-arduino-macosx-latest.zip. -
Extract the contents to
~/Library/.cd ~/Downloads unzip manual-install-spresense-arduino-macosx-latest.zip -d ~/Library/
-
The board package is now installed.
6.4. How to install the pre-release version of Spresense Arduino board package
We have started pre-release of Spresense Arduino board package which is under development since 2021. This section describes how to install the pre-release package.
By installing the pre-release package, you’ll be the first to try out the latest features!
6.4.1. How to download the pre-release version
Pre-release versions are available at the following page. For each release, updates history and pre-release packages are available for you to install into your Arduino IDE.
You can find a list of packages by clicking on Assets on the page.
|
The following 4 files are to be downloaded for installation.
-
package_spresense_beta_index.json: Package configuration file
-
spresense-beta.tar.gz: Archive containing libraries for Audio/GNSS/Camera, etc.
-
spresense-tools-beta.tar.gz: Archive containing tools for building sketches and writing them to the Spresense board.
-
spresense-sdk-beta.tar.gz: Archive containing the pre-built Spresense SDK
| The above pre-release package is a set of four files. You cannot install a combination of different versions. |
6.4.2. How to install pre-release package
The downloaded pre-release package can be installed from the Board Manager of the Arduino IDE in the following 3 steps.
6.4.2.1. Copy the download package
-
Open
File→Preferences→Settingsin the Arduino IDE -
Click on the path to the file listed under the text "
More preferences can be edited directory in the file" to open theArduino15(Windows/macOS cases) or.arduino15(Ubuntu case) directory.
-
Create a directory
staging, and inside it, create a directorypackages.

  + Arduino15 (or .arduino15)
  └──+ staging
     └─── packages
| If you have already installed any board in the Board Manager, these directory has already been created. |
-
Copy the 4 files you downloaded into the
packagesdirectory you created.
  + Arduino15 (or .arduino15)
  └───+ staging
      └───+ packages
          ├── package_spresense_beta_index.json
          ├── spresense-beta.tar.gz
          ├── spresense-sdk-beta.tar.gz
          └── spresense-tools-beta.tar.gz
6.4.2.2. Specify the Board Manager URL
-
Open
File→Preferences→Settingsin the Arduino IDE -
Add the following 2 lines to the Additional Boards Manager URLs.
https://github.com/sonydevworld/spresense-arduino-compatible/releases/download/generic/package_spresense_index.json
file://<The path to the copied package_spresense_beta_index.json>
|
The format of the copied package_spresense_beta_index.json path will match the file path in your OS.
|
|
The following is an example on a Windows environment. Replace Username with your user name. 
|
6.4.2.3. Running the installation in the Board Manager
-
Open
Tools→Board→Boards Manager…in the Arduino IDE -
Search the
Spresense -
Install the
Spresense beta Board
-
When the message
version 999.999.999 INSTALLEDis displayed, installation is complete.
-
Select
Tools→Board→Spresense Boards (beta)→Spresense (beta)to use the package you have installed