
1. Introduction
This section describes how to start working with the Spresense SDK via CLI (Command Line Interface).
2. Development environment
You can develop Spresense SDK on Linux/Windows/macOS. Please setup development environment for your appropriate OS.
Supported Operation System
-
Linux (64bit)
-
Ubuntu 16.04 or later
-
-
Windows (64bit)
-
11 (with WSL2 console)
-
-
macOS
-
High Sierra (10.13) or later
-
| Does not support 32bit version OS |
2.1. Setup for Linux
-
Serial Configuration
Add user to
dialoutgroupsudo usermod -a -G dialout <user-name>Please logout and login after running the above command.
-
Install development tools
wget https://raw.githubusercontent.com/sonydevworld/spresense/master/install-tools.sh
bash install-tools.sh
If you run wget command and install-tools.sh via proxy server, set your proxy server as below.
export http_proxy=http://<your proxy server>:<port number>
export https_proxy=http://<your proxy server>:<port number>
The version of the GNU Arm Embedded Toolchain (compiler) is updated in the SDKv2.3 and SDKv3.0 releases.
SDK version GNU Arm Toolchain version SDKv3.0 or later
gcc-arm-none-eabi-10.3-2021.10
SDKv2.3 or later
gcc-arm-none-eabi-9-2019-q4-major
SDK v2.2 or earlier
gcc-arm-none-eabi-7-2018-q2-update
If you want to reinstall including the new compiler, get the latest version of
install-tools.shand runinstall-tools.shwith the-roption.bash install-tools.sh -rIf you want to check the compiler version you have already installed, run
arm-none-eabi-gcc -vaftersource ~/spresenseenv/setup. The version information will be displayed on the last line.arm-none-eabi-gcc -v (snip) gcc version 10.3.1 20210824 (release) (GNU Arm Embedded Toolchain 10.3-2021.10)And run this command to activate installed tools.
source ~/spresenseenv/setupThis command must run in every terminal window. If you want to skip this step, please add this command in your
${HOME}/.bashrc.The tool chain is installed in spresenseenv/usr/binunder the home directory. -
Clone the Spresense SDK with submodule
git clone --recursive https://github.com/sonydevworld/spresense.gitIf you want to update a spresense.git repository that is already downloaded by git clone, please refer to How to get specified Spresense SDK version .
2.2. Setup for Windows 11 (for WSL2)
-
Install WSL2
Install WSL2 according to the following procedure
-
Open PowerShell console
-
Run
wslcommand to install WSL2.wsl --installThe following command can be used to specify the version of Ubuntu to be installed as WSL2. (The following command is an example of installing Ubuntu 20.04.)
wsl --install -d Ubuntu-20.04 -
Open the WSL2 console.

-
When starting up for the first time, you will be asked to create an account as shown below, and enter a user name and password.

-
Once the account is created and the console opens as shown below, WSL2 setup is complete.

-
-
Install development tools
Open the
WSL2console from start menu, and run following commands.curl -L https://raw.githubusercontent.com/sonydevworld/spresense/master/install-tools.sh > install-tools.sh bash install-tools.sh
If you run curl command and install-tools.sh via proxy server, set your proxy server as below.
export http_proxy=http://<your proxy server>:<port number> export https_proxy=http://<your proxy server>:<port number>
The version of the GNU Arm Embedded Toolchain (compiler) is updated in the SDKv2.3 and SDKv3.0 releases.
SDK version GNU Arm Toolchain version SDKv3.0 or later
gcc-arm-none-eabi-10.3-2021.10
SDKv2.3 or later
gcc-arm-none-eabi-9-2019-q4-major
SDK v2.2 or earlier
gcc-arm-none-eabi-7-2018-q2-update
If you want to reinstall including the new compiler, get the latest version of
install-tools.shand runinstall-tools.shwith the-roption.bash install-tools.sh -rIf you want to check the compiler version you have already installed, run
arm-none-eabi-gcc -vaftersource ~/spresenseenv/setup. The version information will be displayed on the last line.arm-none-eabi-gcc -v (snip) gcc version 10.3.1 20210824 (release) (GNU Arm Embedded Toolchain 10.3-2021.10)And run this command to activate installed tools.
source ~/spresenseenv/setupThis command must run in every terminal window. If you want to skip this step, please add this command in your
${HOME}/.bashrc.The tool chain is installed in /opt/spresenseenv/usr/bin. -
Clone the Spresense SDK with submodule
git clone --recursive https://github.com/sonydevworld/spresense.gitIf you want to update a spresense.git repository that is already downloaded by git clone, please refer to How to get specified Spresense SDK version . -
Install USB serial driver
User must install before connecting Spresense board to the PC. Please download and install from below.
-
CP210x USB to serial driver (v11.1.0) for Windows 11
If you use the latest Silicon Labs driver (v11.2.0) in Windows 11 environment, USB communication may cause an error and it may fail to flash the program. Please download v11.1.0 from the above URL and install it.
-


2.3. Setup for macOS
-
Install development tools provided by Apple
Open the
Teminaland run following command.xcode-select --install -
Install Python3
-
Install wget (Necessary to build some of NuttX application tools)
/bin/bash -c "$(curl -fsSL https://raw.githubusercontent.com/Homebrew/install/master/install.sh)" brew install wget
-
Install flock (Necessary to build for SDKv3.2.0 or later)
brew tap discoteq/discoteq brew install flock
-
Install development tools
curl -L https://raw.githubusercontent.com/sonydevworld/spresense/master/install-tools.sh > install-tools.sh
bash install-tools.sh
If you run curl command and install-tools.sh via proxy server, set your proxy server as below.
export http_proxy=http://<your proxy server>:<port number>
export https_proxy=http://<your proxy server>:<port number>
The version of the GNU Arm Embedded Toolchain (compiler) is updated in the SDKv2.3 and SDKv3.0 releases.
SDK version GNU Arm Toolchain version SDKv3.0 or later
gcc-arm-none-eabi-10.3-2021.10
SDKv2.3 or later
gcc-arm-none-eabi-9-2019-q4-major
SDK v2.2 or earlier
gcc-arm-none-eabi-7-2018-q2-update
If you want to reinstall including the new compiler, get the latest version of
install-tools.shand runinstall-tools.shwith the-roption.bash install-tools.sh -rIf you want to check the compiler version you have already installed, run
arm-none-eabi-gcc -vaftersource ~/spresenseenv/setup. The version information will be displayed on the last line.arm-none-eabi-gcc -v (snip) gcc version 10.3.1 20210824 (release) (GNU Arm Embedded Toolchain 10.3-2021.10)And run this command to activate installed tools.
source ~/spresenseenv/setupThis command must run in every terminal window. If you want to skip this step, please add this command in your
${HOME}/.bash_profile.The tool chain is installed in spresenseenv/usr/binunder the home directory. -
Clone the Spresense SDK with submodule
git clone --recursive https://github.com/sonydevworld/spresense.gitIf you want to update a spresense.git repository that is already downloaded by git clone, please refer to How to get specified Spresense SDK version . -
Install USB serial driver
User must install before connecting Spresense board to the PC. Please download and install from below.
On High Sierra (10.13) and later, the installation of the driver may be blocked. Please allow this driver from System Preferences Security & Privacy pane. See Apple Technical Note TN2459 "User-Approved Kernel Extension Loading" for more information.
3. Example application of "Hello, World!"
Old SDK 1.5 Document is here
This section describes the procedure from building to execution of the sample application "Hello, World!".
See the following chapters for details of how to configure and build.
3.1. Configuration instructions
-
Navigate to the folder where you have stored the cloned Spresense SDK code, and enter the
sdkfolder:cd spresense/sdk -
Set the initial SDK configuration:
tools/config.py examples/hello
If you see a message like WARNING: New loader vX.Y.Z is required, please download and install. in this step, please install a new bootloader with refer Flashing bootloader.
|
3.2. Build instructions
-
Build the example image:
make
|
In SDKv2.3 or later, parallel build is available with the -j option. make -j
If you use |
A nuttx.spk file will be created in the sdk folder when this step has successfully finished.
This file is the final result and can be flashed onto the Spresense board.
3.3. Tutorial to flash SW
Type tools/flash.sh for flashing nuttx.spk into Spresense board.
-
Please refer to USB connection for checking the
<port>of the-coption.Example for Linux environment (
<port>=/dev/ttyUSB0)tools/flash.sh -c /dev/ttyUSB0 nuttx.spk >>> Install files ... install -b 115200 Install nuttx.spk |0%-----------------------------50%------------------------------100%| ###################################################################### 252480 bytes loaded. Package validation is OK. Saving package to "nuttx" updater# sync updater# Restarting the board ... reboot
Example for Windows environment (
<port>=COM9)tools/flash.sh -c COM9 nuttx.spk >>> Install files ... install -b 115200 Install nuttx.spk |0%-----------------------------50%------------------------------100%| ###################################################################### 252480 bytes loaded. Package validation is OK. Saving package to "nuttx" updater# sync updater# Restarting the board ... reboot
Example for macOS environment (
<port>=/dev/cu.SLAB_USBtoUART)tools/flash.sh -c /dev/cu.SLAB_USBtoUART nuttx.spk >>> Install files ... install -b 115200 Install nuttx.spk |0%-----------------------------50%------------------------------100%| ###################################################################### 252480 bytes loaded. Package validation is OK. Saving package to "nuttx" updater# sync updater# Restarting the board ... reboot
-
On installation completion, the Spresense board will reboot.
If you see a message like WARNING: New loader vX.Y.Z is required, please download and install. in this step, please install a new bootloader with refer Flashing bootloader.
|
3.4. Run "Hello, World!"
hello example is a simple program that it shows Hello world!! on the console. So you need serial terminal software.
You can use any serial terminal software, for example, screen or minicom on Linux and macOS, or PuTTY or Tera Term on Windows.
Baudrate |
115200 |
Data Bits |
8 bit |
Parity Bit |
none |
Stop Bit |
1 bit |
Flow Control |
none |
In this chapter, use screen. If you use Linux, install first.
sudo apt install screen
Run terminal in 115200 baud
screen /dev/ttyUSB0 115200
If nsh> is shown after typing Enter and Esc keys, the Spresense board working properly. nsh> is the command prompt for NuttShell.
NuttShell (NSH) nsh>
Type hello
NuttShell (NSH) nsh> hello Hello, World!! nsh>
If you want to finsh screen, then press Ctrl+a k. When it asks Really kill this window [y/n], press y.
|
You can also use the simple serial terminal tool (miniterm) included in the Spresense SDK development environment.
| Environment | Tool-path |
|---|---|
Linux |
tools/linux/miniterm |
Windows |
tools/macos/miniterm |
macOS |
tools/windows/miniterm.exe |
An example of execution in a Windows environment is shown below.
-
Run the
minitermcommand with the--raw --eol LFoptions.The serial port list will be displayed as follows.
./tools/windows/miniterm.exe --raw --eol LF --- Available ports: --- 1: COM5 'Silicon Labs CP210x USB to UART Bridge (COM5)' --- Enter port index or full name:
-
If the Spresense board is connected correctly,
Silicon Labs CP210x USB to UART Bridgewill be displayed.In the example above, select
1and press theEnterkey.The NSH prompt will appear as follows.
./tools/windows/miniterm.exe --raw --eol LF --- Available ports: --- 1: COM5 'Silicon Labs CP210x USB to UART Bridge (COM5)' --- Enter port index or full name: 1 --- Miniterm on COM5 115200,8,N,1 --- --- Quit: Ctrl+] | Menu: Ctrl+T | Help: Ctrl+T followed by Ctrl+H --- NuttShell (NSH) NuttX-12.3.0 nsh>
If you know the COM port number in advance, you can skip port number verification and connect directly by specifying the COM port number as an argument.
./tools/windows/miniterm.exe --raw --eol LF COM5 -
To exit the serial terminal, press
Ctrl+](Press]while holding the Control key).
4. Build method
Old SDK 1.5 Document is here
This chapter describes the structure and build procedure of the Spresense SDK. Spresense SDK uses a build system using GNU Make.
It might be handy to have a local clone of the Spresense SDK while reading this section. The Spresense SDK is be cloned from GitHub.
git clone --recursive https://github.com/sonydevworld/spresense.git
4.1. Configuration
The NuttX kernel and Spresense SDK are configurable to be able to comply with the requirements for specific applications and hardware configurations. The Spresense SDK is using Kconfig to handle the configuration, just as the Linux kernel build system does. Please refer to Development environment to get the Kconfig installation instructions.
The Spresense SDK provides a set of tools: tools/config.py and tools/mkdefconfig.py to handle the system configuration.
cd spresense/sdk tools/config.py -h usage: config.py [-h] [-k] [-l] [-m] [-q] [-g] [-d DIR] [-v] [-i [config [config ...]]] [<config name> [<config name> ...]] Configuration tool positional arguments: <config name> configuration name optional arguments: -h, --help show this help message and exit -k, --kernel DEPRECATED -l, --list list default configurations. show kernel defconfigs with --kernel. -m, --menuconfig run config in "menuconfig" -q, --qconfig run config in "qconfig" -g, --gconfig run config in "gconfig" -d DIR, --dir DIR change configs directory -v, --verbose verbose messages -i [config [config ...]], --info [config [config ...]] show configuration information
cd spresense/sdk tools/mkdefconfig.py -h usage: mkdefconfig.py [-h] [-k] [-d DIR] [-y] [--all] [--verbose] <config name> Make default config from current config positional arguments: <config name> configuration name optional arguments: -h, --help show this help message and exit -k DEPRECATED -d DIR, --dir DIR change configs directory -y overwrite existing defconfig --all DEPRECATED --verbose, -v verbose messages
In the following example tools/config.py tool will load the kconfig-frontends with menuconfig as user interface and load a predefined configuration (described below).
The tools/config.py and tools/mkdefconfig.py scripts depend on the current directory structure so make sure that they run from the sdk directory.
|
4.1.1. menuconfig, qconfig, gconfig
Kconfig have a few different user interfaces. To open them to modify the configuration execute tools/config.py with one of the options in the table below.
Options |
|
|
CUI menu selection using the ncurses library |
|
GUI menu selection using the Qt library |
|
GUI menu selection using the gtk library |
Depending on what user interface options that where activated when kconfig-frontend was built some of the options might not be available.
4.1.2. Predefined Configuration (defconfig)
The predefined configuration (defconfig) is a predefined combination of settings required when you want to use a certain function.
If you want to use a defconfig, specify the defconfig name as the argument of the tools/config.py tool.
It is possible to list the available defconfigs by executing the tools/config.py with the -l option.
tools/config.py -l
Multiple defconfigs can be specified at the same time. If more than one defconfig is specified, the result is a combination of all the defconfigs.
tools/config.py device/sdcard feature/wifi
Specifying a defconfig when calling tools/config.py will reset/overwrite the current configuration.
|
If you do not know the contents of defconfig, use the -i or --info option to display the information of the specified defconfig.
./tools/config.py -i device/sdcard
=== device/sdcard ===
[Description]
This configuration contains required options to use SD card slot.
[Differences]
+CXD56_SDIO=y
4.1.3. Save settings
It is possible to save custom settings made by the user.
<config name> use the following command:tools/mkdefconfig.py <config name>
In the example above on the Spresense SDK settings will be saved.
If the name specified in <config name> already exists, a confirmation will be displayed asking if you want to overwrite it.
|
tools/config.py and tools/mkdefconfig.py apply/save to defconfig files in the folder sdk/configs. The defconfig destination folder can be set with the -d or --dir option.
../path/to/configs directory to save the <config name> defconfig to:tools/mkdefconfig.py -d ../path/to/configs <config name>
../path/to/configs use:tools/config.py -d ../path/to/configs <config name>
4.2. Build system
To build the SDK, type in the commands in the following example.
tools/config.py default tools/config.py -m # Above commands are to configure the SDK settings. make
|
In SDKv2.3 or later, parallel build is available with the -j option. make -j
If you use |
If the build succeeds two files will be created in the sdk directory: nuttx and nuttx.spk.
These two files have the following format:
nuttx-
ELF format. To be used when loaded with a debugger.
nuttx.spk-
A proprietary file packaged to write to the actual machine.
5. Flashing binaries to the Spresense board
-
nuttx.spk
-
loader.espk
-
gnss.espk
5.1. USB connection
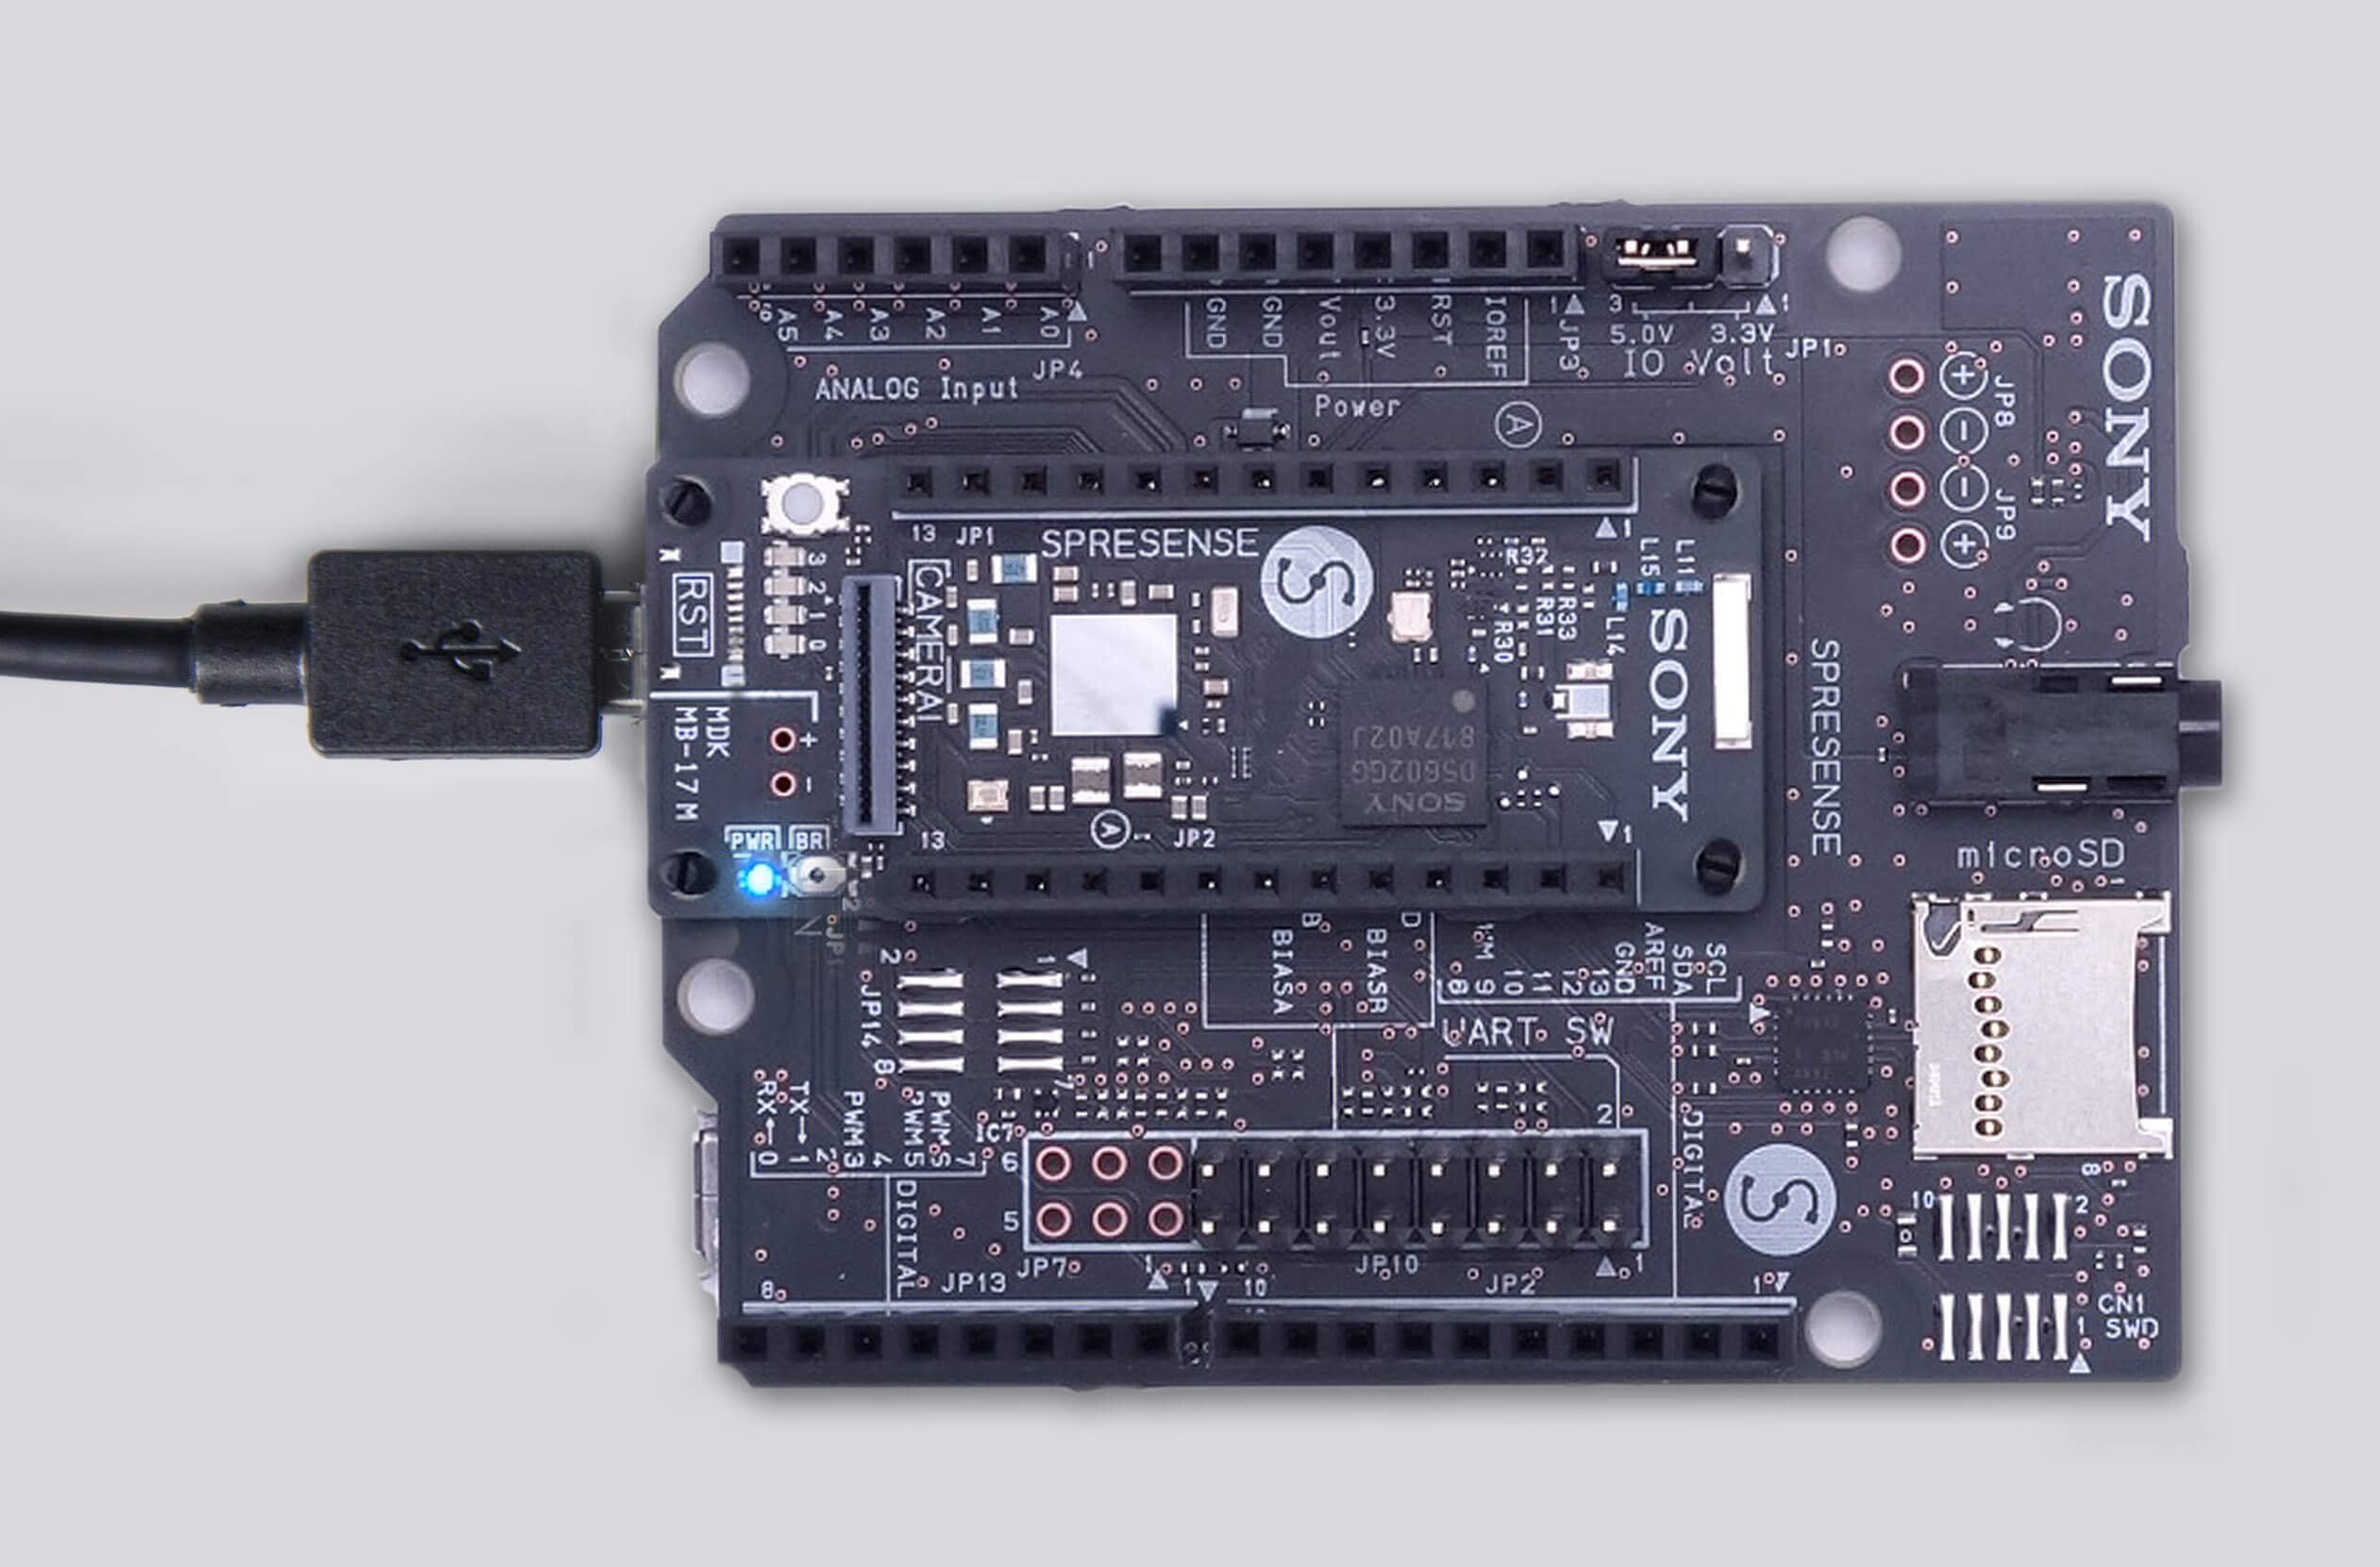
Connect the Spresense main board to the PC via the USB cable.
5.1.1. Check the serial port name
SDK tools needs the serial port name for communicate with Spresense board. The serial port name is different on each OS.
-
on Linux
dmesg | grep "cp21.*attached" [12220.625979] usb 1-1: cp210x converter now attached to ttyUSB0In this case, the port name is
/dev/ttyUSB0. -
on macOS
ls /dev/{tty,cu}.* /dev/cu.SLAB_USBtoUART /dev/tty.SLAB_USBtoUARTIn this case, the port name is
/dev/tty.SLAB_USBtoUART. -
on Windows
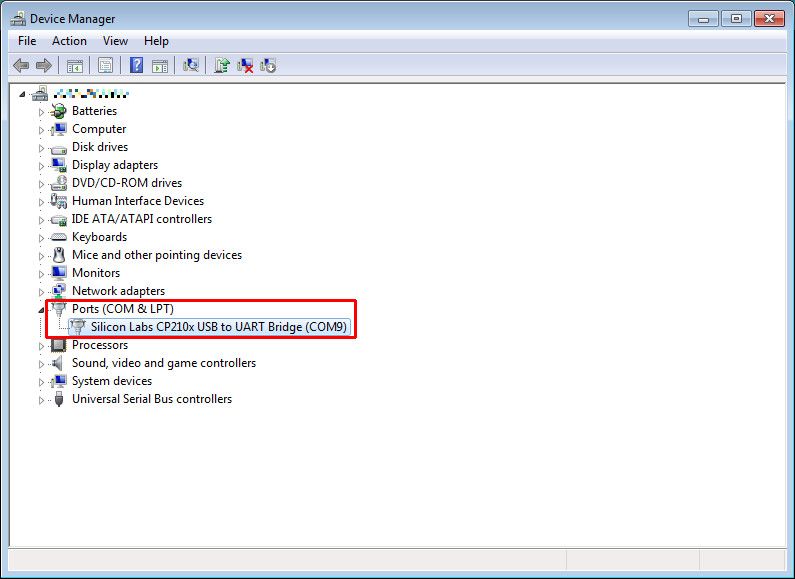
Open
Settings>Devices, and Spresense board will be shown inOther deviceslist likeSilicon Labs CP210x USB to UART Bridge (COM3). In this case, the port name isCOM3. Alternatively, you can check it from Device Manager.
In this case, the port name is
COM9.
5.2. Flash the bootloader
Please see Flashing bootloader.
5.3. Flash the user nuttx.spk image
Use the tools/flash.sh script to flash nuttx.spk to Spresense board.
-
Connect the USB cable from the Spresense main board to your PC.
-
Check serial port number by using next command.
dmesg | grep "cp21.*attached" [12220.625979] usb 1-1: cp210x converter now attached to ttyUSB0In this case, Spresense board use
/dev/ttyUSB0for serial connection. -
Type
tools/flash.shfor flashingnuttx.spkinto Spresense board.tools/flash.sh -c /dev/ttyUSB0 nuttx.spk Figure 2.
nuttx.spkflashing -
On installation completion, the Spresense board will reboot.

6. Adding a user application
Old SDK 1.5 Document is here
A new user application can be added using the following methods:
-
Using the application template in the
sdk/apps/examplesdirectory, or -
Adding the user application to any other directory.
6.1. Add to the examples
The most straightforward way to quickly get started with developing a custom made user application is to use the hello example.
-
Copy the whole
sdk/apps/examples/hellofolder to a directory with a new name. -
Replace all
hellostrings inMakefile,Make.defs,Kconfig,hello_main.cwith the new name chosen in step 1. -
Change the file name of
hello_main.cto an arbitrary file name. (See Example of adding a user application from scratch). -
After replacing all the strings, execute
make distcleanonce in the SDK directory. -
Perform initial SDK configuration
cd sdk make distclean tools/config.py default make menuconfig
Examples ---> [] My first app example (NEW)
If the Kconfig file have been added or deleted, the config menu menuconfig, can be updated by running make clean in the SDK directory.
|
Once the new application has been enabled, the SDK is ready to be built by the command:
make
|
In SDKv2.3 or later, parallel build is available with the -j option. make -j
If you use |
After flashing the created nuttx.spk file and restarting the Spresense board, the added application can be executed as a command.
6.1.1. Example of adding a user application from scratch
config EXAMPLES_MYFIRSTAPP
tristate "My first app example"
default n
---help---
Enable the my first app example
if EXAMPLES_MYFIRSTAPP
config EXAMPLES_MYFIRSTAPP_PROGNAME
string "Program name"
default "myfirstapp"
---help---
This is the name of the program that will be used when the NSH ELF
program is installed.
config EXAMPLES_MYFIRSTAPP_PRIORITY
int "My firstapp task priority"
default 100
config EXAMPLES_MYFIRSTAPP_STACKSIZE
int "My first app stack size"
default 2048
endif
|
Symbols defined with |
Option symbols defined in the Kconfig file must be unique in the SDK. If symbols are duplicated, a warning will be displayed when running the configuration tool.
|
-include $(TOPDIR)/Make.defs PROGNAME = $(CONFIG_EXAMPLES_MYFIRSTAPP_PROGNAME) PRIORITY = $(CONFIG_EXAMPLES_MYFIRSTAPP_PRIORITY) STACKSIZE = $(CONFIG_EXAMPLES_MYFIRSTAPP_STACKSIZE) MODULE = $(CONFIG_EXAMPLES_MYFIRSTAPP) MAINSRC = myfirstapp_main.c include $(APPDIR)/Application.mk
|
ifneq ($ (CONFIG_EXAMPLES_MYFIRSTAPP),) CONFIGURED_APPS += myfirstapp endif
|
6.2. Add to a different directory
It is possible to store the application outside the Spresense SDK repository. The following steps will explain how to add a directory outside of the repository into the build system.
-
Create arbitrary directories in the same directory as the SDK.
-
Copy
Makefile,Make.defsand.sdksubdirsfrom theexamplesdirectory. -
Add any application in the newly created directory in the same way as described in Add to the examples.
-
Execute
makein the SDK directory.
6.2.1. Example of adding another directory
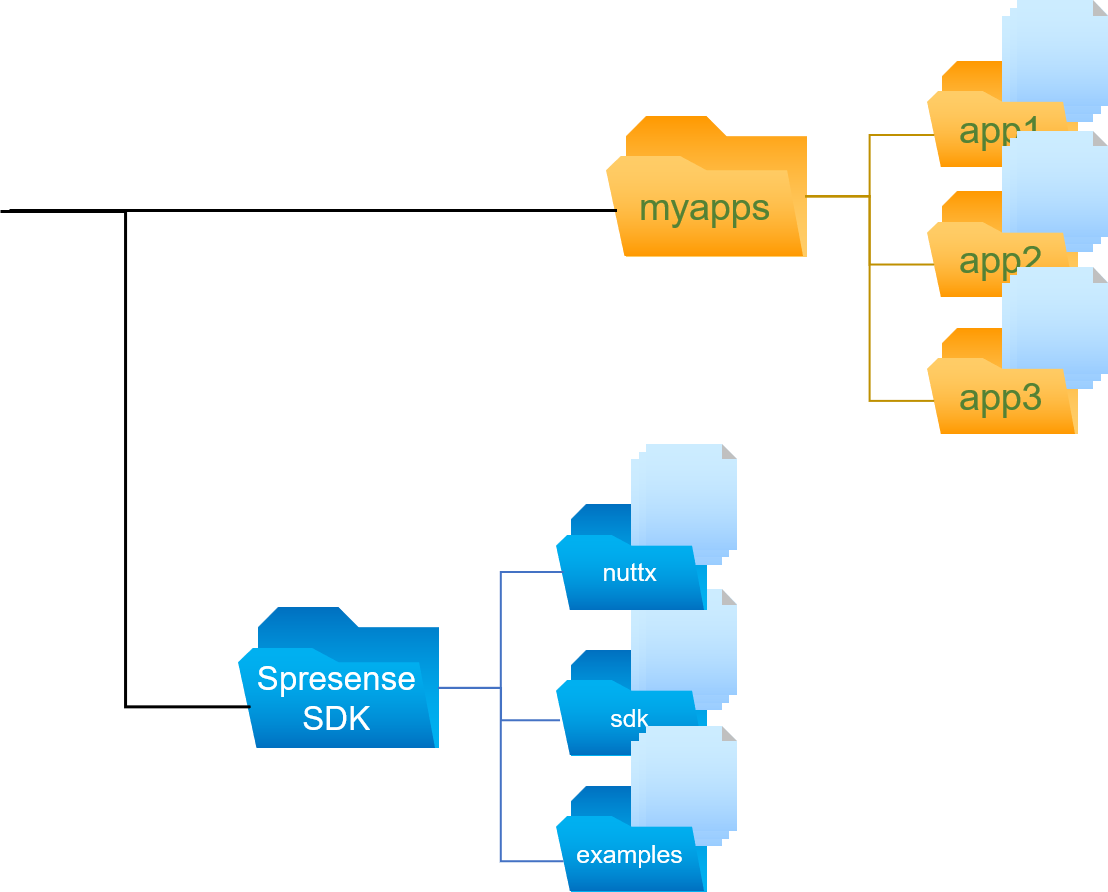
In this example, the application myfirstapp is placed in a folder called myapps.
|-- sdk
|-- examples
└-- myapps
|-- .sdksubdirs
|-- Make.defs
|-- Makefile
└-- myfirstapp
|-- Kconfig
|-- Make.defs
|-- Makefile
└-- myfirstapp_main.c
MENUDESC = "My Apps" include $(SDKDIR)/tools/Sdk.mk
|
6.3. How to use utility tools
There are utility tools to add your application to the examples and a different directory as mentioned above.
tools/mkcmd.py -h
usage: mkcmd.py [-h] [-d BASEDIR] [-v] <app name> [desc]
Create a new application
positional arguments:
<app name> New application name
desc Menu description
optional arguments:
-h, --help show this help message and exit
-d BASEDIR, --basedir BASEDIR
Base directory to create new application
-v, --verbose Verbose messages
This tool create a new application at examples directory.
You can use '-d' option to change application directory, it is a same level
of sdk and examples.
tools/mkapppsdir.py -h
usage: mkappsdir.py [-h] [-s] [-v] <dir name> [desc]
Create a new application directory at the outside of sdk repository
This tool must be run on sdk directory.
positional arguments:
<dir name> New application directory name
desc Menu description
optional arguments:
-h, --help show this help message and exit
-s, --spresense_home using spresense home
-v, --verbose verbose messages
Run these tools under the sdk directory.
|
6.3.1. Usage
myfirstapp application to the examplecd spresense/sdk tools/mkcmd.py myfirstapp "My first app example"
myapps and add myfirstapp application to its directorycd spresense/sdk tools/mkappsdir.py myapps "My Apps" tools/mkcmd.py -d myapps myfirstapp "My first app example"
7. Flashing bootloader
Correct bootloader is required for using Spresense board properly. The bootloader installation method has been changed since SDKv3.4.3 or later versions. If you use old SDKv3.4.2 or earlier, please refer to old installation method.
|
7.1. How to install bootloader (SDKv3.4.3 or later)
A WARNING might be shown when using tools/flash.sh with bootloader missing.
In this case, please flash the Spresense bootloader into the Spresense board.
------------------------------------------------------------------------ WARNING: New bootloader vX.Y.Z is required, please install. By agreeing to the EULA, the installation process will begin. Install command: $ ./tools/flash.sh -c <port> -B NOTE: Replace <port> with your serial port (e.g., /dev/ttyUSB0 or COM3). ------------------------------------------------------------------------
-
Flash Spresense bootloader into Spresense board.
Make sure the Spresense board is attached to the PC via the USB cable. Please refer to USB connection for checking the
<port>of the-coption. The following is an execution command example in the Linux / Windows / macOS environment.Example for Linux environment (
<port>=/dev/ttyUSB0)../tools/flash.sh -c /dev/ttyUSB0 -BExample for Windows environment (
<port>=COM9)../tools/flash.sh -c COM9 -BExample for macOS environment (
<port>=/dev/cu.SLAB_USBtoUART)../tools/flash.sh -c /dev/cu.SLAB_USBtoUART -B -
The End User License Agreement will appear in the terminal.
END USER LICENSE AGREEMENT FOR SPRESENSE BOOTLOADER FILES ========================================================= IMPORTANT: ---------- : Press Enter to continue...
"Press Enter to continue…" is displayed, enter the Enter key to send to the next page.
: By agreeing to the EULA, the installation process will begin. Do you agree to the EULA? (Y/N):
Finally, "Do you agree to the EULA? (Y/N):" will appear.
If you agree, type 'y' and press Enter.
-
Installation of the boot loader will begin.
>>> Install files ... install -b 115200 Install .../sdk/tools/../../firmware/spresense/loader.espk |0%-----------------------------50%------------------------------100%| ###################################################################### 130080 bytes loaded. Package validation is OK. Saving package to "loader" updater# install -b 115200 Install .../sdk/tools/../../firmware/spresense/AESM.espk |0%-----------------------------50%------------------------------100%| ###################################################################### 28944 bytes loaded. Package validation is OK. Saving package to "AESM" updater# install -b 115200 Install .../sdk/tools/../../firmware/spresense/dnnrt-mp.espk |0%-----------------------------50%------------------------------100%| ###################################################################### 109808 bytes loaded. Package validation is OK. Saving package to "dnnrt-mp" updater# install -b 115200 Install .../sdk/tools/../../firmware/spresense/gnssfw.espk |0%-----------------------------50%------------------------------100%| ###################################################################### 454528 bytes loaded. Package validation is OK. Saving package to "gnssfw" updater# install -b 115200 Install .../sdk/tools/../../firmware/spresense/mp3dec.spk |0%-----------------------------50%------------------------------100%| ###################################################################### 48016 bytes loaded. Package validation is OK. Saving package to "mp3dec" updater# install -b 115200 Install .../sdk/tools/../../firmware/spresense/sysutil.spk |0%-----------------------------50%------------------------------100%| ###################################################################### 307168 bytes loaded. Package validation is OK. Saving package to "sysutil" updater# sync updater# Restarting the board ... reboot
If the boot loader is successfully installed, "reboot" will be displayed.
If the installation fails, press Ctrl-C to cancel the execution and run the install command again.
7.2. How to install bootloader (SDKv3.4.2 or earlier)
A WARNING might be shown when using tools/config.py or tools/flash.sh with bootloader missing.
In this case, please flash the Spresense bootloader into the Spresense board.
WARNING: New loader vX.Y.Z is required, please download and install.
Download URL : <<Displays the download URL of the appropriate boot loader for your Spresense SDK>>
Install command:
1. Extract loader archive into host PC.
./tools/flash.sh -e <download zip file>
2. Flash loader into Board.
./tools/flash.sh -l <<Displays the firmware directory path of the boot loader for your Spresense SDK>> -c <port>
-
Download the EULA binary zip archive.
Go to the
Download URLinWARNINGdescription which will provide a link to the specific version you need by execute atools/config.pyortools/flash.shcommand, and download it to your PC. -
Extract the EULA binary zip on your PC by executing:
./tools/flash.sh -e <<Downloaded zip file>> -
Flash Spresense bootloader into Spresense board. Make sure the Spresense board is attached to the PC via the USB cable.
Please refer to USB connection for checking the
<port>of the-coption. The following is an execution command example in the Linux / Windows / macOS environment.(This is an example when second step of Install command in WARNING description shows
./tools/flash.sh -l /home/user/spresense/firmware/spresense -c <port>.)Example for Linux environment (
<port>=/dev/ttyUSB0)../tools/flash.sh -l /home/user/spresense/firmware/spresense -c /dev/ttyUSB0Example for Windows environment (
<port>=COM9)../tools/flash.sh -l /home/user/spresense/firmware/spresense -c COM9Example for macOS environment (
<port>=/dev/cu.SLAB_USBtoUART)../tools/flash.sh -l /home/user/spresense/firmware/spresense -c /dev/cu.SLAB_USBtoUART
8. Spresense Commands (β version)
Developers can use build-env.sh to enable a these features:
-
Enable to add a user application to your directory except in Spresense SDK.
-
Add a Spresense command (
spr-*) -
Completion of
./tools/config.py
How to apply
source tools/build-env.sh
| This script use a environment variable. If you re-open a terminal, please re-execute it. |
8.1. Add user application except in Spresense SDK directory
We can add own application outside of Spresense SDK directory.
As shown in above image, you can create a user application into application root which is independent from Spresense SDK.
And you can import other applications which have been created by the same method by copying.
Next commands is for using User application.
-
spr-create-approot -
spr-set-approot -
spr-create-app
Description of these commands Please refer to Spresense command for details of these commands.
8.2. Spresense command
| Command | Functionality |
|---|---|
spr-config |
For building configuration. The same as |
spr-make |
For building application. Almost the same as |
spr-create-approot |
For creating application root directory that can contain user applications. |
spr-set-approot |
For setting application root directory. |
spr-create-app |
For creating skeleton application into applicatno root directory. |
spr-go-sdk |
For changing current directory to Spresense SDK |
spr-go-approot |
For changing current directory to application root directory. |
8.3. spr-config
spr-config is wrapper command of tools/config.py
spr-config can do the configuration required to build the SDK. The functionality is the same as tools/config.py .In addition, this command supports TAB completion , and you can assist key inputs of configuration by inputting the command as follow:
spr-config exam<TAB key> spr-config examples/he<TAB key> spr-config examples/hello
Also, by making effective use of this function, you can check the available configurations as follow as shown in the list:
spr-config <TAB key><TAB key>
board/collet examples/hello
board/corvo examples/helloxx
board/spresense examples/jpeg_decode
default examples/lcdrw
device/accelerometer examples/light
device/adc examples/lte_awsiot
device/bcm20706 examples/lte_http_get
device/camera examples/lte_lwm2m
device/charger examples/lte_mqtt
device/colorsensor examples/lte_tls
device/lcd examples/lte_websocket
device/lightsensor examples/mag
device/magnetometer examples/nx
device/pressure examples/nxhello
8.4. spr-make
This command has the same function as the Spresense SDK build command make.
So it also supports the subcommand buildkernel and so on.
And you can also run builds with this command from somewhere other than spresense/sdk .
spr-config --kernel release spr-config examples/hello spr-make buildkernel spr-make
8.5. spr-create-approot
This is a command to create (set) a directory to be used as an application root .
Files necessary for building with SDK are also created by this command.
If you create application root at /home/user/myapps , please type commands as follow:
spr-create-approot /home/user/myapps
Creating application directory into /home/user/myapps
After typing the commands,
When the above commands are executed, the files necessary for build are created in the directory which will be application root as shown below.
tree /home/user/myapps
/home/user/myapps
├── Application.mk
├── LibTarget.mk
├── Make.defs
└── Makefile
0 directories, 4 files
Applications can be added to the directory created by this command.
The configured application root is restored by executing the following command when switching terminals.
|
8.6. spr-set-approot
This is a command to switch directories used as application root.
The directory to switch must have been created beforehand with the spr-create-approot command.
If you switch to /home/user/myapps as application root, please execute this command:
spr-set-approot /home/user/myapps
8.7. spr-create-app
This is a command to create a new skeleton application.
Applications are created in the application root selected by spr-create-approot or spr-set-approot .
If you create an application with the name myapp, please execute tihs command:
spr-create-app myapp
New 'myapp' app successfully created at '/home/user/myapps/myapp'.
When you execute the above command, files required for build are created in application root as follow:
tree /home/user/myapps/myapp
/home/user/myapps/myapp
├── configs
│ └── default-defconfig
├── Kconfig
├── Make.defs
├── Makefile
└── myapp_main.c
1 directory, 5 files
Applications can also be updated by writing a code in <application name> _main.c.
With this command, a program file is created as follows, and the program can be described in the myapp_main(int argc, char *argv []) function in follow,
cat /home/user/myapps/myapp/myapp_main.c #include <sdk/config.h> #include <stdio.h> #ifdef CONFIG_BUILD_KERNEL int main(int argc, FAR char *argv[]) #else int myapp_main(int argc, char *argv[]) #endif { return 0; }
Also, the configuration of the created application can be selected as myapp/myapp/default by ./tools/config.py or spr-config.
spr-config <TAB>
...
examples/audio_recorder_pre examples/mag myapp/myapp/default
examples/audio_through examples/nx
examples/ble_central examples/nxhello
9. Limitations
9.1. Spresense SDK may not be used depending on the folder name/path used
Spresense SDK does not allow filenames and folder names with spaces due to build system restrictions.
If there is a space in the path of the file name or folder name, the configuration or build cannot be performed properly. Please download and use the Spresense SDK in a location with no spaces in the path.
10. Appendix
10.1. How to get specified Spresense SDK version
This section shows how to change Spresense SDK that already downloaded by git clone to specified version.
10.1.1. Clean the repository
You should clean the repository before changing specified SDK version. Please follow the steps below to check the status and clean the repository.
10.1.1.1. Remove the build objects
Remove the build objects generated by make with the following command.
make distclean
10.1.1.2. Clean the uncommitted files
Use the following command to check the edited contents of the repository that has not been committed.
git status
If there is a file being edited in the repository, it will be displayed as modified or Untracked files as shown below.
On branch master Changes not staged for commit: (use "git add <file>..." to update what will be committed) (use "git checkout -- <file>..." to discard changes in working directory) modified: examples/accel/accel_main.c Untracked files: (use "git add <file>..." to include in what will be committed) examples/accel/README no changes added to commit (use "git add" and/or "git commit -a")
In such a case, please commit by git commit the edited contents or use the following command to temporarily save.
git stash
By using git stash pop, you can take back your changes that has been temporarily saved by git shash.
|
10.1.2. Update git objects
Please follow next commands to update git objects.
(e.g. If you clone repository into /home/user/spresense )
cd /home/user/spresense git fetch origin
The origin is the remote repository name, which is associated with the <URL> specified by git clone <URL>.
|
10.1.3. Checkout the specified SDK version
(e.g. If you want to checkout v2.0.2 )
git checkout v2.0.2 git submodule init git submodule update
If you want to checkout specific branch, please use branch name such like origin/develop in behalf of SDK version.
|
Once checkout the repository, your modification will be lost. If you want to avoid it, please use git merge to merge changes or create a new branch to save your changes.
|
10.1.4. If Untracked files: remains after checkout
If you change the major version such like SDK v1.5.1 → v2.0.2 or v2.0.2 → v1.5.1, git status might shows Untracked files: such as next lines.
HEAD detached at v2.0.2 Untracked files: (use "git add <file>..." to include in what will be committed) externals/nnabla-c-runtime/ nothing added to commit but untracked files present (use "git add" to track)
In such case, please remove untracked files manually.
10.2. How to build SDK for v1.5 and earlier versions
The build method of SDK v1.5 or earlier is shown below.
10.2.1. Example application of "Hello, World!" (old version 1.X)
This section describes the procedure from building to execution of the sample application "Hello, World!".
See the following chapters for details of how to configure and build.
10.2.1.1. Configuration instructions
-
Navigate to the folder where you have stored the cloned Spresense SDK code, and enter the
sdkfolder:cd spresense/sdk -
Set the initial NuttX kernel configuration:
tools/config.py --kernel release -
Set the initial SDK configuration:
tools/config.py examples/hello
10.2.1.2. Build instructions
-
Build the NuttX kernel:
make buildkernel -
Build the example image:
make
A nuttx.spk file will be created in the sdk folder when this step has successfully finished.
This file is the final result and can be flashed onto the Spresense board.
10.2.1.3. Tutorial to flash SW
Use the tools/flash.sh script to flash nuttx.spk to Spresense board.
Type tools/flash.sh for flashing nuttx.spk into Spresense board.
tools/flash.sh -c /dev/ttyUSB0 nuttx.spk >>> Install files ... install -b 115200 Install nuttx.spk |0%-----------------------------50%------------------------------100%| ###################################################################### 252480 bytes loaded. Package validation is OK. Saving package to "nuttx" updater# sync updater# Restarting the board ... reboot
On installation completion, the Spresense board will reboot.
10.2.1.4. Run "Hello, World!"
hello example is a simple program that it shows Hello world!! on the console. So you need serial terminal software.
You can use any serial terminal software, screen and minicom for example.
Baudrate |
115200 |
Data Bits |
8 bit |
Parity Bit |
none |
Stop Bit |
1 bit |
Flow Control |
none |
In this chapter, use screen. If you use Linux, install first.
sudo apt install screen
Run terminal in 115200 baud
screen /dev/ttyUSB0 115200
If nsh> is shown after typing Enter and Esc keys, the Spresense board working properly. nsh> is the command prompt for NuttShell.
NuttShell (NSH) nsh>
Type hello
NuttShell (NSH) nsh> hello Hello, World!! nsh>
If you want to finsh screen, then press Ctrl+a k. When it asks Really kill this window [y/n], press y.
|
10.2.2. Build method (old version 1.X)
This chapter describes the structure and build procedure of the Spresense SDK. Spresense SDK uses a build system using GNU Make.
It might be handy to have a local clone of the Spresense SDK while reading this section. The Spresense SDK is be cloned from GitHub.
git clone --recursive https://github.com/sonydevworld/spresense.git
10.2.2.1. Configuration
The NuttX kernel and Spresense SDK are configurable to be able to comply with the requirements for specific applications and hardware configurations.. The Spresense SDK is using Kconfig to handle the configuration, just as the Linux kernel build system does. Please refer to Development environment to get the Kconfig installation instructions.
-
NuttX kernel configuration
-
SDK configuration
The Spresense SDK provides a set of tools: tools/config.py and tools/mkdefconfig.py to handle the configuration of these two systems.
cd spresense/sdk tools/config.py -h usage: config.py [-h] [-k] [-l] [-m] [-q] [-g] [-d DIR] [-v] [<config name> [<config name> ...]] Configuration tool positional arguments: <config name> configuration name optional arguments: -h, --help show this help message and exit -k, --kernel kernel config -l, --list list default configurations. show kernel defconfigs with --kernel. -m, --menuconfig run config in "menuconfig" -q, --qconfig run config in "qconfig" -g, --gconfig run config in "gconfig" -d DIR, --dir DIR change configs directory -v, --verbose verbose messages
cd spresense/sdk tools/mkdefconfig.py -h usage: mkdefconfig.py [-h] [-k] [-d DIR] [--all] [--verbose] <config name> Make default config from current config positional arguments: <config name> configuration name optional arguments: -h, --help show this help message and exit -k save kernel configuration -d DIR, --dir DIR change configs directory --all Save SDK and kernel configuration with same name --verbose, -v verbose messages
In the following example tools/config.py tool will load the kconfig-frontends with menuconfig as user interface and load a predefined configuration (described below).
This tool is used for both for the NuttX kernel and Spresense SDK configuration.
Selecting what target to configure is done by extra option switches on the command line when executing the tools/config.py script.
The -k or --kernel option will affect the NuttX kernel configuration.
When the tools/config.py script is called without any switch the Spresense SDK configuration is affected.
cd spresense/sdk tools/config.py -k -m
The tools/config.py and tools/mkdefconfig.py scripts depend on the current directory structure so make sure that they run from the sdk directory.
|
menuconfig, qconfig, gconfig
Kconfig have a few different user interfaces. To open them to modify the configuration execute tools/config.py with one of the options in the table below.
Options |
|
|
CUI menu selection using the ncurses library |
|
GUI menu selection using the Qt library |
|
GUI menu selection using the gtk library |
Depending on what user interface options that where activated when kconfig-frontend was built some of the options might not be available.
Predefined Configuration (defconfig)
The predefined configuration (defconfig) is a predefined combination of settings required when you want to use a certain function.
If you want to use a defconfig, specify the defconfig name as the argument of the tools/config.py tool.
It is possible to list the available defconfigs by executing the tools/config.py with the -l option.
tools/config.py -l
Multiple defconfigs can be specified at the same time. If more than one defconfig is specified, the result is a combination of all the defconfigs.
tools/config.py board/spresense device/sdcard
Specifying a defconfig when calling tools/config.py will reset/overwrite the current configuration.
|
Save settings
It is possible to save custom settings made by the user.
<config name> use the following command:tools/mkdefconfig.py <config name>
In the example above on the Spresense SDK settings will be saved, but not the NuttX kernel settings.
To save the NuttX kernel settings the -k option has to be used.
Use the -k option or the --all option. If you specify the --all option, the current settings of both the SDK and the kernel are saved with the specified name.
tools/mkdefconfig.py -k <config name>
or
tools/mkdefconfig.py --all <config name>
If the name specified in <config name> already exists, a confirmation will be displayed asking if you want to overwrite it.
|
tools/config.py and tools/mkdefconfig.py apply/save to defconfig files in the folder sdk/configs. The defconfig destination folder can be set with the -d or --dir option.
../path/to/configs directory to save the <config name> defconfig to:tools/mkdefconfig.py -d ../path/to/configs <config name>
../path/to/configs use:tools/config.py -d ../path/to/configs <config name>
Changing the defconfig directory is also supported when using the -k option.
10.2.2.2. Build system
-
NuttX kernel
-
Spresense SDK
Each of these two need to be built separately. Starting the build must be done from the sdk directory in both cases.

Building the NuttX kernel
To build the NuttX kernel, type the commands in the following example. Before the build is started, the NuttX kernel have to be configured.
cd spresense/sdk tools/config.py -k release tools/config.py -k -m # Above commands are to configure the NuttX kernel settings. make buildkernel
cd spresense/sdk make buildkernel KERNCONF=release
| If the settings of the NuttX kernel haven’t been changed or if the source have not been modified, then the NuttX kernel doesn’t have to be rebuilt. |
Building the SDK
To build the SDK, type in the commands in the following example. Just as in the NuttX kernel case, the configuration have to be set prior starting the build.
tools/config.py default tools/config.py -m # Above commands are to configure the SDK settings. make
If the build succeeds two files will be created in the sdk directory: nuttx and nuttx.spk.
These two files have the following format:
nuttx-
ELF format. To be used when loaded with a debugger.
nuttx.spk-
A proprietary file packaged to write to the actual machine.
10.2.3. Adding a user application (old version 1.X)
A new user application can be added using the following methods:
-
Using the application template in the
examplesdirectory, or -
Adding the user application to any other directory.
10.2.3.1. Add to the examples
The most straightforward way to quickly get started with developing a custom made user application is to use the hello example.
-
Copy the whole
hellofolder to a directory with a new name. -
Replace all
hellostrings inMakefile,Make.defs,Kconfig,hello_main.cwith the new name chosen in step 1. -
Change the file name of
hello_main.cto an arbitrary file name. (See Example of adding a user application from scratch). -
After replacing all the strings, execute
make cleanonce in the SDK directory. -
Enter
menuconfig, your new custom made example application should be listed underexamples.
cd sdk make clean tools/config.py -m
Examples ---> [] My first app example (NEW)
If the Kconfig file have been added or deleted, the config menu menuconfig, can be updated by running make clean in the SDK directory.
|
Once the new application has been enabled, the SDK is ready to be built by the command:
make
After flashing the created nuttx.spk file and restarting the Spresense board, the added application can be executed as a command.
Example of adding a user application from scratch
config EXAMPLES_MYFIRSTAPP
bool "My first app example"
default n
---help---
Enable the my first app example
if EXAMPLES_MYFIRSTAPP
config EXAMPLES_MYFIRSTAPP_PROGNAME
string "Program name"
default "myfirstapp"
depends on BUILD_KERNEL
---help---
This is the name of the program that will be used when the NSH ELF
program is installed.
config EXAMPLES_MYFIRSTAPP_PRIORITY
int "My firstapp task priority"
default 100
config EXAMPLES_MYFIRSTAPP_STACKSIZE
int "My first app stack size"
default 2048
endif
|
Symbols defined with |
Option symbols defined in the Kconfig file must be unique in the SDK. If symbols are duplicated, a warning will be displayed when running the configuration tool.
|
-include $ (TOPDIR) / Make.defs -include $ (SDKDIR) /Make.defs # My first app built-in application info CONFIG_EXAMPLES_MYFIRSTAPP_PRIORITY? = SCHED_PRIORITY_DEFAULT CONFIG_EXAMPLES_MYFIRSTAPP_STACKSIZE? = 2048 APPNAME = myfirstapp PRIORITY = $ (CONFIG_EXAMPLES_MYFIRSTAPP_PRIORITY) STACKSIZE = $ (CONFIG_EXAMPLES_MYFIRSTAPP_STACKSIZE) # My first app Example ASRCS = CSRCS = MAINSRC = myfirstapp_main.c CONFIG_EXAMPLES_MYFIRSTAPP_PROGNAME? = Myfirstapp $ (EXEEXT) PROGNAME = $ (CONFIG_EXAMPLES_MYFIRSTAPP_PROGNAME) include $ (APPDIR) /Application.mk
|
ifeq ($ (CONFIG_EXAMPLES_MYFIRSTAPP), y) CONFIGURED_APPS + = myfirstapp endif
|
10.2.3.2. Add to a different directory
It is possible to store the application outside the Spresense SDK repository. The following steps will explain how to add a directory outside of the repository into the build system.
-
Create arbitrary directories in the same directory as the SDK.
-
Copy
LibTarget.mk,Makefile,Make.defsandApplication.mkfrom theexamplesdirectory. -
Change the path of the archive in
LibTarget.mk. -
Change the path of the archive in
Application.mk. -
Change the file name of the
BINvariable inMakefileto the same file name as the file name changed withLibTarget.mk. -
Add any application in the newly created directory in the same way as described in Add to the examples.
-
Execute
makein the SDK directory.
Example of adding another directory
In this example, the application myfirstapp is placed in a folder called myapps.
|-- sdk
|-- examples
└-- myapps
|-- Application.mk
|-- LibTarget.mk
|-- Make.defs
|-- Makefile
└-- myfirstapp
|-- Kconfig
|-- Make.defs
|-- Makefile
└-- myfirstapp_main.c
# Change directory from examples to myapps # Change the archive name from libexamples to libmyapps $(SDKDIR)$(DELIM)..$(DELIM)myapps$(DELIM)libmyapps$(LIBEXT): context $(Q) $(MAKE) -C $(dir $@) TOPDIR="$(TOPDIR)" SDKDIR="$(SDKDIR)" $(notdir $@) lib$(DELIM)libmyapps$(LIBEXT): $(SDKDIR)$(DELIM)..$(DELIM)myapps$(DELIM)libmyapps$(LIBEXT) $(Q) install $< $@ EXTLIBS += lib$(DELIM)libmyapps$(LIBEXT)
|
MENUDESC = "My Apps" BIN = libmyapps$(LIBEXT) # libexamples -> libmyapps include $(SDKDIR)/Makefile.ext
|
ifeq ($(WINTOOL),y)
BIN = "${shell cygpath -w $(APPDIR)$(DELIM)libmyapps$(LIBEXT)}" # libexamples -> libmyapps
INSTALL_DIR = "${shell cygpath -w $(BIN_DIR)}"
else
BIN = $(APPDIR)$(DELIM)libmyapps$(LIBEXT) # libexamples -> libmyapps
INSTALL_DIR = $(BIN_DIR)
endif
ROOTDEPPATH = --dep-path .
VPATH =
all: .built
.PHONY: clean preconfig depend distclean
.PRECIOUS: $(APPDIR)/libmyapps$(LIBEXT) # libexamples -> libmyapps
10.2.3.3. How to use utility tools
There are utility tools to add your application to the examples and a different directory as mentioned above.
tools/mkcmd.py -h
usage: mkcmd.py [-h] [-d BASEDIR] [-v] <app name> [desc]
Create a new application
positional arguments:
<app name> New application name
desc Menu description
optional arguments:
-h, --help show this help message and exit
-d BASEDIR, --basedir BASEDIR
Base directory to create new application
-v, --verbose Verbose messages
This tool create a new application at examples directory.
You can use '-d' option to change application directory, it is a same level
of sdk and examples.
tools/mkapppsdir.py -h
usage: mkappsdir.py [-h] [-s] [-v] <dir name> [desc]
Create a new application directory at the outside of sdk repository
This tool must be run on sdk directory.
positional arguments:
<dir name> New application directory name
desc Menu description
optional arguments:
-h, --help show this help message and exit
-s, --spresense_home using spresense home
-v, --verbose verbose messages
Run these tools under the sdk directory.
|
Usage
myfirstapp application to the examplecd spresense/sdk tools/mkcmd.py myfirstapp "My first app example"
myapps and add myfirstapp application to its directorycd spresense/sdk tools/mkappsdir.py myapps "My Apps" tools/mkcmd.py -d myapps myfirstapp "My first app example"
10.3. Windows10 (MSYS2) Development Environment
|
Due to Microsoft’s end of support for Windows 10, support for the Windows 10 (MSYS2) development environment has been discontinued. For reference, the legacy setup procedures are provided below, however, please use a Windows 11 (WSL2) environment going forward. |
10.3.1. Setup for Windows 10 (for MSYS2) [Not Supported]
-
Install MSYS2
-
Install development tools
Run
MSYS2 MSYSfrom start menu, and run following commands.MSYS2 MinGW 64-bitandMSYS2 MinGW 32-bitis not supported. Please useMSYS2 MSYS.curl -L https://raw.githubusercontent.com/sonydevworld/spresense/master/install-tools.sh > install-tools.sh bash install-tools.sh
If you run curl command and install-tools.sh via proxy server, set your proxy server as below.
export http_proxy=http://<your proxy server>:<port number>
export https_proxy=http://<your proxy server>:<port number>
The version of the GNU Arm Embedded Toolchain (compiler) is updated in the SDKv2.3 and SDKv3.0 releases.
SDK version GNU Arm Toolchain version SDKv3.0 or later
gcc-arm-none-eabi-10.3-2021.10
SDKv2.3 or later
gcc-arm-none-eabi-9-2019-q4-major
SDK v2.2 or earlier
gcc-arm-none-eabi-7-2018-q2-update
If you want to reinstall including the new compiler, get the latest version of
install-tools.shand runinstall-tools.shwith the-roption.bash install-tools.sh -rIf you want to check the compiler version you have already installed, run
arm-none-eabi-gcc -vaftersource ~/spresenseenv/setup. The version information will be displayed on the last line.arm-none-eabi-gcc -v (snip) gcc version 10.3.1 20210824 (release) (GNU Arm Embedded Toolchain 10.3-2021.10)And run this command to activate installed tools.
source ~/spresenseenv/setupThis command must run in every terminal window. If you want to skip this step, please add this command in your
${HOME}/.bashrc.The tool chain is installed in /opt/spresenseenv/usr/bin. -
Clone the Spresense SDK with submodule
git clone --recursive https://github.com/sonydevworld/spresense.gitIf you want to update a spresense.git repository that is already downloaded by git clone, please refer to How to get specified Spresense SDK version . -
Install USB serial driver
User must install before connecting Spresense board to the PC. Please download and install from below.
-
CP210x USB to serial driver (v11.1.0) for Windows 10/11
If you use the latest Silicon Labs driver (v11.2.0) in Windows 10/11 environment, USB communication may cause an error and it may fail to flash the program. Please download v11.1.0 from the above URL and install it.
-