Developer World Spresense
日本語 中文
Table of Contents

Spresense Web-based sample flash writer

Overview

This tool is a utility tool for installing pre-built Sample spk binaries to the Spresense board from a web browser using the Web Serial API. Before setting up the Spresense SDK development environment, you can easily experience Spresense functions and example applications.

This tool can be used with the following browsers that support the Web Serial API.

  • Google Chrome

  • Microsoft Edge(Chromium-based)

To use this tool in Windows or macOS environment, you need the USB serial driver for CP210x. If the driver is not yet installed, please download it from the link below and install it.

After trying out the sample, the next step is to try developing your own application using the Spresense SDK. For instructions on how to setup your development environment, please see Development environment.

Sample spk binaries

Several sample spk binaries are available depending on the function and board. 
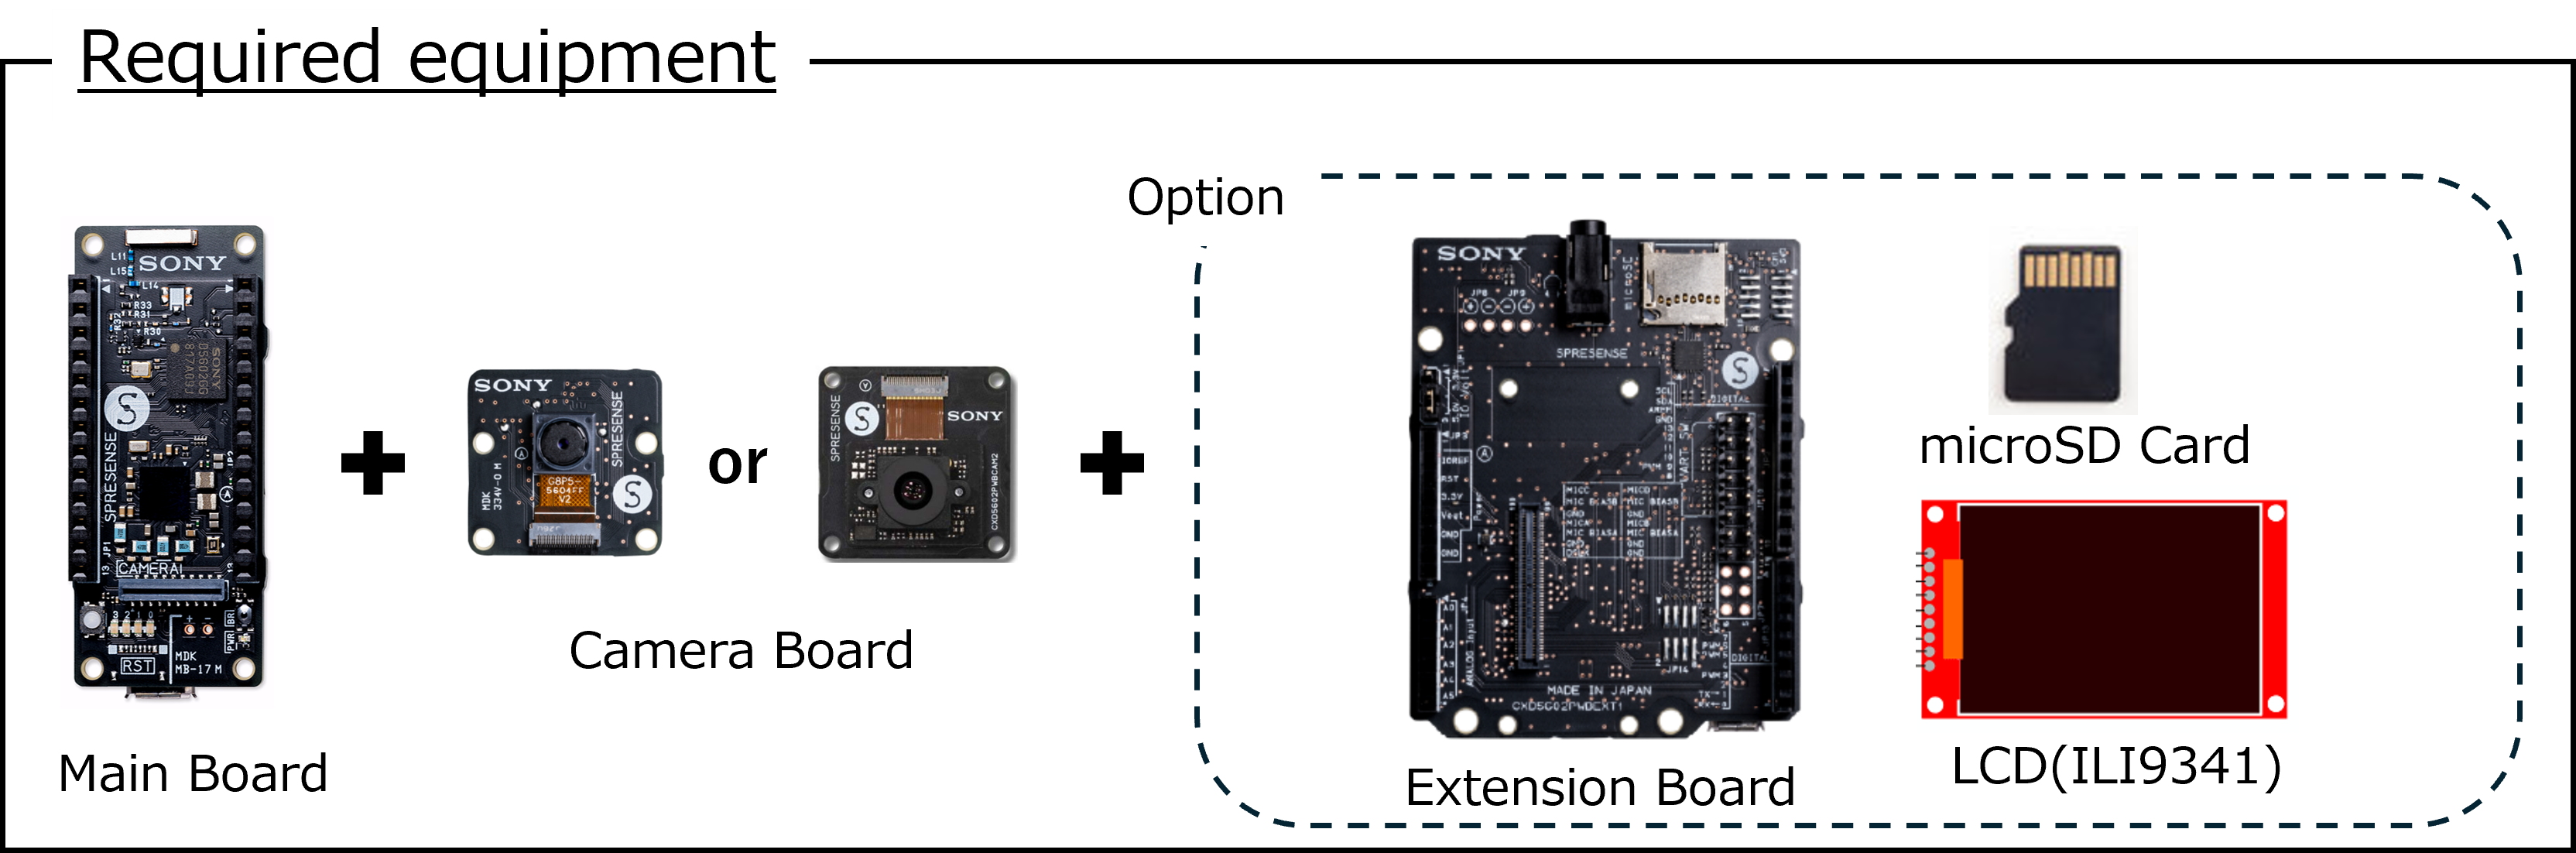
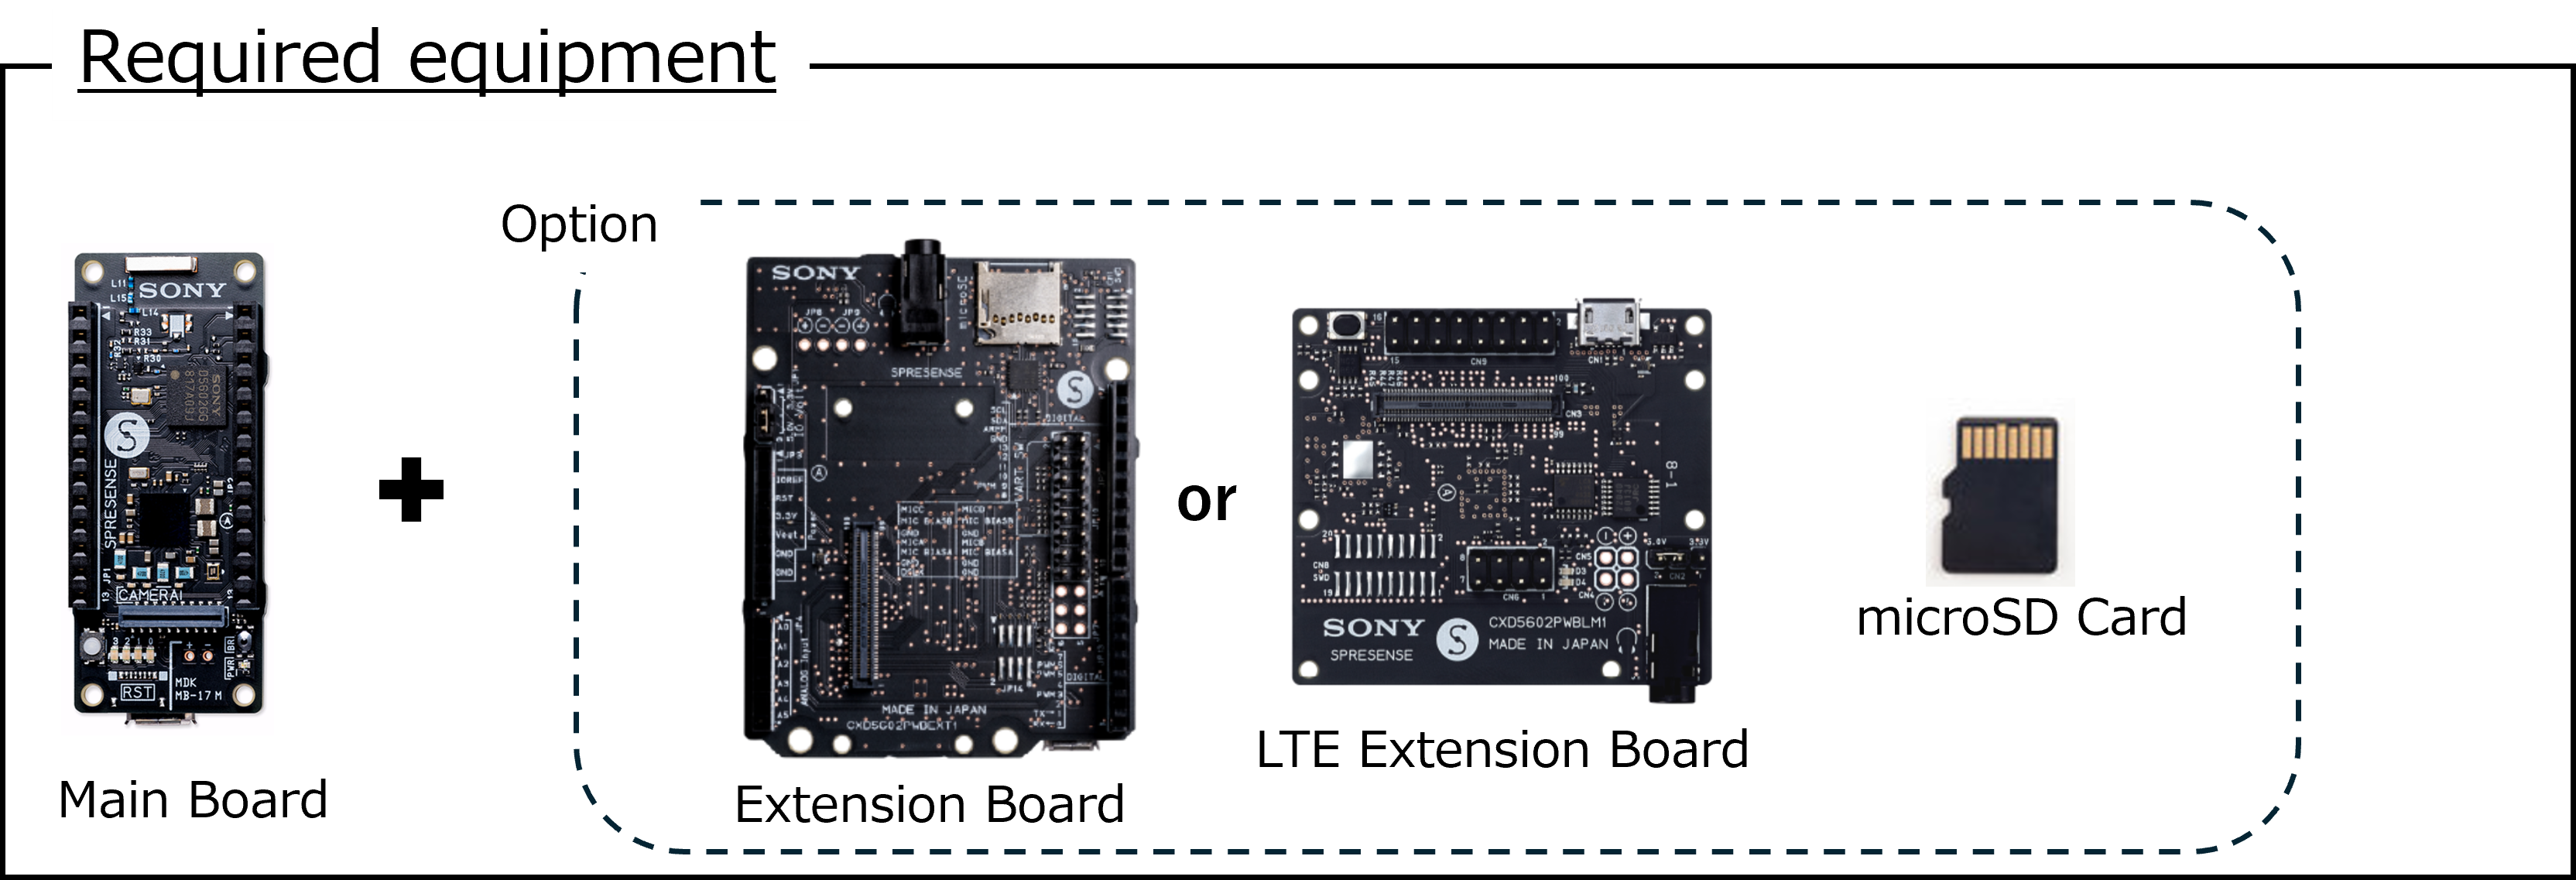
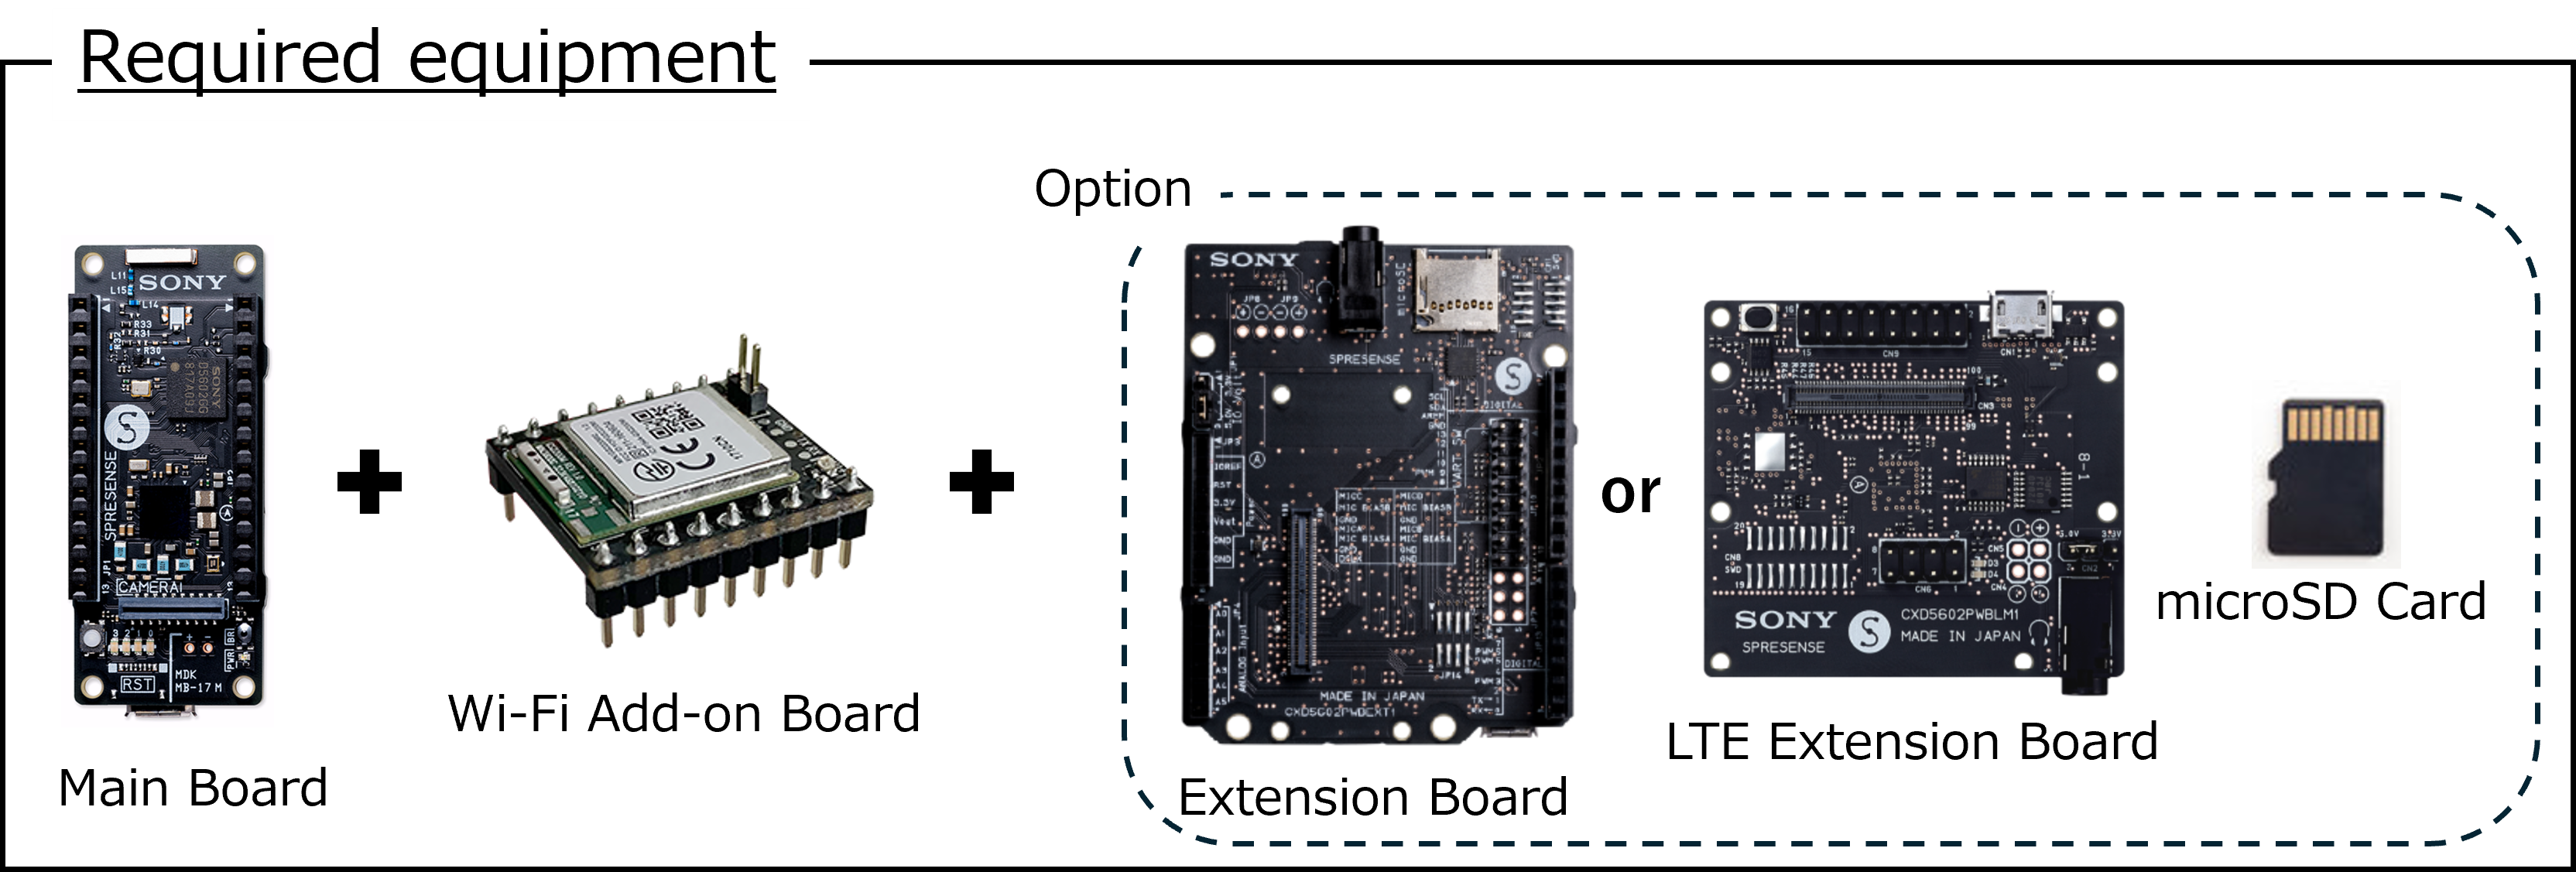
Before installing each binary, please prepare the Required equipment listed in the table. The Command column represents typical commands included in the sample spk binaries and links to their tutorials. Please refer to the tutorial for specific usage of the commands.

Filename Description Command

Common

This section describes the common usage to all sample spk binaries.

It has a command line interface called NuttShell, similar to the Linux shell, and can execute various commands on the nsh> prompt. Various applications are also provided as commands. The following commands and functions are included in all sample spk binary files.

  • help command shows a list of supported commands. There are standard NuttShell commands and Built-in Apps commands.

  • uname -a command shows the version information.

  • hello or helloxx command prints "Hello World".

  • led_blink & command blinks the LEDs on the main board. By executing a command with &,multiple commands can be executed simultaneously.

  • It contains commands to operate each peripheral such as GPIO, RTC, ADC, PWM, Watchdog, I2C, SPI, PMIC, etc. For more information on how to use each, please click on the command in the right column and refer to the various tutorials.

  • df command shows the mount point of the file system. The SPI-Flash on the main board is mounted to /mnt/spif and the SD card on the extension board is mounted to /mnt/sd0. You can operate directories and files with commands such as cd, ls, mkdir, cat and hexdump.

  • If the msconn command is included in the sample, the SD card on the extension board will be mounted as a USB mass storage drive when the command is executed with the USB port on the extension board connected to the PC via USB. Then you can read and write files directly from the PC to the SD card on the extension board.

  • reboot command can reboot the system.

  • Auto startup script is enabled. The /mnt/spif/init.rc shell script allow you to run specified commands automatically at system startup.

hello, helloxx
led_blink
gpio
pmic
alarm
adc_monitor
pwm
watchdog
i2c
spi
fsperf
vi
zip, unzip, gzip

gnss.spk
Try it now

This sample spk uses the built-in GNSS function.

GNSS chip antenna is mounted on the main board, enabling GNSS positioning with only the main board.

  • gnss command starts GNSS positioning. The time and position acquired from the satellites are output to the terminal. For stable signal reception, it is recommended to execute this command outdoors in an open sky environment.

  • gnss_atcmd command can get the positioning data in NMEA format.

webserial gnss en

gnss
gnss_atcmd
geofence

gnss_addon.spk
Try it now

This is a sample spk for the GNSS Add-on board.
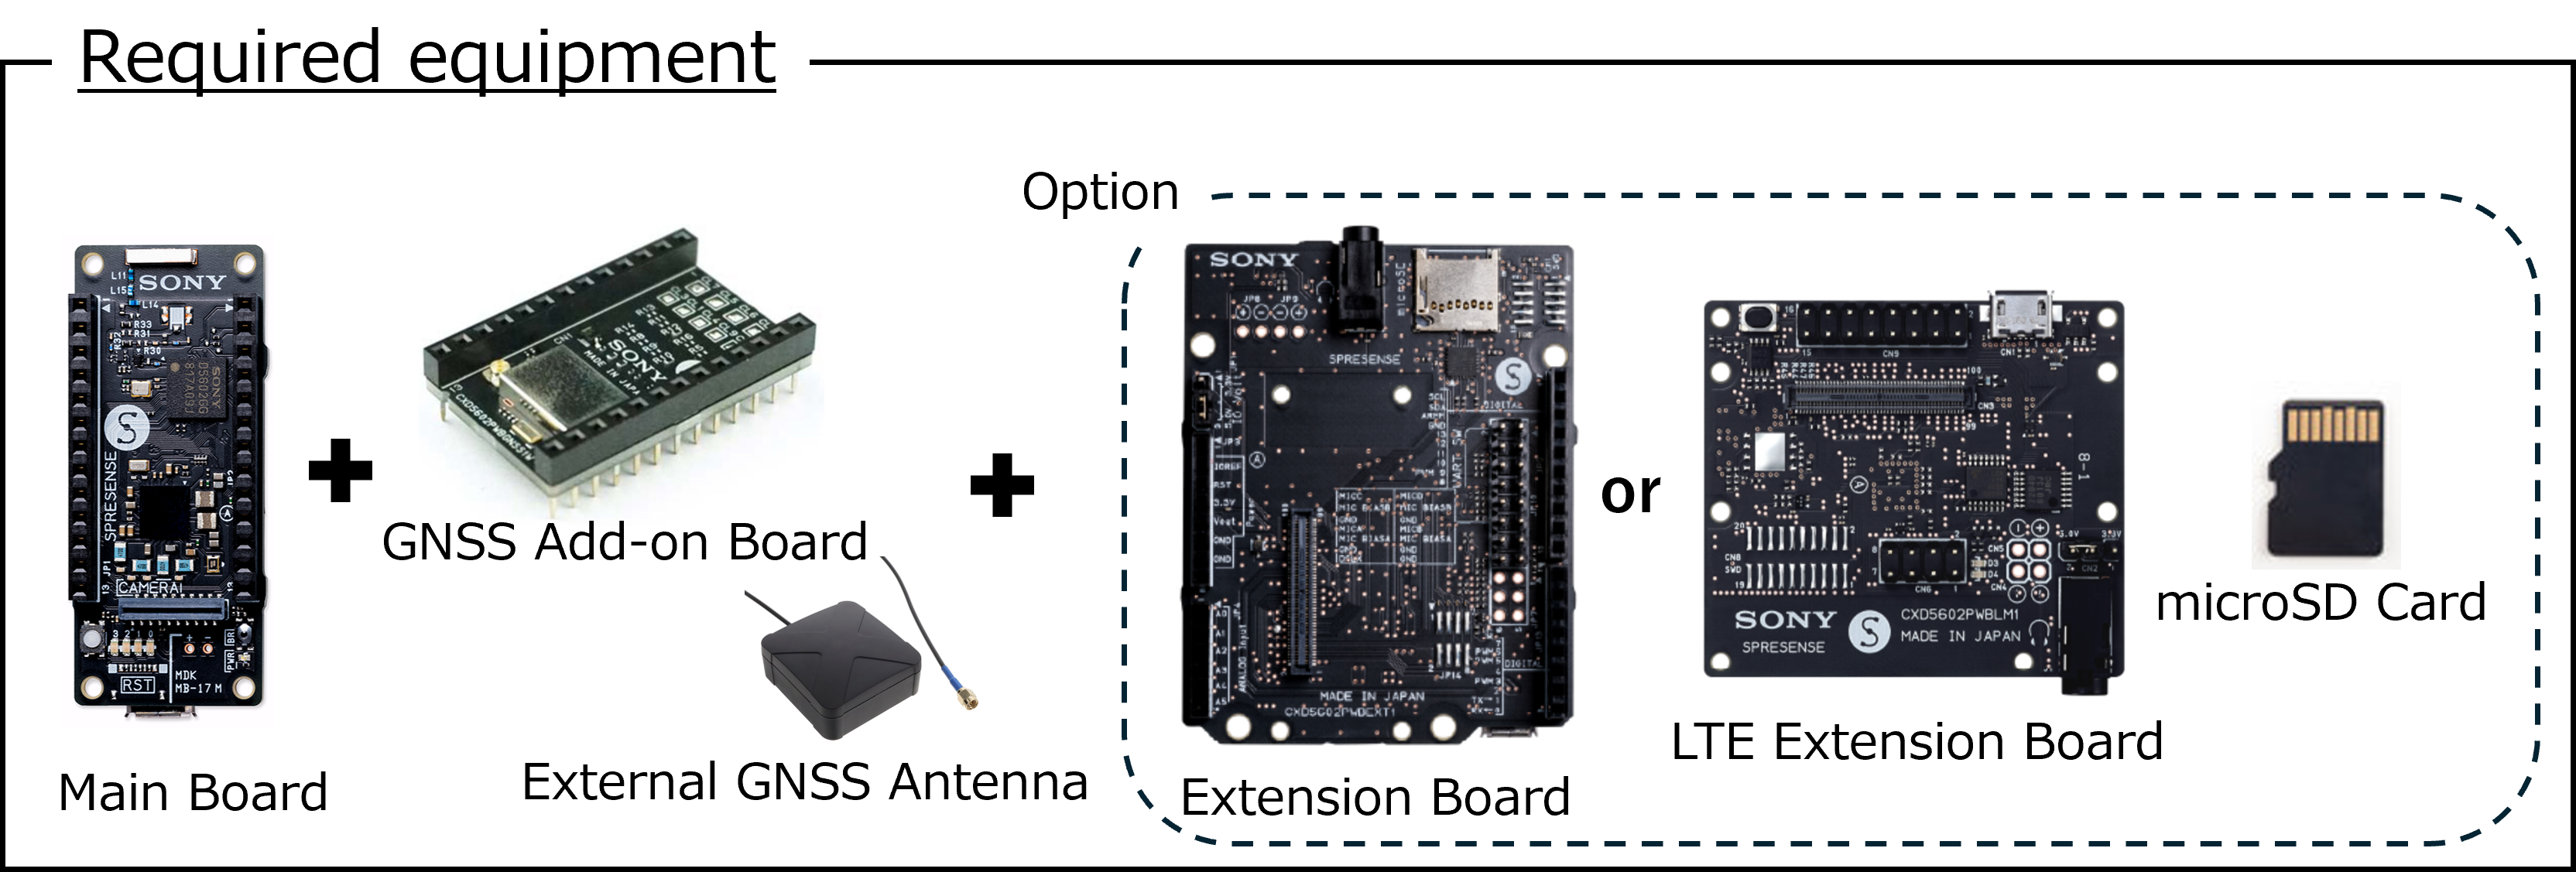
A separate external antenna is required to use the GNSS Add-on board.

  • gnss_addon command starts GNSS positioning and outputs the results to the terminal. With command options, it can also be used as a GPS data logger application, including output in NMEA format and file saving to SD card.

webserial gnss addon en

gnss_addon
gnss
gnss_atcmd
msconn

audiolite.spk
Try it now

This sample spk uses the audio feature.
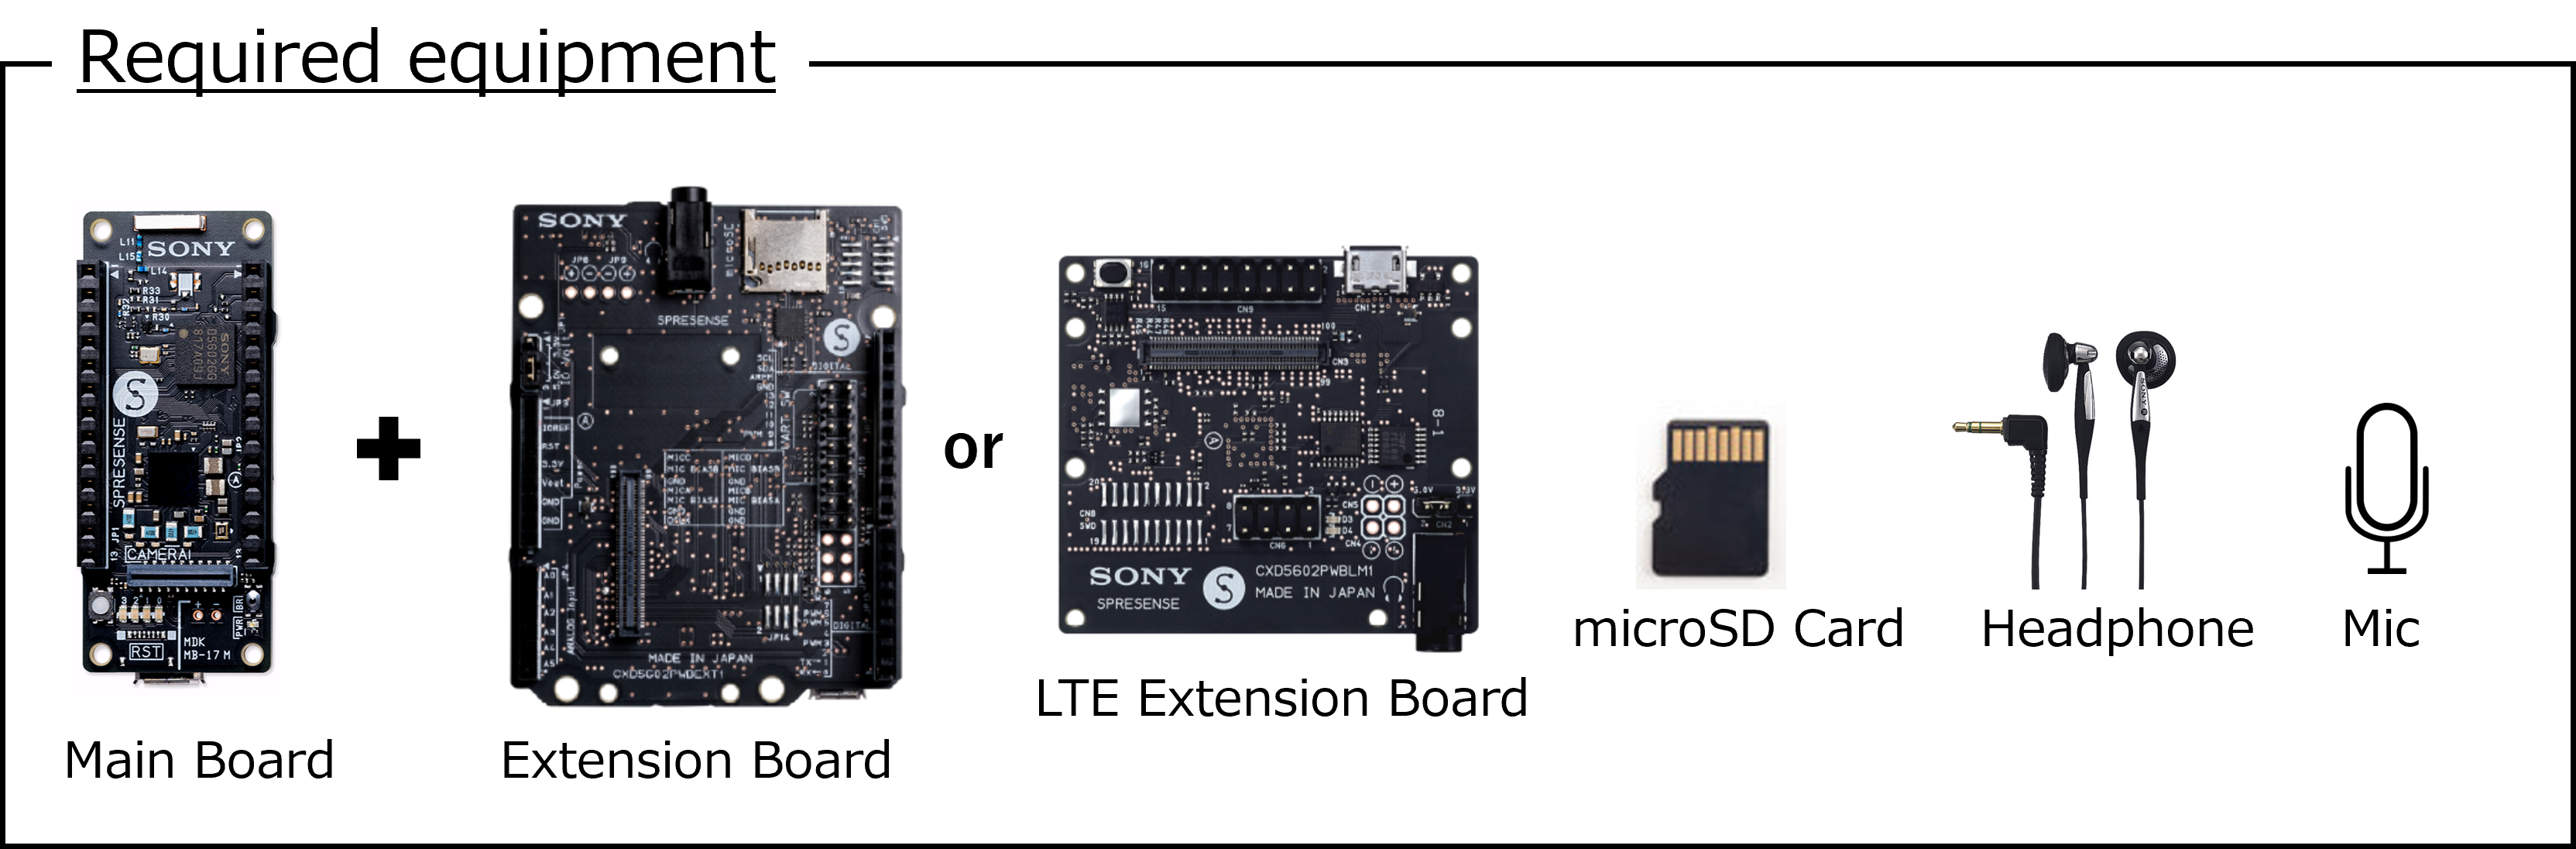
  • audiolite_mp3player or audiolite_wavplayer command plays MP3 or WAV (48kHz/16bit/2ch) in an SD card on the extension board through the headphone jack.

  • audiolite_wavrecorder command can record the sound of microphone connected to an extension board or LTE extension board to an SD card as a WAV file.

  • keyboard or mmlplayer command plays the FM sound through the headphone jack.

  • Several other commands using the audiolite feature are supported.

webserial audiolite en

audiolite_mp3player
audiolite_wavplayer
audiolite_wavrecorder
audiolite_through
audiolite_fft
audiolite_rec2net
audio_sin
audio_micinput
audio_through
keyboard, mmlplayer

camera-lcd.spk
Try it now

This sample spk uses a camera board and LCD.

The camera can work with either a standard camera board or an HDR camera board.
Please refer to here for the connection to the LCD(ILI9341).

  • camera -jpg 1 command take a JPEG picture and saves on the SD card or SPI-Flash.

  • camera 0 command starts streaming video and displays it on the LCD if an LCD (ILI9341) is connected to the extension board.

  • dsc command executes a simple camera application. UI (user interface) screen is displayed on the LCD, and the UI can be controlled from the keyboard.

  • nx or nxhello command displays graphics on the LCD.

webserial camera lcd en

camera
dsc
nx
nxhello
msconn

dnnrt.spk
Try it now

This is a sample spk for DNN(Deep Neural Network).

This is a sample application for handwritten digit recognition using LeNet-5, one using a training model generated by Sony Neural Network Console and the other using a training model generated by TensorFlow Lite.

  • In advance, store trained model data and input image file in SPI-Flash or SD card.

  • dnnrt_lenet /mnt/sd0/lenet-5.nnb /mnt/sd0/0.pgm command takes model data and an input image, performs DNN inference, and finally output the recognition results.

  • In the case of TensorFlow Lite, the learning model is embedded in the program. tflmrt_lenet default /mnt/sd0/0.pgm command outputs the recognition results.

webserial dnnrt en

dnnrt_lenet
tflmrt_lenet
msconn

lte.spk
Try it now

This is a sample spk for the LTE extension board.

  • First lte_sysctl command set up the APN for your SIM.

    • e.g.) lte_sysctl -a <APN> -v <auth> -u <user> -p <password> start

  • Then ifup eth0 command enables the network.

  • ifconfig command can check the IP address of your board.

  • lte_http_get command outputs the results gotten via an HTTP GET request.

  • lte_mqtt command executes MQTT publish/subscribe. For instructions on how to check the operation using the MQTT broker (test.mosquitto.org), click the command in the right column and refer to the tutorial.

  • lte_lwm2m command communicates with LwM2M server. For instructions on how to use Leshan LwM2M Server to check operation, click the command in the right column to see the tutorial.

webserial lte en

lte_sysctl
lte_http_get
lte_tls
lte_mqtt
lte_lwm2m
lte_websocket_gmocoin
lte_websocket_bitbank
lte_hibernation
wget
iperf
msconn

wifi-a.spk
Try it now
wifi-b.spk
Try it now
wifi-c.spk
Try it now

This is a sample spk for the Wi-Fi Add-on board.

The Wi-Fi Add-on Board iS110B is divided into three types, V1.0A, V1.0B, and V1.0C, depending on the board version. Install the appropriate spk file for your board version. (ref: https://idy-design.com/product/is110b.html)

  • First gs2200m command set the SSID and password to suit your environment.

    • e.g.) gs2200m <SSID> <password> &

  • ifconfig can check the IP address of your board.

  • ftpd_start -4 command starts the FTP daemon, allowing your PC on the same network to send and receive files via FTP transfer.

  • telnetd & command starts the telnet daemon, allowing you to login to the Spresense board from a telnet client on your PC.

  • webserver & command starts a web server, allowing clients such as PCs to access the web server.

  • wget command retrieves and displays the file from the server.

webserial wifi en
  • By connecting the camera board, multiwebcam command uses as a network camera, allowing a PC, smartphone or other browser to connect to the Spresense board via the network and display the camera images.

webserial multiwebcam en

gs2200m
ftpd_start, ftpc
tcpecho
telnetd
webserver
wget
multiwebcam
msconn

ble_mouse.spk
Try it now

This is a sample spk for the BLE Add-on board.

Short-circuit a jumper when using with extension board.

  • ble_mouse_central command connects and communicates with the BLE mouse. Mouse pointer, button and scroll operations are retrieved via BLE and displayed on the terminal.

webserial ble mouse en

ble_central
ble_peripheral
ble_mouse_central

ble_toio.spk
Try it now

This is a sample spk for the BLE Add-on board.

Short-circuit a jumper when using with extension board.

  • ble_toio_central command connects to the toio device and communicates with toio via BLE. Spresense can control various functions of toio, such as motor control, sound output, button, and motion detection.

webserial ble toio en

ble_central
ble_peripheral
ble_toio_central

eltres.spk
Try it now

This is a sample spk for the ELTRES Add-on board.

Short-circuit a jumper when using with extension board.

  • eltres_lpwa command sends data according to the ELTRES communication profile.

  • eltres_eeprom command reads and writes the EEPROM on the ELTRES module.

webserial eltres en

eltres_lpwa
eltres_eeprom

How to use

  1. Select the spk file you want to install to the board from the Select File list and press the [Download] button.

  2. If you want to install the latest bootloader at the same time, check the Install bootloader as well checkbox.

    • The EULA (End User License Agreement) will be displayed. Press the [Approve] button at the end of the EULA window to download the bootloader files and add them to the installation target.

  3. With the PC and Spresense main board connected via USB, press the [Connect Serial Port] button, select the serial port to which the Spresense board is connected, and then press the [Connect] button.

    • If the serial port is already connected to another terminal, Failed to open serial port. error will occur. Please disconnect the currently connected serial port.

    • If Prompt Not found error occurs, press the [Connect Serial Port] button and try again.

  4. If the writing is completed successfully, Installation completed. is displayed.

    • If any error occurs, please refresh your browser and try again.

  5. Once the installation is complete, open any serial terminal and confirm the operation of the sample spk.

WebSerial Flash Writer

Please click on the link to open the page of the flash writer tool.