1. Introduction
This chapter explains the installation and setup procedures for developing Spresense SDK applications on Visual Studio Code (hereafter called as VS Code) provided by Microsoft.
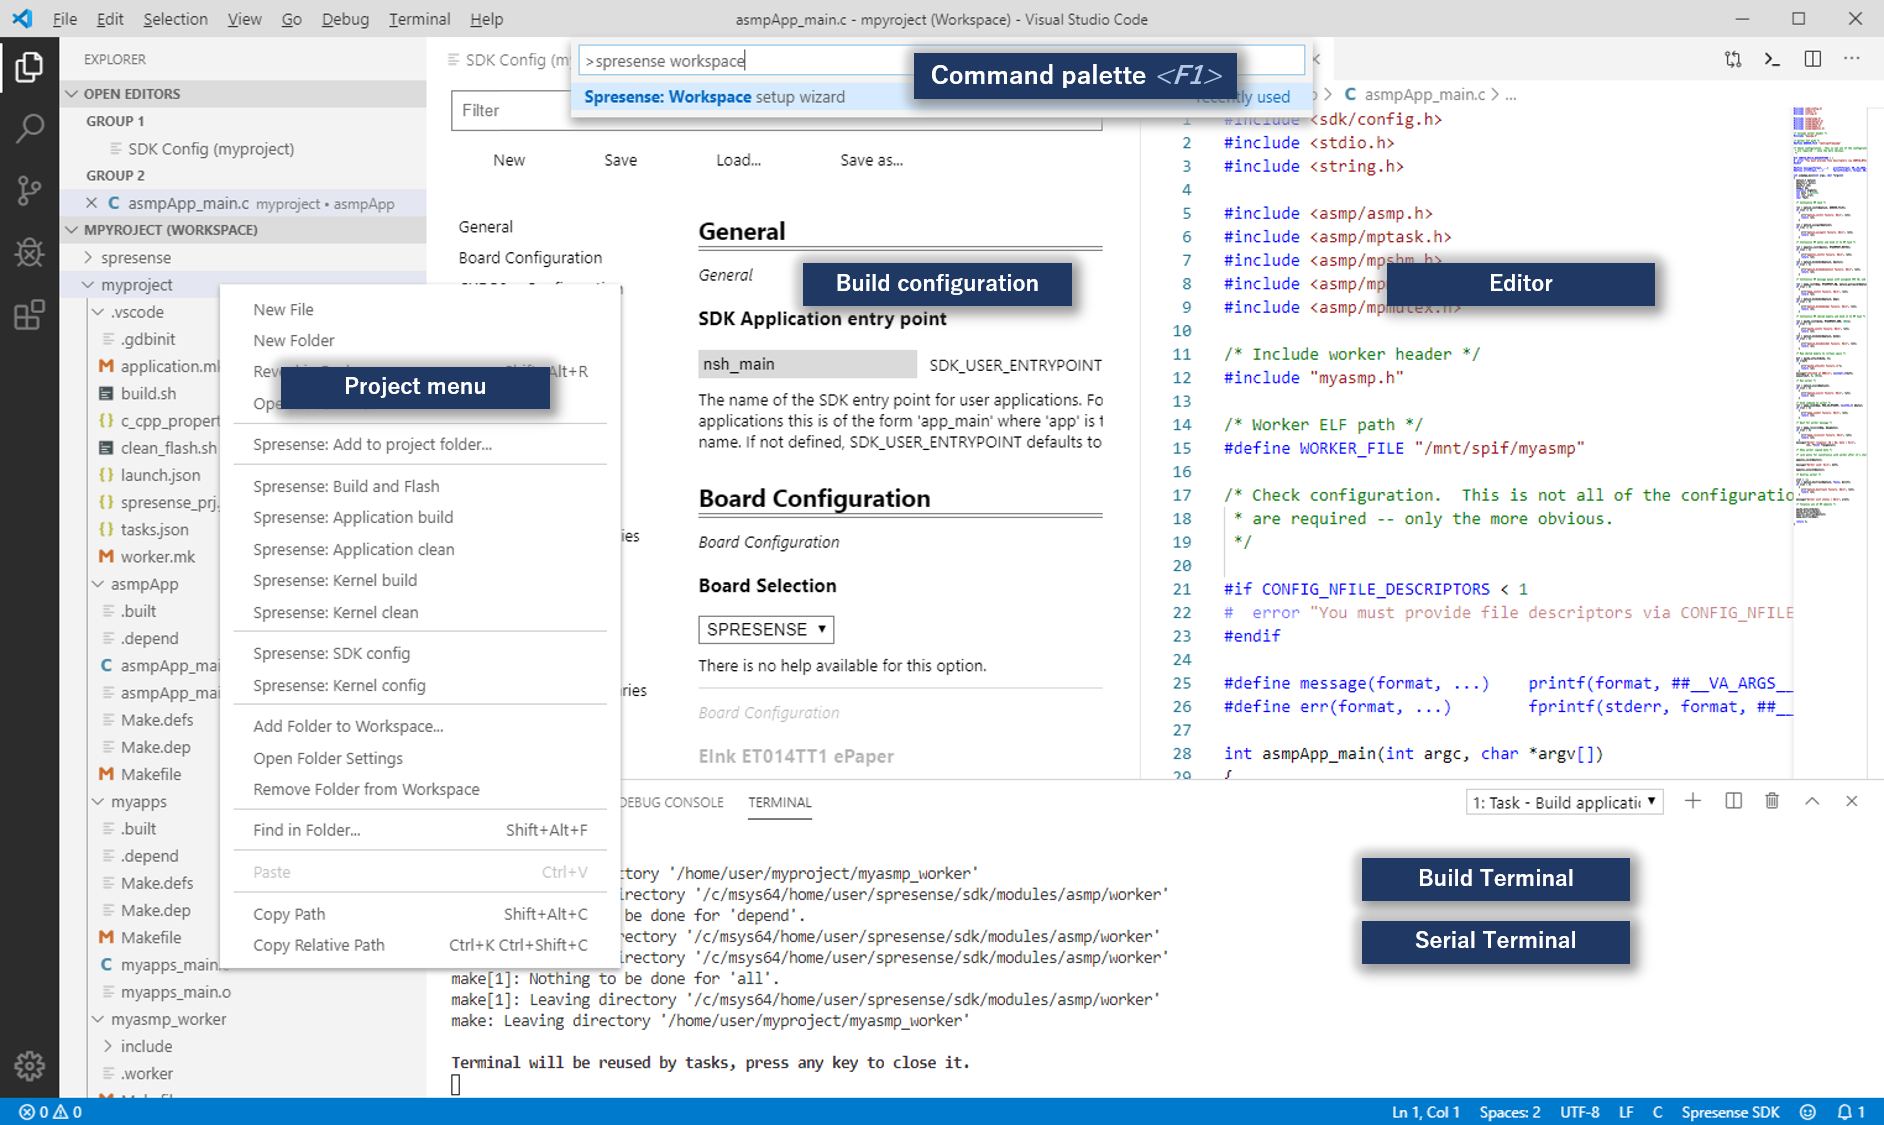
Spresense VSCode IDE is an extension of VS Code specializing in Spresense SDK application development. This extension adds the following functions to support development with a unified interface from project creation to ICE debugging.
-
Automatic creation of settings for building and debugging applications
-
Create application templates, including multi-core applications
-
Configuring builds with the GUI
-
Serial terminal to check Spresense operation
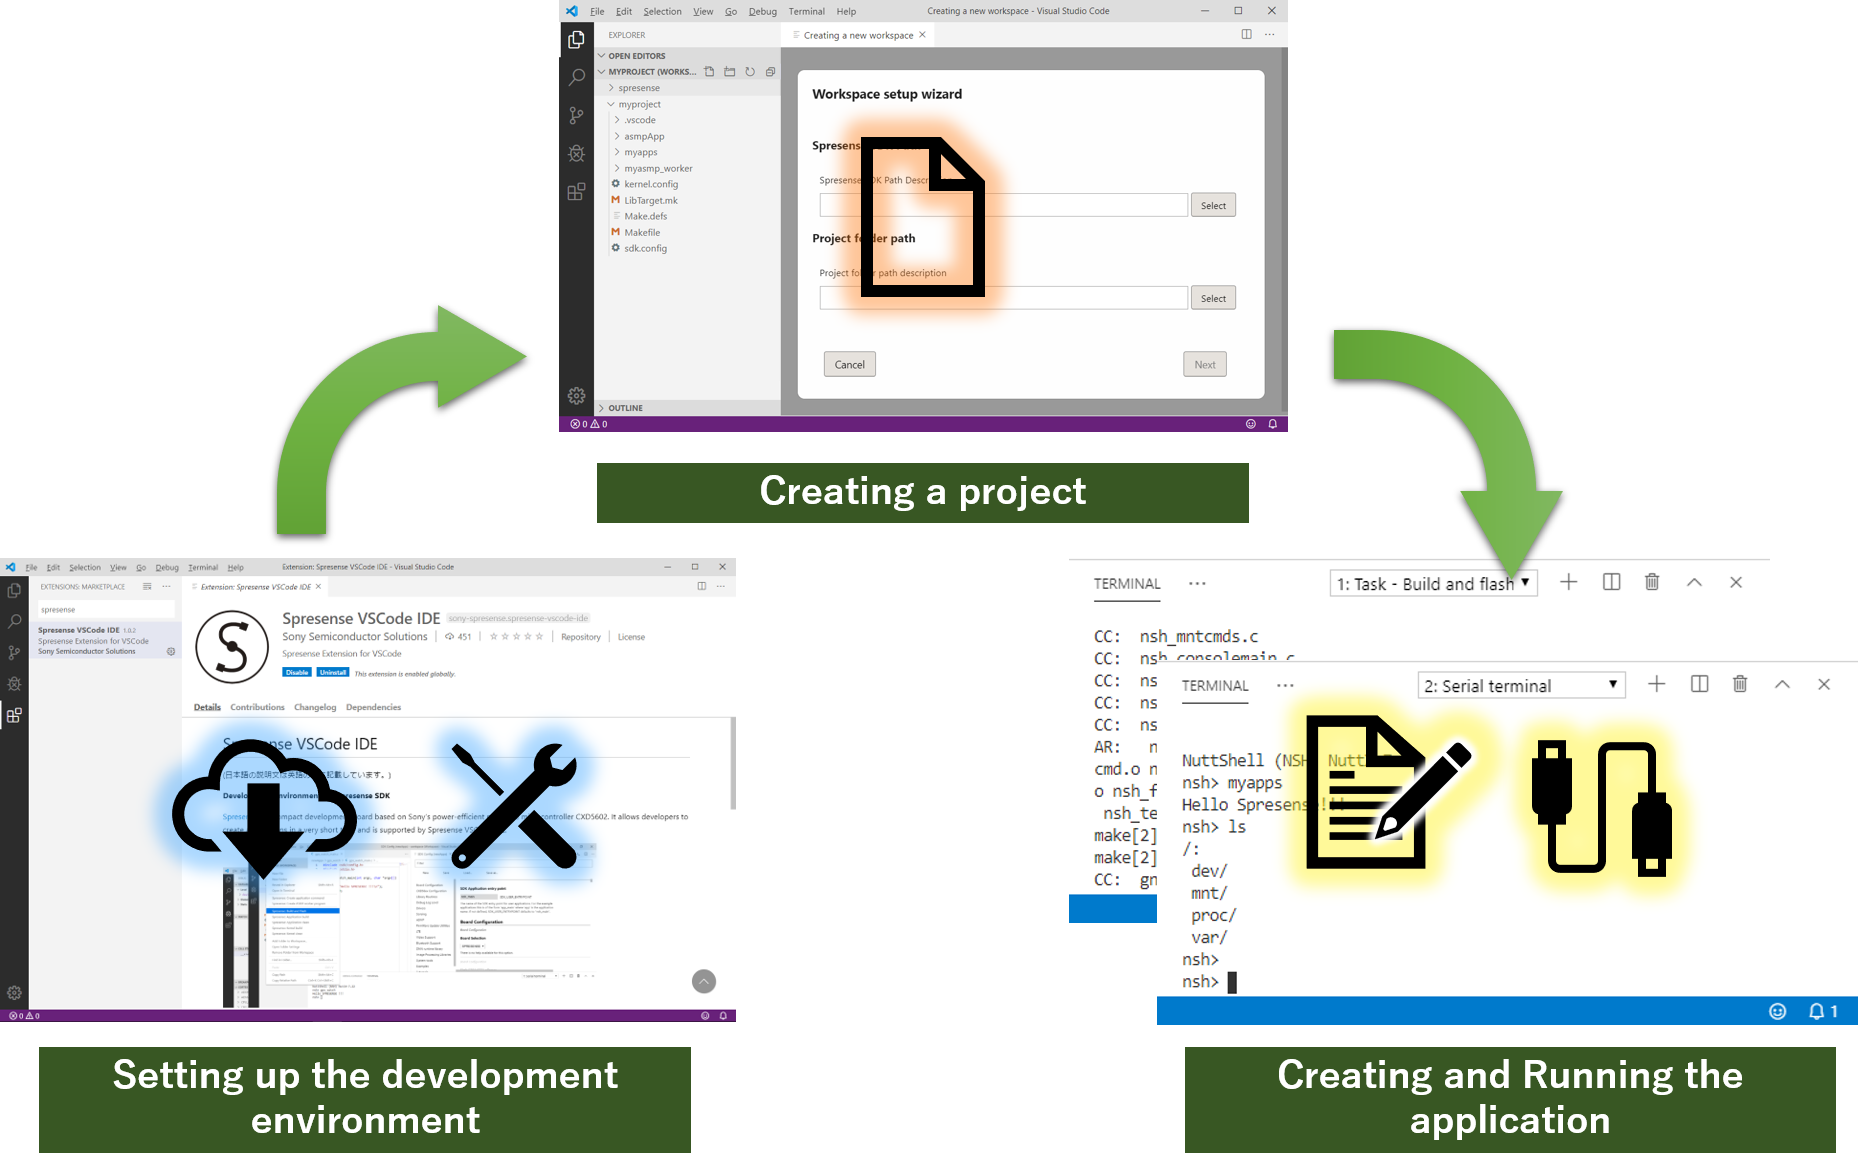
Using the above functions, here is an example of adding a simple sample application myapps to a project called myproject, and explains how to run the application by Spresense.
2. Setup the Spresense VSCode IDE
Install the Spresense SDK application development environment using the following procedure. As a result, a series of development environment from project creation to debugging is prepared on VS Code.
| If you already have a GUI development environment that is setup by default to Spresense SDK 入门指南(CLI版), you do not need to execute the Development environment section steps. |
2.1. Development environment
You can develop Spresense SDK on Linux/Windows/macOS. Please setup development environment for your appropriate OS.
Supported Operation System
-
Linux (64bit)
-
Ubuntu 16.04 or later
-
-
Windows (64bit)
-
10 (with MSYS2 console)
-
11 (with WSL2 console)
-
-
macOS
-
High Sierra (10.13) or later
-
| Does not support 32bit version OS |
2.1.1. Setup for Linux
-
Serial Configuration
Add user to
dialoutgroupsudo usermod -a -G dialout <user-name>Please logout and login after running the above command.
-
Install development tools
wget https://raw.githubusercontent.com/sonydevworld/spresense/master/install-tools.sh
bash install-tools.sh
If you run wget command and install-tools.sh via proxy server, set your proxy server as below.
export http_proxy=http://<your proxy server>:<port number>
export https_proxy=http://<your proxy server>:<port number>
The version of the GNU Arm Embedded Toolchain (compiler) is updated in the SDKv2.3 and SDKv3.0 releases.
SDK version GNU Arm Toolchain version SDKv3.0 or later
gcc-arm-none-eabi-10.3-2021.10
SDKv2.3 or later
gcc-arm-none-eabi-9-2019-q4-major
SDK v2.2 or earlier
gcc-arm-none-eabi-7-2018-q2-update
If you want to reinstall including the new compiler, get the latest version of
install-tools.shand runinstall-tools.shwith the-roption.bash install-tools.sh -rIf you want to check the compiler version you have already installed, run
arm-none-eabi-gcc -vaftersource ~/spresenseenv/setup. The version information will be displayed on the last line.arm-none-eabi-gcc -v (snip) gcc version 10.3.1 20210824 (release) (GNU Arm Embedded Toolchain 10.3-2021.10)And run this command to activate installed tools.
source ~/spresenseenv/setupThis command must run in every terminal window. If you want to skip this step, please add this command in your
${HOME}/.bashrc.The tool chain is installed in spresenseenv/usr/binunder the home directory. -
Clone the Spresense SDK with submodule
git clone --recursive https://github.com/sonydevworld/spresense.gitIf you want to update a spresense.git repository that is already downloaded by git clone, please refer to How to get specified Spresense SDK version .
2.1.2. Setup for Windows 10 (for MSYS2)
-
Install MSYS2
-
Install development tools
Run
MSYS2 MSYSfrom start menu, and run following commands.MSYS2 MinGW 64-bitandMSYS2 MinGW 32-bitis not supported. Please useMSYS2 MSYS.curl -L https://raw.githubusercontent.com/sonydevworld/spresense/master/install-tools.sh > install-tools.sh bash install-tools.sh
If you run curl command and install-tools.sh via proxy server, set your proxy server as below.
export http_proxy=http://<your proxy server>:<port number> export https_proxy=http://<your proxy server>:<port number>
The version of the GNU Arm Embedded Toolchain (compiler) is updated in the SDKv2.3 and SDKv3.0 releases.
SDK version GNU Arm Toolchain version SDKv3.0 or later
gcc-arm-none-eabi-10.3-2021.10
SDKv2.3 or later
gcc-arm-none-eabi-9-2019-q4-major
SDK v2.2 or earlier
gcc-arm-none-eabi-7-2018-q2-update
If you want to reinstall including the new compiler, get the latest version of
install-tools.shand runinstall-tools.shwith the-roption.bash install-tools.sh -rIf you want to check the compiler version you have already installed, run
arm-none-eabi-gcc -vaftersource ~/spresenseenv/setup. The version information will be displayed on the last line.arm-none-eabi-gcc -v (snip) gcc version 10.3.1 20210824 (release) (GNU Arm Embedded Toolchain 10.3-2021.10)And run this command to activate installed tools.
source ~/spresenseenv/setupThis command must run in every terminal window. If you want to skip this step, please add this command in your
${HOME}/.bashrc.The tool chain is installed in /opt/spresenseenv/usr/bin. -
Clone the Spresense SDK with submodule
git clone --recursive https://github.com/sonydevworld/spresense.gitIf you want to update a spresense.git repository that is already downloaded by git clone, please refer to How to get specified Spresense SDK version . -
Install USB serial driver
User must install before connecting Spresense board to the PC. Please download and install from below.
-
CP210x USB to serial driver (v11.1.0) for Windows 10/11
If you use the latest Silicon Labs driver (v11.2.0) in Windows 10/11 environment, USB communication may cause an error and it may fail to flash the program. Please download v11.1.0 from the above URL and install it.
-
2.1.3. Setup for Windows 11 (for WSL2)
-
Install WSL2
Install WSL2 according to the following procedure
-
Open PowerShell console
-
Run
wslcommand to install WSL2.wsl --installThe following command can be used to specify the version of Ubuntu to be installed as WSL2. (The following command is an example of installing Ubuntu 20.04.)
wsl --install -d Ubuntu-20.04 -
Open the WSL2 console.

-
When starting up for the first time, you will be asked to create an account as shown below, and enter a user name and password.

-
Once the account is created and the console opens as shown below, WSL2 setup is complete.

-
-
Install development tools
Open the
WSL2console from start menu, and run following commands.curl -L https://raw.githubusercontent.com/sonydevworld/spresense/master/install-tools.sh > install-tools.sh bash install-tools.sh
If you run curl command and install-tools.sh via proxy server, set your proxy server as below.
export http_proxy=http://<your proxy server>:<port number> export https_proxy=http://<your proxy server>:<port number>
The version of the GNU Arm Embedded Toolchain (compiler) is updated in the SDKv2.3 and SDKv3.0 releases.
SDK version GNU Arm Toolchain version SDKv3.0 or later
gcc-arm-none-eabi-10.3-2021.10
SDKv2.3 or later
gcc-arm-none-eabi-9-2019-q4-major
SDK v2.2 or earlier
gcc-arm-none-eabi-7-2018-q2-update
If you want to reinstall including the new compiler, get the latest version of
install-tools.shand runinstall-tools.shwith the-roption.bash install-tools.sh -rIf you want to check the compiler version you have already installed, run
arm-none-eabi-gcc -vaftersource ~/spresenseenv/setup. The version information will be displayed on the last line.arm-none-eabi-gcc -v (snip) gcc version 10.3.1 20210824 (release) (GNU Arm Embedded Toolchain 10.3-2021.10)And run this command to activate installed tools.
source ~/spresenseenv/setupThis command must run in every terminal window. If you want to skip this step, please add this command in your
${HOME}/.bashrc.The tool chain is installed in /opt/spresenseenv/usr/bin. -
Clone the Spresense SDK with submodule
git clone --recursive https://github.com/sonydevworld/spresense.gitIf you want to update a spresense.git repository that is already downloaded by git clone, please refer to How to get specified Spresense SDK version . -
Install USB serial driver
User must install before connecting Spresense board to the PC. Please download and install from below.
-
CP210x USB to serial driver (v11.1.0) for Windows 10/11
If you use the latest Silicon Labs driver (v11.2.0) in Windows 10/11 environment, USB communication may cause an error and it may fail to flash the program. Please download v11.1.0 from the above URL and install it.
-
2.1.4. Setup for macOS
-
Install development tools provided by Apple
Open the
Teminaland run following command.xcode-select --install -
Install Python3
-
Install wget (Necessary to build some of NuttX application tools)
/bin/bash -c "$(curl -fsSL https://raw.githubusercontent.com/Homebrew/install/master/install.sh)" brew install wget
-
Install flock (Necessary to build for SDKv3.2.0 or later)
brew tap discoteq/discoteq brew install flock
-
Install development tools
curl -L https://raw.githubusercontent.com/sonydevworld/spresense/master/install-tools.sh > install-tools.sh
bash install-tools.sh
If you run curl command and install-tools.sh via proxy server, set your proxy server as below.
export http_proxy=http://<your proxy server>:<port number>
export https_proxy=http://<your proxy server>:<port number>
The version of the GNU Arm Embedded Toolchain (compiler) is updated in the SDKv2.3 and SDKv3.0 releases.
SDK version GNU Arm Toolchain version SDKv3.0 or later
gcc-arm-none-eabi-10.3-2021.10
SDKv2.3 or later
gcc-arm-none-eabi-9-2019-q4-major
SDK v2.2 or earlier
gcc-arm-none-eabi-7-2018-q2-update
If you want to reinstall including the new compiler, get the latest version of
install-tools.shand runinstall-tools.shwith the-roption.bash install-tools.sh -rIf you want to check the compiler version you have already installed, run
arm-none-eabi-gcc -vaftersource ~/spresenseenv/setup. The version information will be displayed on the last line.arm-none-eabi-gcc -v (snip) gcc version 10.3.1 20210824 (release) (GNU Arm Embedded Toolchain 10.3-2021.10)And run this command to activate installed tools.
source ~/spresenseenv/setupThis command must run in every terminal window. If you want to skip this step, please add this command in your
${HOME}/.bash_profile.The tool chain is installed in spresenseenv/usr/binunder the home directory. -
Clone the Spresense SDK with submodule
git clone --recursive https://github.com/sonydevworld/spresense.gitIf you want to update a spresense.git repository that is already downloaded by git clone, please refer to How to get specified Spresense SDK version . -
Install USB serial driver
User must install before connecting Spresense board to the PC. Please download and install from below.
On High Sierra (10.13) and later, the installation of the driver may be blocked. Please allow this driver from System Preferences Security & Privacy pane. See Apple Technical Note TN2459 "User-Approved Kernel Extension Loading" for more information.
2.2. Installation of VSCode
-
Download the VSCode installer from the following site.
-
Run the downloaded installer
-
For Windows
-
Start the installer (VSCodeUserSetup.exe).
-
Proceed with installation according to the dialog.
-
-
For macOS
-
Unzip the installation file (VSCode-darwin-stable.zip).
-
Move the unzipped Visual Studio Code to the application.
-
-
For Ubuntu
-
Install from the downloaded file (code_1.37.1-xxx.deb) with the following command.
$ sudo dpkg -i code_1.37.1-xxx.deb
-
-
-
Launch the installed VS Code

2.3. Installing the Spresense extension
| If you have installed the Spresense Extension α version , please uninstall it. If you do not uninstall, the Spresense extension will not work properly. |
-
Search
Spresenseon the extension screen. -
Spresense VSCode IDEwill appear in the list and click on it. -
Click
Installbutton on the details displayed on the right side of the window.
-
The installation is complete when the message
Installation is completeappears as shown in the screen below.
The Spresense VSCode IDE will automatically install these extensions for use with C/C++ for Visual Studio CodeandCortex Debug.
2.3.1. Installing the Spresense extension on Remote-WSL2 (Windows 11 only)
In order to develop on WSL2 on Windows 11, it is necessary to open a remote window of VSCode and install the Spresense extension again. Follow the steps below to install the Spresense VSCode IDE on the remote window.
-
Click the following icon in the lower left corner of the VSCode screen.

-
Select the
New WSL Window using Distro… -
Select the distribution of WSL2 you have installed.

-
Confirm that a remote window has opened with the lower left corner of the screen as shown below.

-
Search for
Spresensein the Extensions screen. -
Spresense VSCode IDEwill appear in the list and click on it. -
Click
Installbutton on the details displayed on the right side of the window.
2.3.2. Setting MSYS2 Installation Path (Windows 10 only)
In this section, we will set the MSYS2 on VS Code.
-
Press
F1to display the command palette. -
Input
spresense msysto filtering commands, and selectMSYS2 path(Windows only): Location for Msys install path.
-
When the folder selection screen appears, select the MSYS2 path and click
Open.
-
This completes the environment for developing Spresense applications on VS Code.
3. Creating an application project
This chapter explains the procedure for creating the application project myproject in the VS Code workspace.
3.1. Creating a workspace
To start developing your application, create a workspace for Spresense by adding an Spresense SDK folder and a project folder in the workspace. When creating a project, you can create an empty folder and add it to this workspace to create a project.
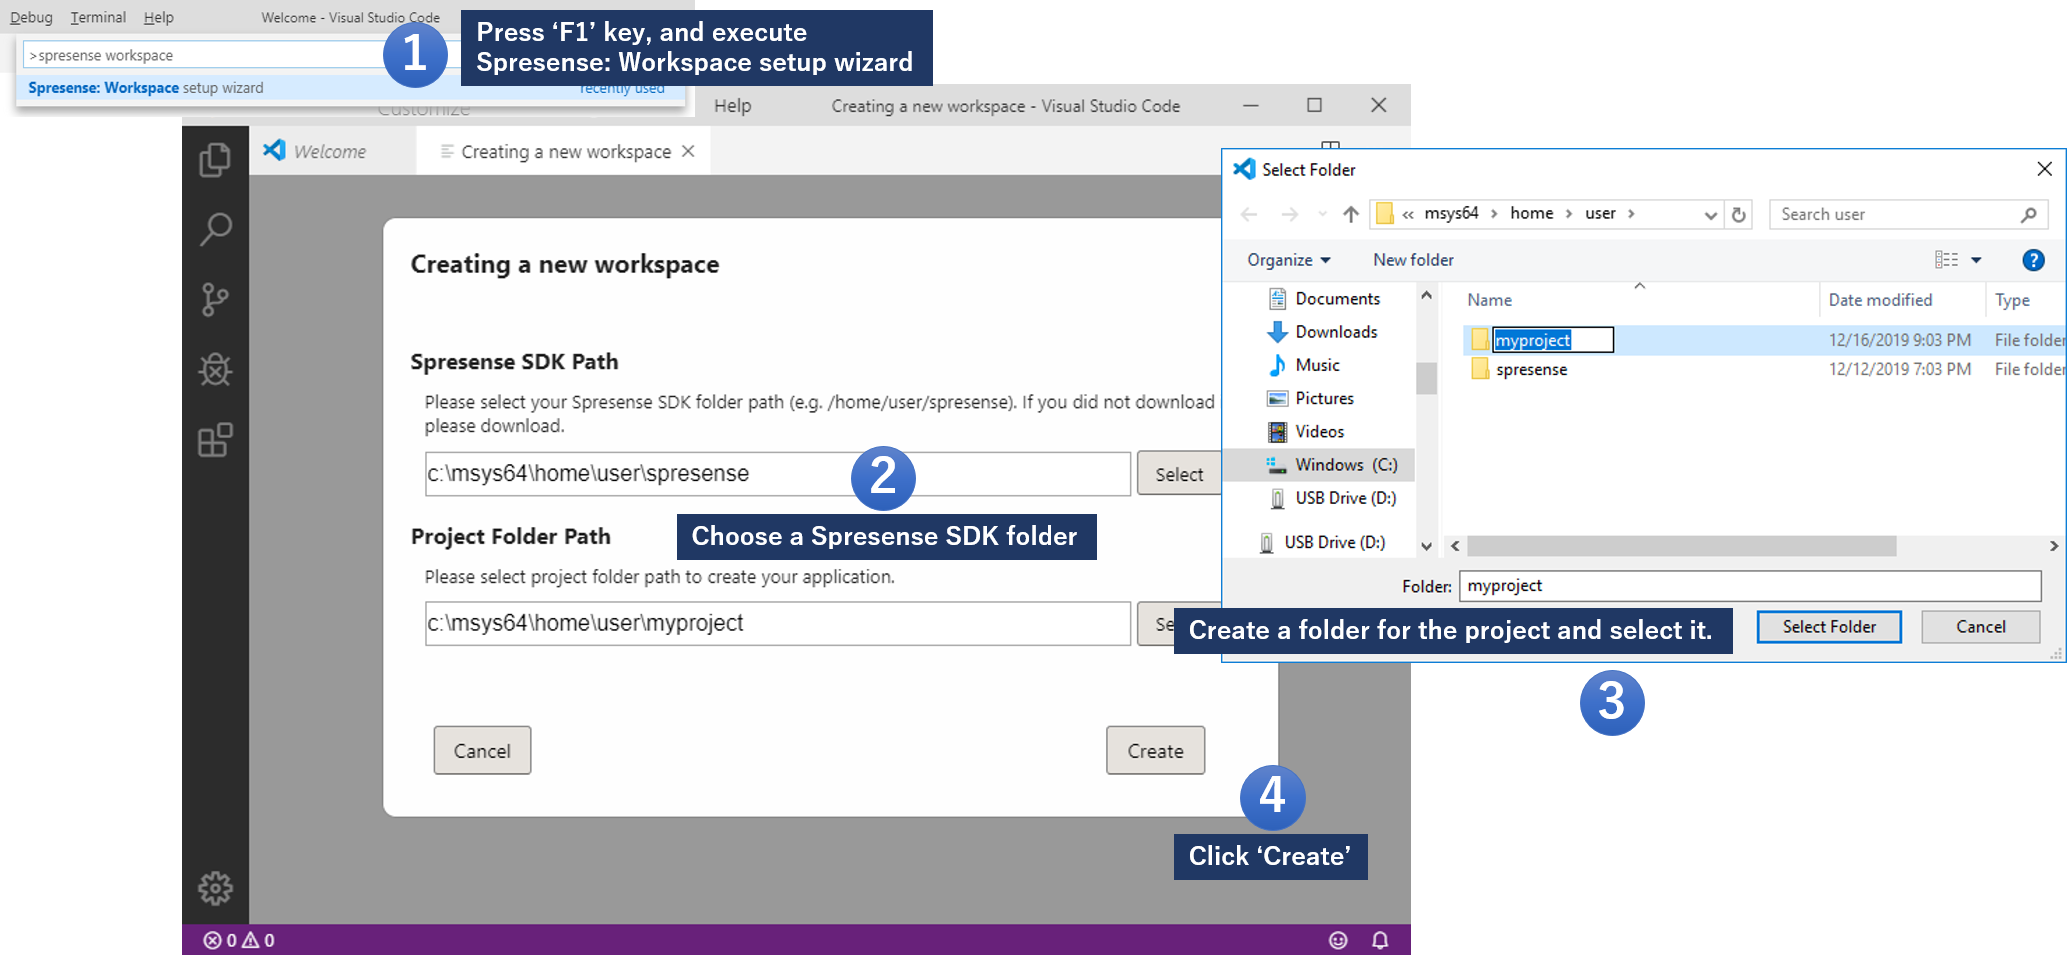
Here, create a workspace with the following configuration using the "Workspace Setup Wizard".
| Setting items | Setting details |
|---|---|
Spresense SDK folder |
C:\msys64\home\user\spresense |
Project folder |
C:\msys64\home\user\myproject |
Workspace file |
C:\msys64\home\user\myproject.code-workspace |
-
Press
F1`key to open command palette and choose `Spresense: Workspace setup wizard.To create a new workspace, the workspace (folder) on the window must be closed. -
Select the Spresense SDK folder that use for project into
Spresense SDK pathform. -
Select the newly created project folder into
Project folder pathform. -
Click
Createto complete the wizard. -
"Do you trust the authors of the files in this folder?" dialog box will appear, select
Yes.
If you do not select Yesin this dialog, the functions of Spresense VSCode IDE, such as building and displaying the serial terminal, will not work properly. If you selectNo, please refer to Terminal does not open correctly (Windows) and set up to trust the authors of the file. -
If
Spresense setup: Setup complete.is displayed, setup is complete.
-
Select
Save Workspace As…fromFileto save a created workspace.
You can reopen the newly created workspace by opening the saved workspace file from “File”→ “Open Workspace …”. -
If the workspace is completed as shown below, it is complete.

| You can also create a workspace by adding folders to the workspace in the order of the Spresense SDK, project folder without using the above workspace setup wizard. |
To add multiple project folders to the workspace, right-click on the source tree and execute Add folder to workspace….
|
3.2. About files included in the project folder
The project folder contains the following 4 types of files.
-
Project configuration file
Files saved in
.vscodedirectly under the project folder. Basically, the files inside are automatically generated, so there is no need to create a new one. -
Application commands (created in the following chapters)
Contains programs to be executed with commands available on the NuttShell console. By implementing the program in this, you can create original commands. For example, the command
myappscan be executed with NuttShell for the following.NuttShell (NSH) NuttX-8.2 nsh> myapps <<Output result>> -
ASMP worker program (created in the following chapter)
A program that uses the multi-core feature of Spresense . By creating this program and using it from the above application commands, you can add multi-core applications.
-
Makefile (
LibTarget.mk,Make.defs,Makefile) (created in the following chapter)This file is required to build the entire project. If this file is changed, it may not build correctly.
3.3. About the Project Menu
Once the workspace is created and the application project is ready to be created, the following Spresense project menu will be available.
image::vscode_project_menu_en.png[width="40%"].
3.3.1. Spresense project menu list
-
Spresense: Add to project folder…
Used to add application commands or ASMP workers to the project. See Adding application commands for more information.
-
Spresense: SDK Config
Used to customize the build configuration of the project. See Build configuration for details.
-
Spresense: Application Build
Used to build the application you have created. See Build the Project for details.
-
Spresense: Application clean
Used to delete files created when building an application. Select this menu item to clear the build environment.
-
Spresense: Build and Flash
Used to build an application and flash it to Spresense. For more information, please refer to Flashing the application into Spresense board and Check operation.
3.3.2. How to open the project menu
The project menu can be opened by right-clicking on the workspace explorer. You can also run the menu by folder, depending on where you right-click.
As shown in the figure below, there is a Spresense SDK folder part and a project folder part, so right-click on the folder of the menu you want to open.
(If you want to open the SDK config in the project folder, right-click inside the red dashed line in the figure below and select SDK Config.)
image::vscode_project_menu_folder_en.png[width="40%"].
4. Create and run application "myapps"
The environment for developing applications in the previous chapters is in place. Here, the procedure to actually create the application "myapps" on VS Code is explained in the following flow. "myapps" is a simple application that only displays "Hello Spresense !!!"
4.1. Adding application commands
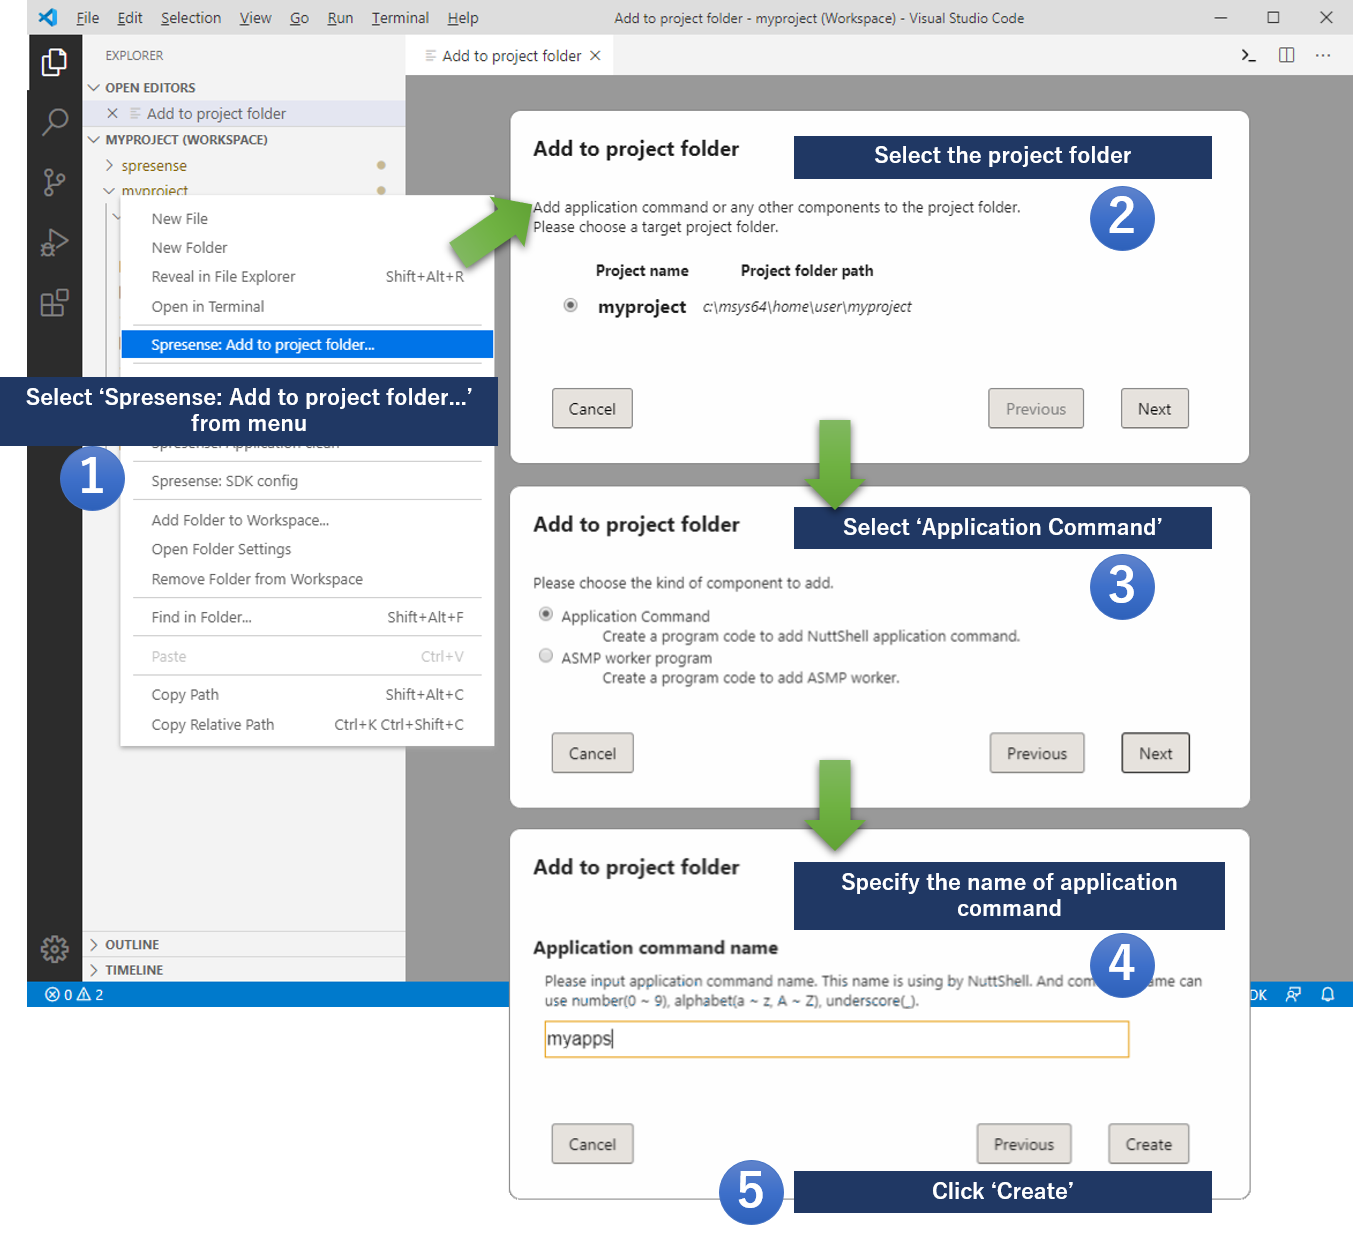
This section describes the procedure for adding the application command myapps that only displays Hello Spresense!!!.
| Setting items | Setting details |
|---|---|
Target project folder |
C:\msys64\home\user\myproject |
Application command name |
myapps |
-
Right click on the project folder created in the previous chapter (
myproject) and selectSpresense: Add to project folder…. -
In the opened
Add to Project Folderdialog, select the project folder to which you want to add application commands and clickNext. -
Select
Application Commandfrom the item type and clickNext. -
Enter the name of the application command you want to add to
Application command name. (In this example, it ismyapps.)
4.1.1. About added files
| File(Folder) | Detail | |
|---|---|---|
|
This folder contains the command program and the Makefile for building application command. |
|
|
The main source file for the command. Simply edit this file after creating a new application. |
|
|
Makefile for building commands. |
|
|
Makefile for customizing commands. You can describe new added files and flags used for building. |
|
4.2. Application implementation
In this chapter, we will implement the application command program to display Hello Spresense !!!.
4.2.1. Edit the main source code
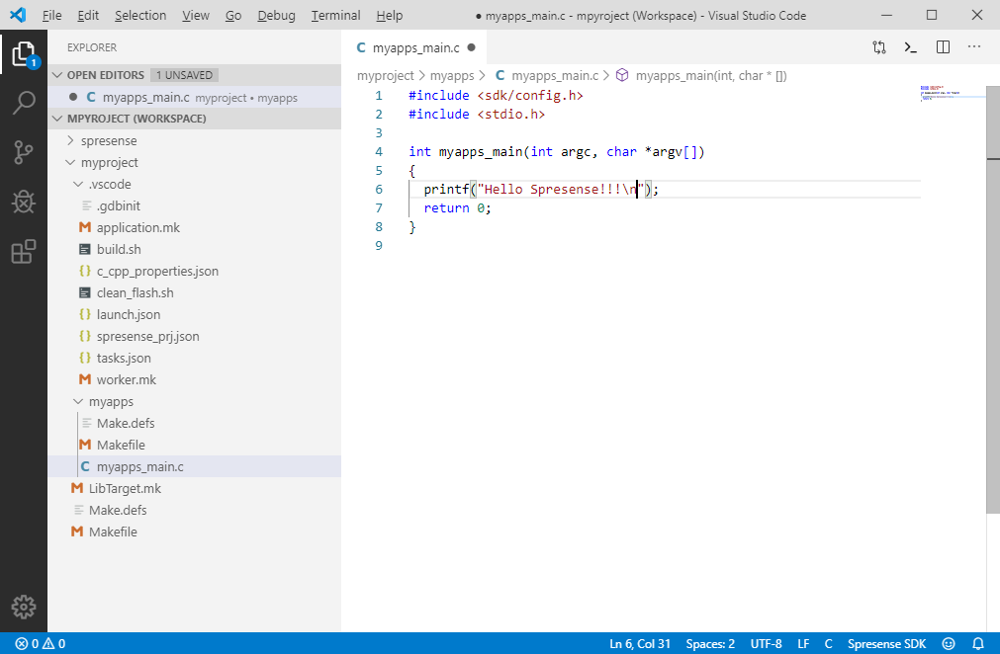
The main source code (myapps_main.c in this example) is created when an application command is added and displayed in the editor.
Edit the main source code as follows:
#include <sdk/config.h>
#include <stdio.h>

int myapps_main(int argc, char *argv[])
{
  printf("Hello Spresense!!!\n"); (1)
  return 0;
}| 1 | Implement the process you want to add. |
4.3. Build configuration
In the previous chapter, you added an application to the project folder and implemented the program. In order to build these programs properly, it is necessary to configure the build according to the function.
This section describes the configuration and steps required to build myapps.
There are no special features other than running Spresense this time, so the following will configure the kernel and SDK.
| In SDK v1.5 or earlier, it is necessary to perform kernel config separately from SDK config. Please refer to How to build SDK with SDK v1.5 or earlier for kernel configuration and build methods. |
| For details of the configuration tool, refer to About Build configuration. |
| Configuration | Detail |
|---|---|
SDK |
Save default configuration(No selecting presets.) |
4.3.1. SDK configuration
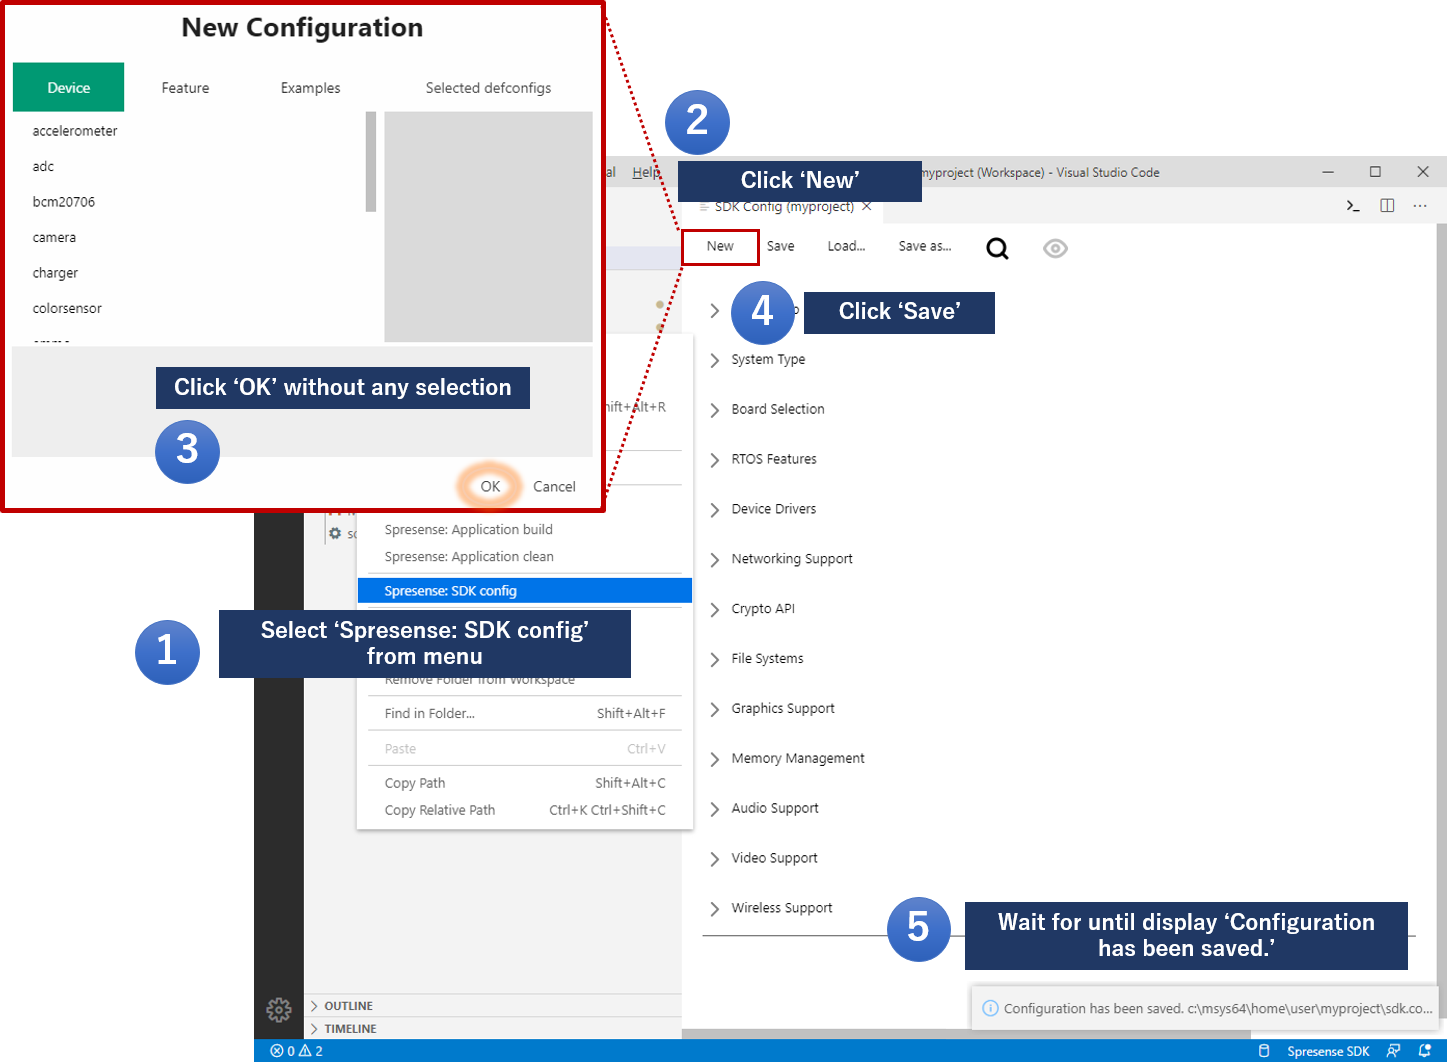
Create a new configuration without selecting a preset.
-
Right click on the project folder and select
Spresense: SDK Configfrom the project menu.If another 'Kernel config' or 'SDK config' is already open, please close it beforehand. Only one config window can be open at a time. -
Click
Newto open the SDK preset list. -
Click
OK. -
Click
Saveto save. -
If
Configuration has been saved.is displayed, SDK configuration is complete.It may take some time to save depending on the environment. Please wait for a completion message.
4.4. Build the project
Up to the previous section, you have created a project, added a program, and configured it.
This section explains how to build the created program into a binary(.spk file) that can be flash into Spresense.
Build application with the NuttX kernel of Spresense SDK. Since various functions are included, it takes considerable time. (Depending on your environment, it may take over ten minutes.)
| In SDK v1.5 or earlier, it is necessary to perform kernel build separately from application build. Please refer to How to build SDK with SDK v1.5 or earlier for kernel configuration and build methods. |
4.4.1. Building the application
-
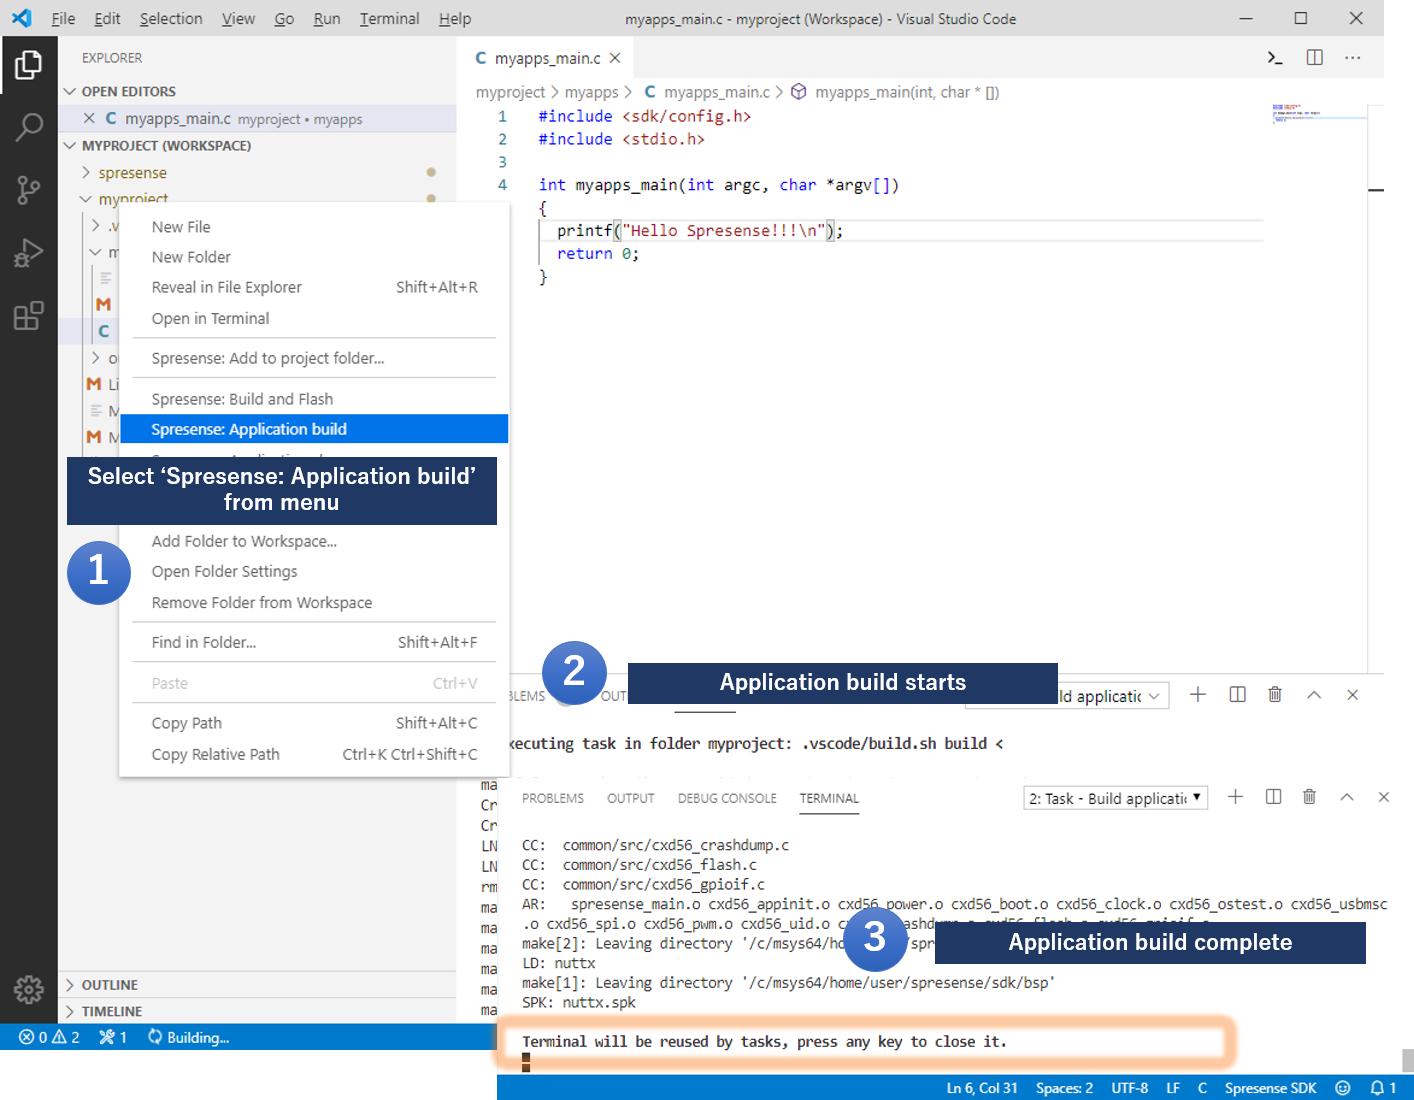
Right click on the project folder you want to build and select
Spresense: Application buildfrom the project menu. -
The application build will start, so wait for it to complete.
-
If
Terminal will be reused by tasks, press any key to close it.is displayed, the Application build is complete.
4.5. Flashing the application into Spresense board and Check operation
In the previous sections, we explained everything from creating a project to creating a binary that is flashing into Spresense.
This section describes the procedure from flashing the actually created binary to Spresense to checking the operation.
4.6. Setting the serial port
-
Connect the PC and Spresense via USB.
-
Press
F1key to display the command palette.
-
Input
spresense serial portto narrow down the command. -
Choose
Spresense: Serial port selection.
-
Choose serial port for Spresense from list.

4.6.1. Flashing build binaries
| If you are using Spresense SDK for the first time or updating the version, you need to update the boot loader. Please refer to here to update the boot loader. |
-
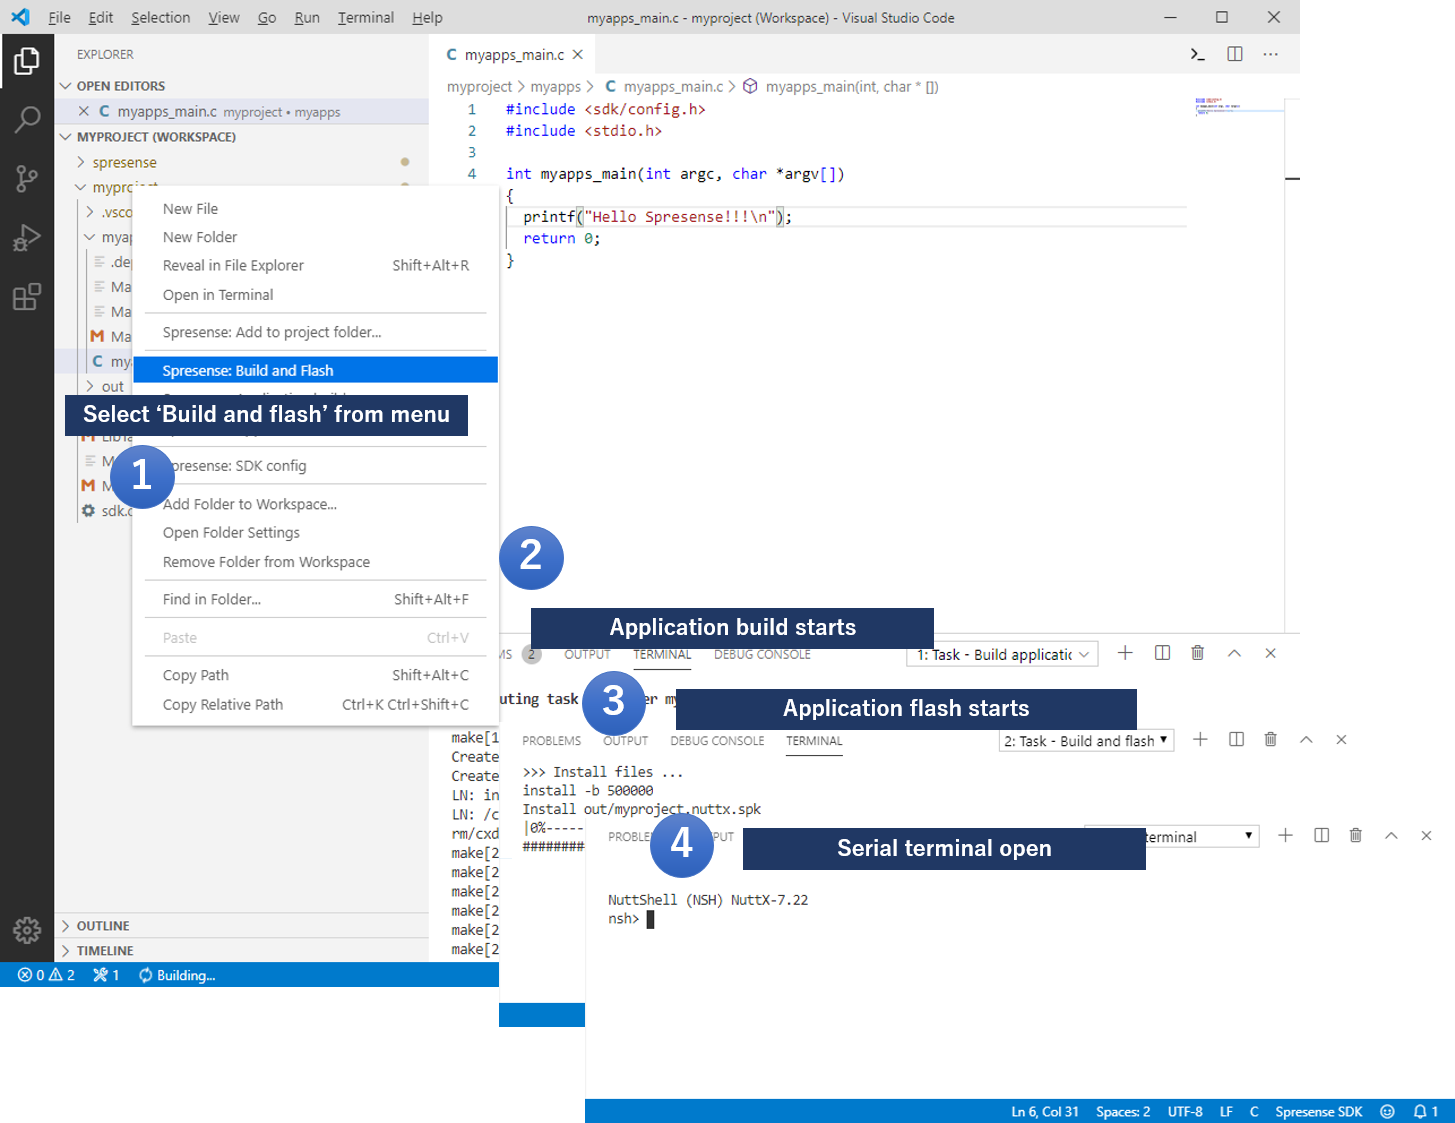
Right click on the project folder you want to flash the built binary and select
Spresense: Build and Flashfrom the project menu. -
The application build will start and wait for completion.
You can also skip the previous section’s command Spresense: Application buildby using this command. -
As soon as the build is over, flashing to Spresense will start.
-
After flashing to Spresense, the serial terminal will open.
5. Limitations
5.1. Cannot build a application that is created with SDK v1.5 or earlier by using SDK v2.0 or later
Since Spresense SDK v2.0, the build system is integrated with the kernel, so the configurations are not compatible with SDK v1.5 or earlier.
When building with SDK Version 2.0 or later, delete .vscode in the project folder first and reconfigure the SDK. (We recommend that you make a backup of the entire project.)
5.2. Spresense VSCode IDE may not be used depending on the folder name/path used
Spresense VSCode IDE has the following restrictions depending on the type of characters used in the path of the folder used due to the specifications of some build systems.
-
Restrictions common to all operating systems
-
Case of the folder path contains a space(Example: C:\Users\Sony Taro\project)
All functions do not work.
-
| If you are using on these conditions, we recommend to create new account for using Spresense VSCode IDE. |
6. Troubleshooting
This section explains the problems that may occur when using VS Code and how to deal with them by category. See here if the VS Code does not work well.
6.1. Setup
6.1.1. Terminal does not open correctly (Windows)
In Windows environment, VS Code uses MSYS2 bash as a terminal. If this bash does not open and PowerShell or cmd (command prompt) opens as shown in the following figure, the trust of the workspace may not be reflected correctly. In that case, try the following steps:
-
Setup the trust setting of the workspace

-
Press
F1to open the command palette and chooseWorkspace: Manage Workspace Trust. -
In the
In a trusted workspacesection, selectTrusted.
-
6.2. `Git not found' warning message appears after workspace creation
If you are using the MSYS2 environment on Windows, you may receive the following message after creating a workspace.
image::vscode_setup_git_not_found_en.png[width="100%"].
This is a message from VSCode’s Git extension indicating that Git is not installed. If you want to operate a Git repository on VSCode, please follow the message displayed on VSCode to install Git.
6.3. Build a project
6.3.1. Build does not progress
If the build does not proceed, the load on your PC may have increased, or there may be a problem with the terminal settings. Check the terminal status by following the steps below.
-
Select
Terminal→New Terminalfrom window menu. -
Run the`echo ${SHELL}` command on the terminal opened in the previous step.
-
If the result is not
/bin/bashor/usr/bin/bash, perform the Terminal does not open correctly (Windows).
6.3.2. Build fail
6.3.2.1. "application.mk: No such file or directory" shows in build logs
If the build fails with a message like the one shown below, your project configuration file does not match the installed Spresense VSCode IDE version. In this case, execute Spresense: Update project folder settings from the command palette to update the project setting file.
Makefile:30: /home/user/myproject/.vscode/application.mk: No such file or directory
make[2]: *** No rule to make target '/home/user/myproject/.vscode/application.mk'.  Stop.
or
Makefile:12: /home/user/myproject/.vscode/worker.mk: No such file or directory
make: *** No rule to make target '/home/user/myproject/.vscode/worker.mk'.  Stop.
7. Appendix
7.1. How to build SDK with SDK v1.5 or earlier
Kernel configuration and build are required for building systems for SDK v1.5 and earlier before an application configuration and build.
This section describes how to configure and build the kernel required to develop using SDK v1.5 or earlier.
7.1.1. Kernel configuration
This is the procedure to configure using the preset release.
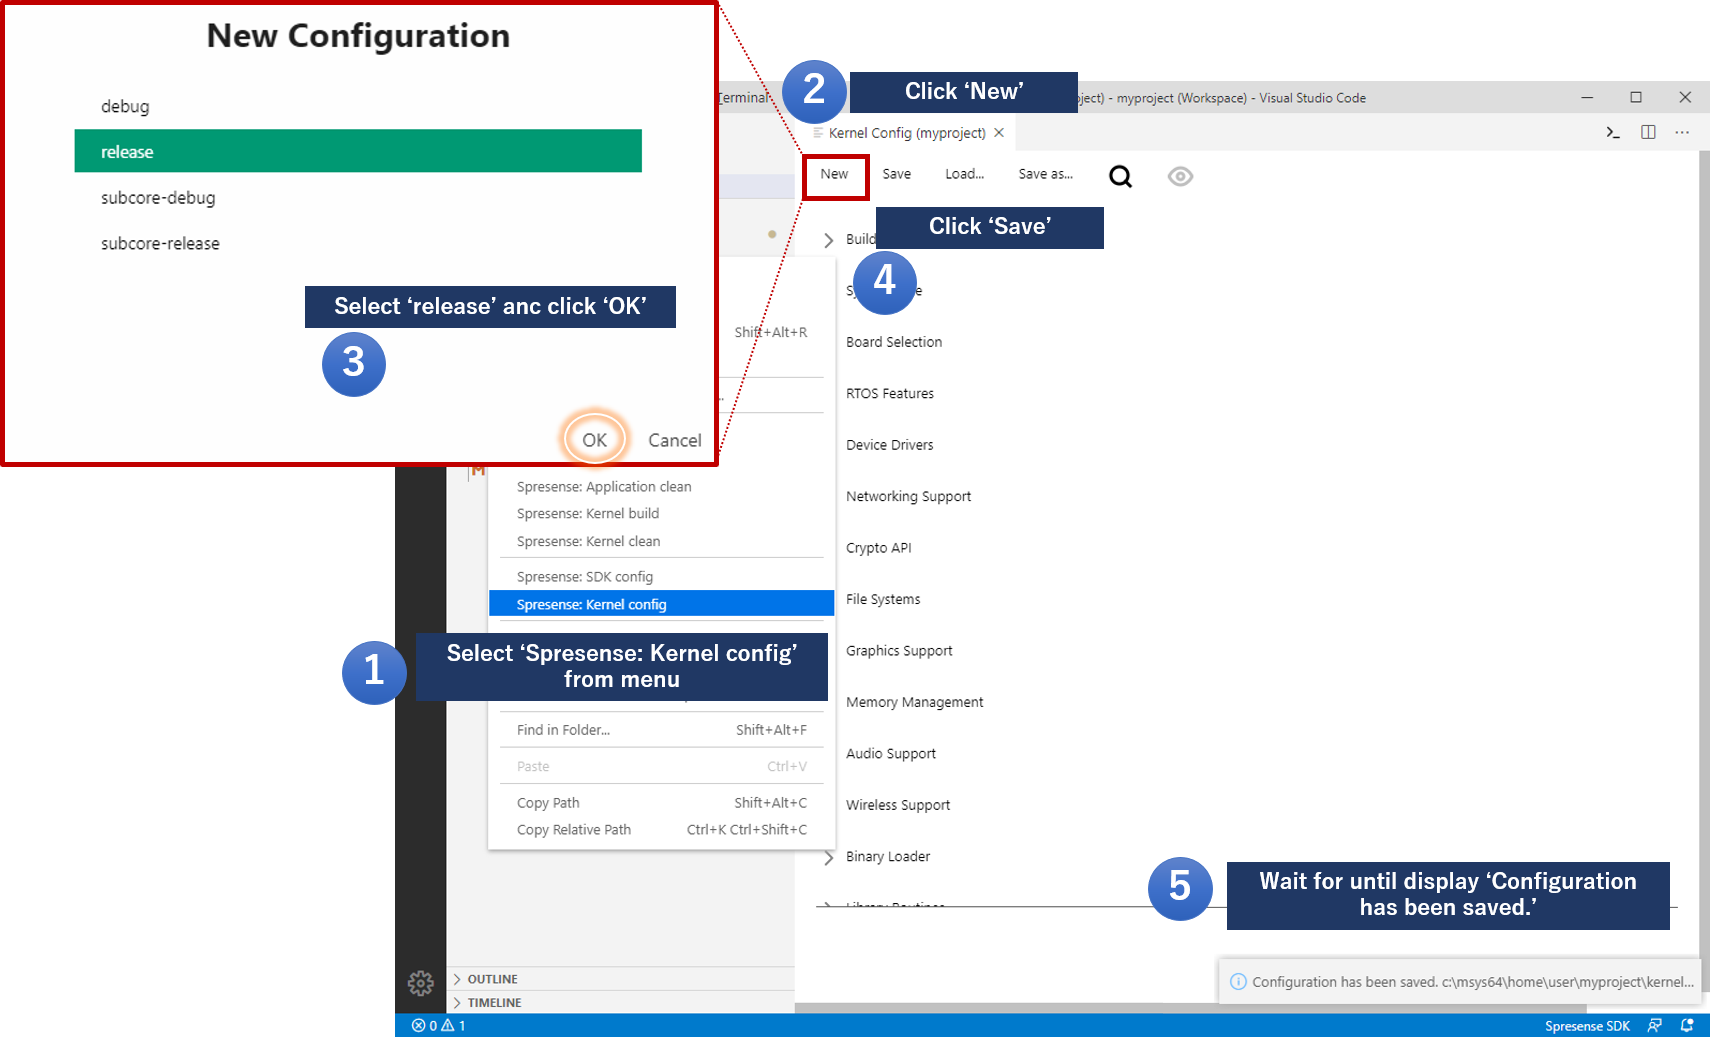
-
Right click on the project folder and select
Spresense: Kernel Configfrom the project menu.If another 'Kernel config' or 'SDK config' is already open, please close it beforehand. Only one config window can be open at a time. -
Open the
Newmenu and display the list of kernel presets. -
Select
releasefrom the preset and click OK. -
Click
Saveto save. -
If
Configuration has been saved.is displayed, kernel configuration is complete.It may take some time to save depending on the environment. Please wait for a completion message. -
Close the configuration.
7.1.2. Build the kernel
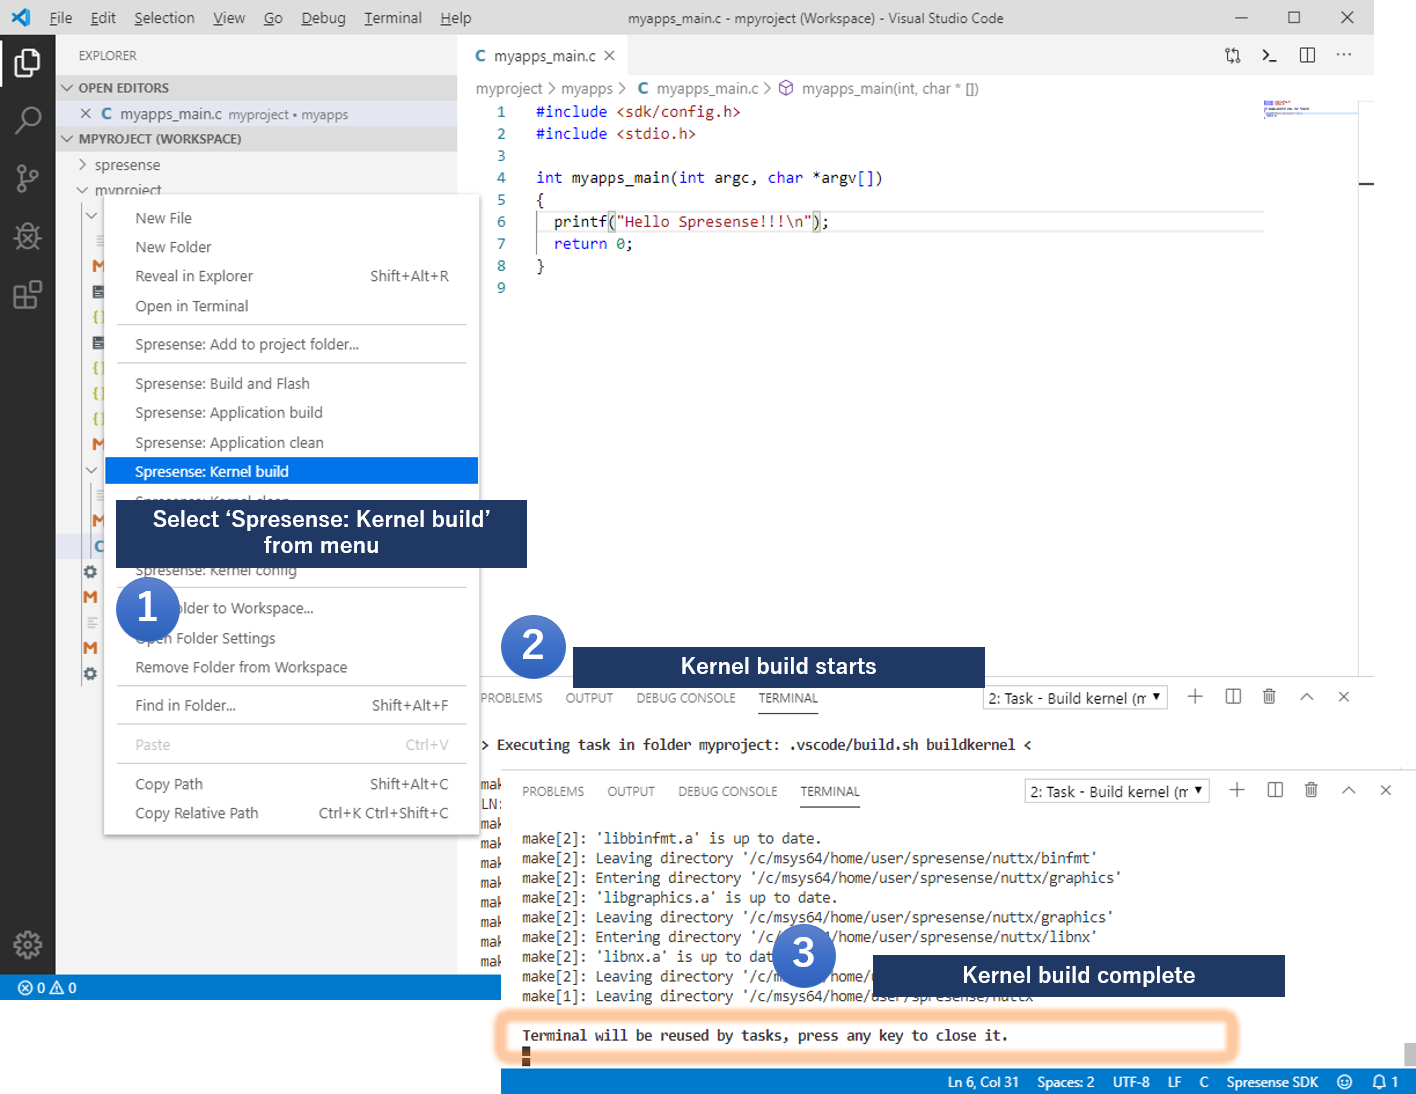
-
Right click on the project folder you want to build and select
Spresense: Kernel buildfrom the project menu. -
Wait until the kernel build is complete.
-
If
Terminal will be reused by tasks, press any key to close it.is displayed, the kernel build is complete.
After these configurations and builds are done, you can configure and build the application in the same way as in SDK v2.0 or later.
7.2. Creating a multi-core application "myasmp"
This section explains how to create a multi-core application "myasmp". In this example, the main core program (supervisor) starts a program (worker) that runs on the sub-core, and creates an application that receives the string "Hello ASMP!" From the sub-core. This example use the workspace that created in "myapps" section.
7.2.1. Adding ASMP worker program
This section describes the procedure for adding a multi-core application in which the sub-core sends Hello ASMP! to the main core and displays the characters received by the main core.
| Setting items | Setting details |
|---|---|
Target project folder |
C:\msys64\home\user\myproject |
ASMP worker name |
myapps |
Creating a sample application |
Yes |
Sample application name |
asmpApp |
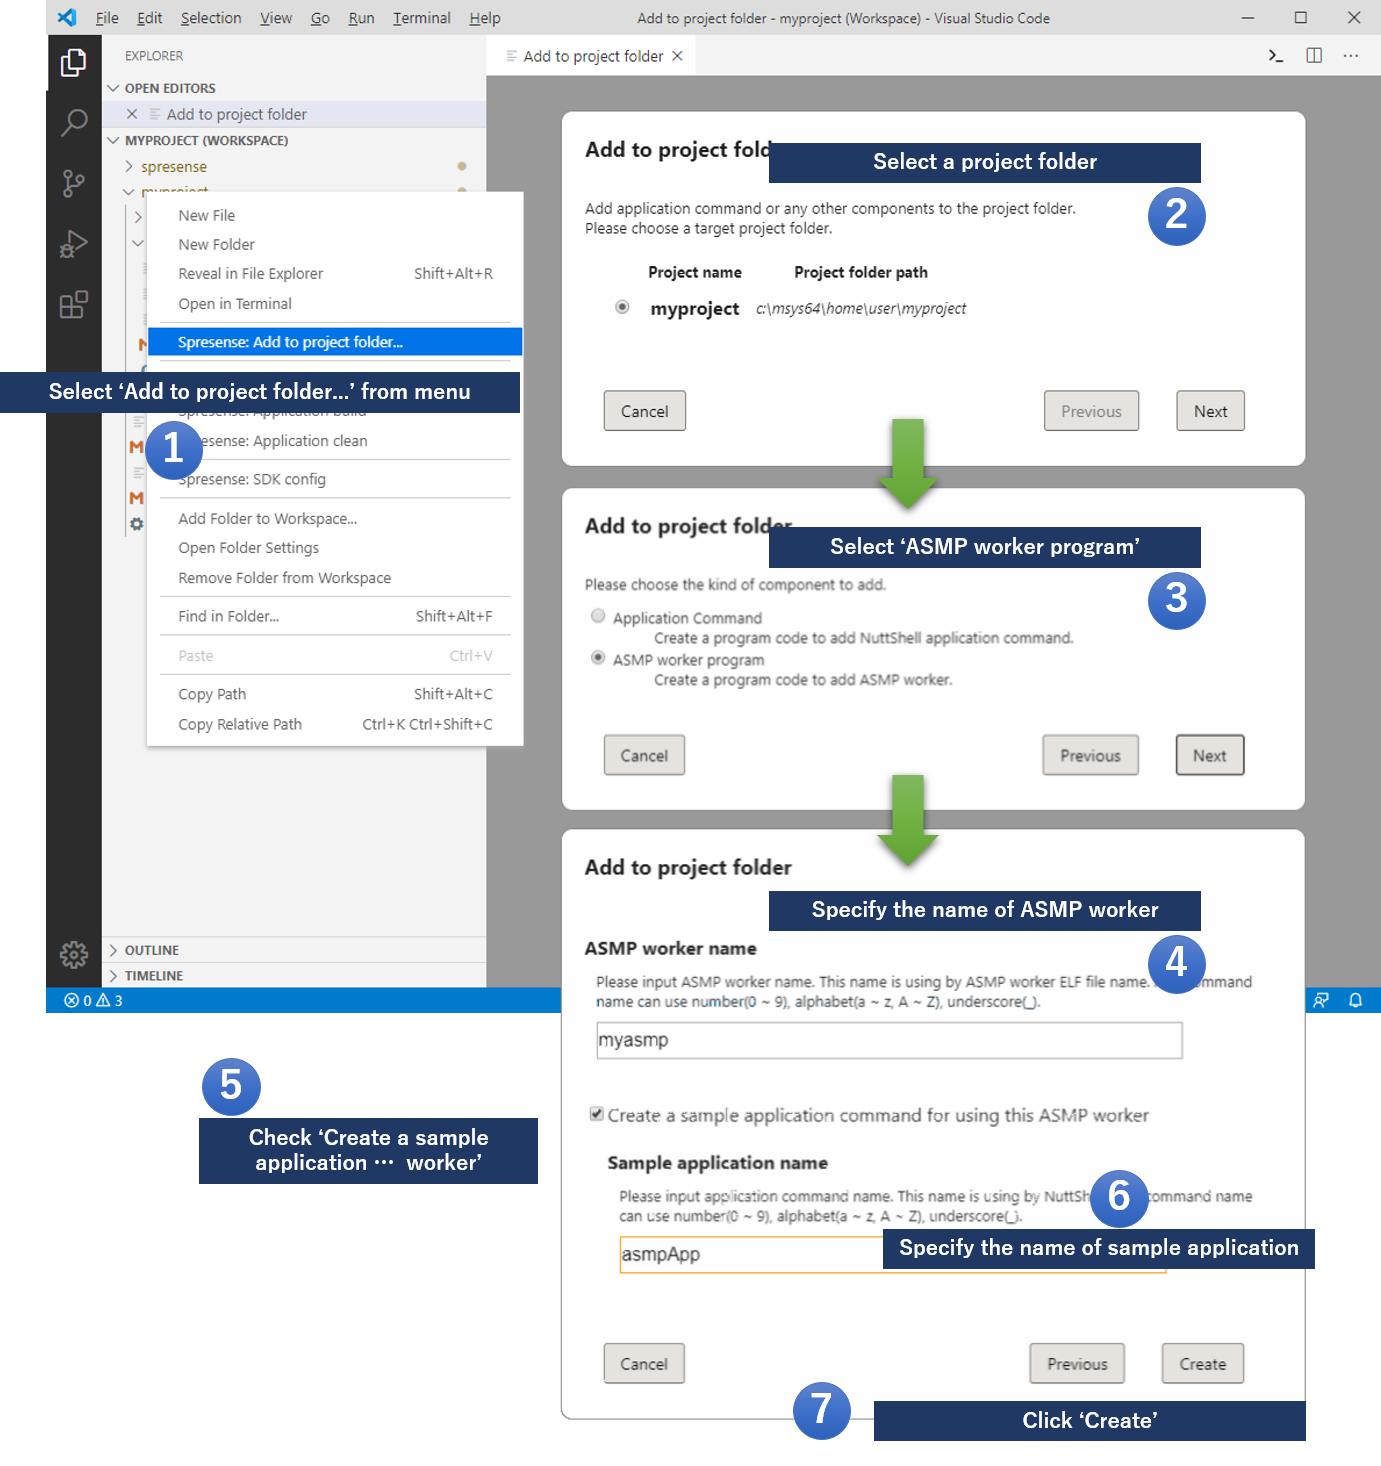
-
Right click on the project folder created in the previous chapter (
myproject) and selectSpresense: Add to project folder…. -
In the opened
Add to Project Folderdialog, select the project folder to which you want to add ASMP worker program and clickNext. -
Select
ASMP worker programfrom the item type and clickNext. -
Enter the name of the ASMP worker you want to add to
ASMP worker name. (In this example, it ismyasmp.) -
Since we will also create an application that starts ASMP workers with main core application, check
Create a sample application command for using this ASMP worker. -
Enter the command name to be created in
Sample application name. (In this example, it isasmpApp.) -
Click the
Createbutton to add the program file as shown below and the main source file is displayed in the editor.
7.2.1.1. About added files
| File(Folder) | Detail | |
|---|---|---|
|
This folder contains worker programs and Makefiles for building them. |
|
|
The main source file for the worker. Implement a program that runs on a sub-core. |
|
|
Makefile for customizing workers. You can describe new added files and flags used for building. |
|
|
This is a header file folder for sharing definitions with the main core application. |
|
|
This folder contains a sample application for using the created worker. |
|
7.2.2. Build configuration
To build a multi-core application, you need to enable feature/asmp in the SDK config preset.
Here, configure to enable ASMP.
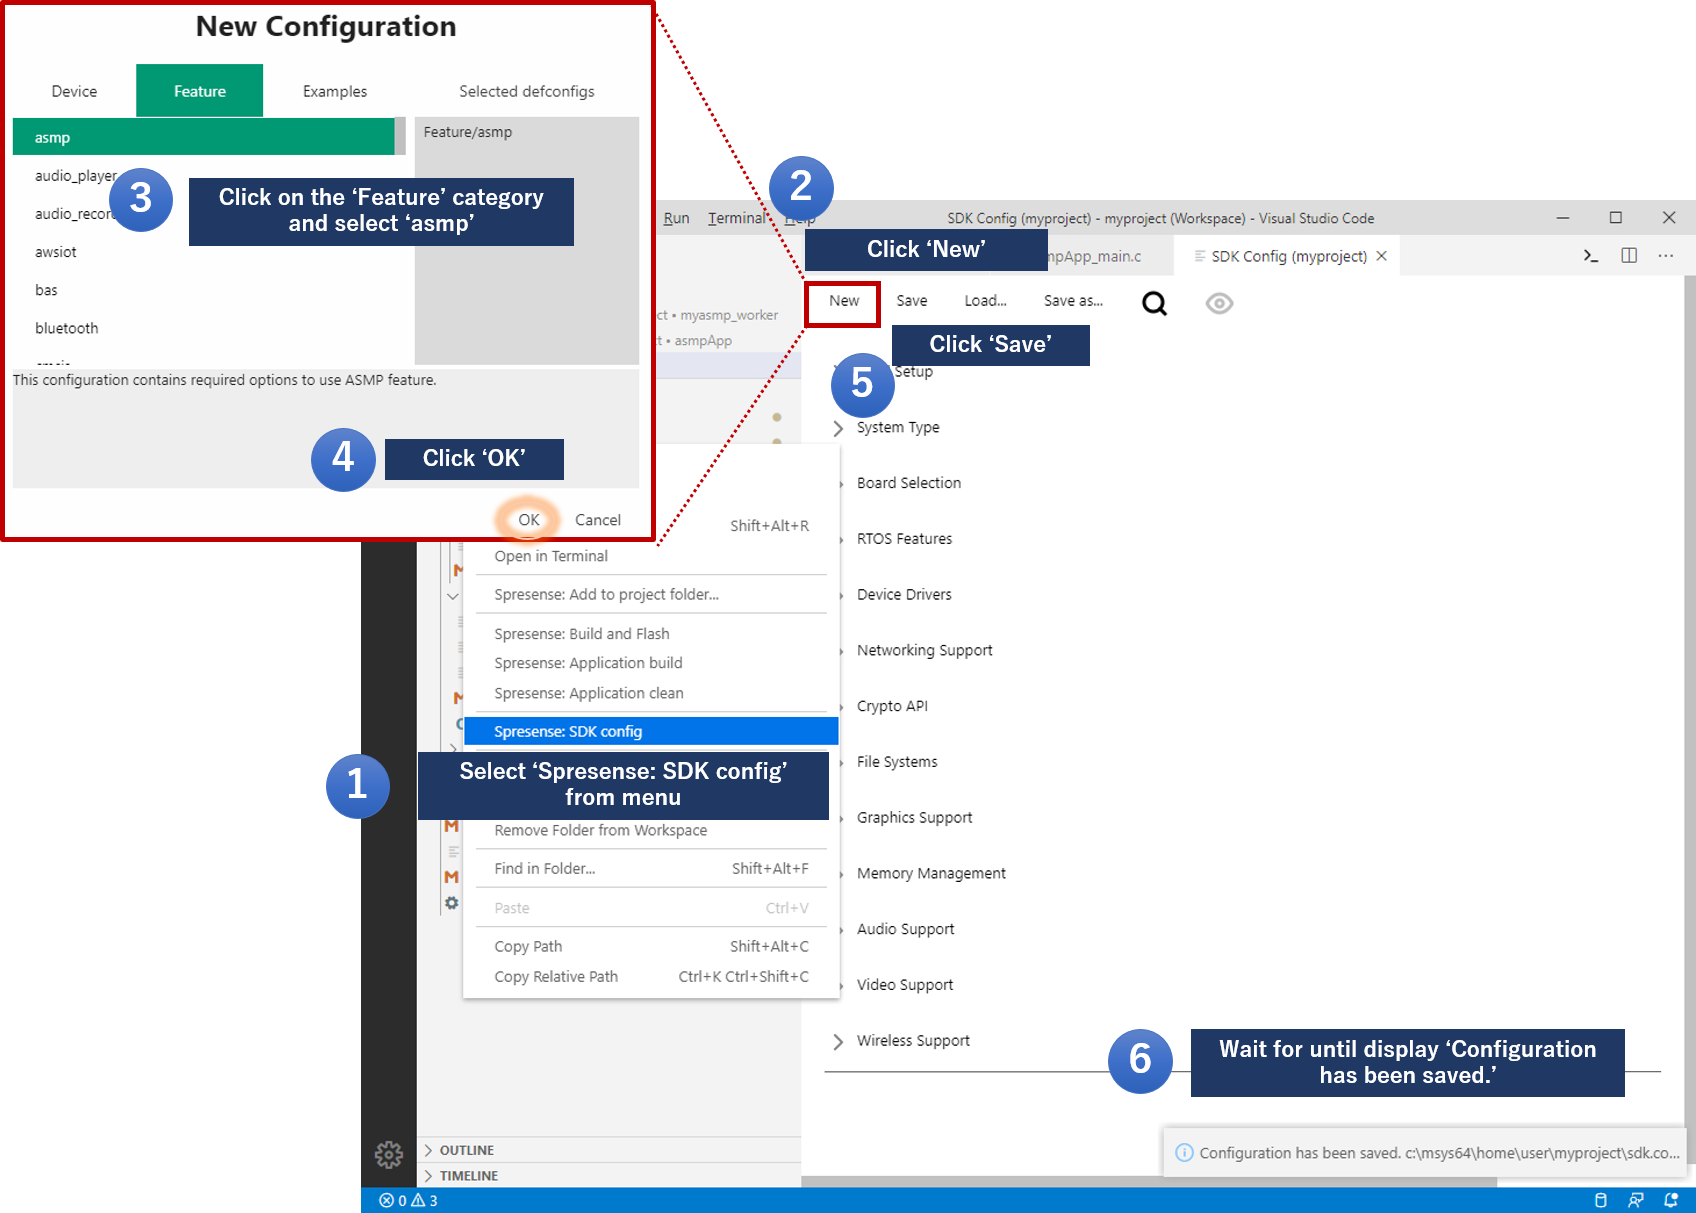
-
Right click on the project folder and select
Spresense: SDK Configfrom the project menu.If another 'Kernel config' or 'SDK config' is already open, please close it beforehand. Only one config window can be open at a time. -
Click
Newto open the SDK preset list. -
Click on the
Featurecategory to switch categories and selectasmp. -
Click
OK. -
Click
Saveto save. -
If
Configuration has been saved.is displayed, SDK configuration is complete.It may take some time to save depending on the environment. Please wait for a completion message.
7.2.3. Build the project
You can build in the same way as the main core application. The ASMP worker will built after the main core application is build.
-
Right click on the project folder you want to build and select
Spresense: Application buildfrom the project menu. -
The application build will start, so wait for it to complete.
-
If
Terminal will be reused by tasks, press any key to close it.is displayed, the Application build is complete.
7.2.3.1. About build output files
| File(Folder) | Detail | ||
|---|---|---|---|
|
|
Debug ELF file for ASMP workers. |
|
|
The folder where the build output files are copied. |
||
|
This is the folder where the ELF file for ASMP workers written to SPI-Flash. |
||
|
ELF file for ASMP worker |
||
|
This file is written to SPI-Flash on the Spresense board. |
||
|
An ELF file containing debugging information. Load this file into Spresense for ICE debugging. |
||
7.2.4. Flashing the multi-core application into Spresense board and Check operation
You can flash binary into Spresense board in the same way as the main core application. After the main core binary is flashed, the worker ELF file is written to SPI-Flash.
7.2.4.1. Flashing build binaries
-
Right click on the project folder you want to flash the built binary and select
Spresense: Build and Flashfrom the project menu. -
The application build will start and wait for completion.
-
As soon as the build is over, flashing to Spresense will start.
-
After flashing to Spresense, the serial terminal will open.
7.3. About Build configuration
Build configuration (kernel config/SDK config) is a tool for configuring the build for application to be developed. It has presets for each purpose.
In SDK v1.5 or earlier, build configuration is divided into two parts, kernel and SDK, and in v2.0 or later, they are integrated and configured using SDK config.
| Keyword completion and parsing syntax functions provided by Microsoft’s C/C++ extension will not work correctly unless this configuration is complete. Make sure to complete the configuration before creating the program. |
7.3.1. For SDK v1.5 or earlier
-
Kernel configuration
This is the configuration of
NuttXa Realtime OS used in Spresense SDK . Configure OS level settings for programs that run on Spresense.For normal use, save with the
releasepreset.Preset Detail release
This is a default setting which is the functions of the Spresense SDK basic work through.Use this preset for normal usage.
debug
This preset includes settings such as debug log in addition to release.
-
SDK configuration
Configuration of features specific to Spresense SDK. Audio, camera, GPS, and other features that run on Spresense are configured here. You can also configure the Examples application and system tools here.
Category of preset Detail Device
Presets for using devices such as sensors and SDcard. Depending on the preset, you may need to connect the device.
Feature
Presets for using Spresense functions and system tools.
Examples
This is a preset for using the sample application provided in the Spresense SDK.
7.3.2. For SDK v2.0 or later
-
SDK configuration
Configuration of overall functions in a Spresense SDK (includes a NuttX). Audio, camera, GPS, and other NuttX features that run on Spresense are configured here. You can also configure the Examples application and system tools here.
Category of preset Detail Device
Presets for using devices such as sensors and SDcard. Depending on the preset, you may need to connect the device.
Feature
Presets for using Spresense functions and system tools.
Examples
This is a preset for using the sample application provided in the Spresense SDK and NuttX.
7.3.3. Configuration save menu
The functions of the configuration save menu are as follow:
| Menu | Function |
|---|---|
New |
You can select a preset configuration provided by Spresense SDK. |
Save |
Save the build configuration with the set contents. |
Load |
Open the saved backup configuration file. |
Save as |
Save the settings to any location. Since it is saved separately from the configuration file used for the build, it is not reflected in the build. |
7.4. Installing the boot loader
To use the functions of Spresense and Spresense VSCode IDE, you need to install the latest boot loader. Otherwise, Spresense and Spresense VSCode IDE will not work properly.
This section explains the boot loader installation procedure.
| Install the boot loader the first time you use it or when the SDK version is updated. |
-
Type a
F1key to display the command palette.
-
Input
spresense bootloaderto narrow down the command and chooseSpresense: Flash bootloader.
-
Click
OKon dialog that showing the messageTo install the bootloader, you must download the bootloader archive with a web browser…..Download the boot loader from the web site. 
-
As the web browser opens, download according to the instructions on the page.


-
Click on the dialog box to confirm the continuation of the installation.

-
In the file dialog that appears, select the downloaded ZIP file.

-
After selecting the ZIP file, the boot loader installation will begin.

-
If the task is completed normally as shown below, the installation of the boot loader is complete.

7.5. ICE debugging
7.5.1. Preparing the debugger
7.5.1.1. Hardware
-
CMSIS-DAP compliant debug adapter (ICE)
-
Keil ULINK2 (http://www.keil.com/arm/ulink2/)
-
NXP MCU-Link (https://www.nxp.com/design/design-center/software/development-software/mcuxpresso-software-and-tools-/mcu-link-debug-probe:MCU-LINK)
-
NXP MCU-Link Pro (https://www.nxp.com/design/design-center/software/development-software/mcuxpresso-software-and-tools-/mcu-link-pro-debug-probe:MCU-LINK-PRO)
-
-
SWD connector
7.5.1.2. Mounting the SWD connector
Refer to the hardware documentation for how to mount the SWD connector.
7.5.2. Debugging the main core with ICE
This section explains how to load the built binary directly into Spresense SRAM and check (debug) the operation.
You can debug by setting a break at a specified location and stopping the program at the specified location, or by writing a Watch statement and stopping at the specified condition.
7.5.2.1. Setting Break points
-
Open the source code where you want to set the Break point (eg: if you want to set it on the 6th line).

-
Click the left edge of the line you want to set (next to the left of the line number) and mark it red.

This completes the setting of the Break point.
7.5.2.2. Starting Debug
-
Click the debug icon from the icon on the left of the window.

-
elect the debug menu for the created project from the debug configuration list.

-
Click the Start debugging button.

-
Wait for the completion of the debugging process.

-
When the debug control button icon changes as shown below, the preparation is complete.

-
Click
Continueon the icon above and Spresense will start running.
-
When processing that passes through the set break point (eg: command execution), the break will occur at the set point.

-
Click
Continuebutton again to release from Break.


